Table of Contents
Advertisement
Revision 1.0
Contents
1 Characteristics of the cash register ______________________________________________ 4
2 The contents of the package ____________________________________________________ 5
3 Construction of the cash register ________________________________________________ 6
4 Cashier's panel _______________________________________________________________ 9
5 Description of graphical symbols ________________________________________________ 9
1 Switching on the cash register _________________________________________________ 11
2 To start working with the cash register __________________________________________ 12
3 Functions ___________________________________________________________________ 13
4 Defining the articles __________________________________________________________ 15
5 Defining the Quick Sale keys __________________________________________________ 18
6 Quick function ______________________________________________________________ 19
7 Sale _______________________________________________________________________ 20
7.1 Quick Sale _______________________________________________________________ 20
7.2 Defined zero price _________________________________________________________ 21
7.3 Entering the article name ____________________________________________________ 21
7.4 Barcode _________________________________________________________________ 23
7.4.1 Selling with unit price and quantity __________________________________________________ 23
7.4.2 Selling with variable quantity and/or price _____________________________________________ 23
7.4.3 Checking the article's price ________________________________________________________ 24
7.5 Discount or margin on a sale position __________________________________________ 26
7.6 Sale of an article with a deposit _______________________________________________ 28
8 Finishing the receipt _________________________________________________________ 28
8.1 Payment with cash _________________________________________________________ 28
8.2 With the use of non- cash payment or currency ___________________________________ 30
8.3 Discount or margin for the whole receipt ________________________________________ 32
9 Additional functions __________________________________________________________ 33
9.1 Viewing the receipt _________________________________________________________ 33
10 Electronic journal of printouts ________________________________________________ 35
11 Cashier's Functions _________________________________________________________ 39
11.1 Logging in _______________________________________________________________ 39
11.2 Logging out ______________________________________________________________ 40
11.3 End of shift ______________________________________________________________ 41
11.4 Payment in the cash register ________________________________________________ 43
11.5 Payment from the cash register ______________________________________________ 44
11.6 Set of reports ____________________________________________________________ 45
12 Configuration ______________________________________________________________ 46
12.1 Articles _________________________________________________________________ 47
12.1.1 Defining ______________________________________________________________________ 47
12.1.2 Deleting ______________________________________________________________________ 47
12.2 Quick sale keys __________________________________________________________ 49
12.2.1 Defining ______________________________________________________________________ 49
12.2.2 Deleting ______________________________________________________________________ 49
12.3 Payments _______________________________________________________________ 50
12.4 Currencies ______________________________________________________________ 52
4
11
Advertisement
Table of Contents

Related Manuals for ELZAB K10

Summary of Contents for ELZAB K10
-
Page 1: Table Of Contents
Revision 1.0 Contents Chapter 1 – General description 1 Characteristics of the cash register ______________________________________________ 4 2 The contents of the package ____________________________________________________ 5 3 Construction of the cash register ________________________________________________ 6 4 Cashier's panel _______________________________________________________________ 9 5 Description of graphical symbols ________________________________________________ 9 Chapter 2 –... - Page 2 12.4.1 Name and exchange rates _______________________________________________________ 52 12.4.2 Change in currency _____________________________________________________________ 54 12.4.3 Printout of equivalent____________________________________________________________ 54 12.4.4 Basic currency _________________________________________________________________ 54 12.4.5 Change of the basic currency _____________________________________________________ 55 12.5 Article groups ____________________________________________________________ 56 12.6 Units of measure _________________________________________________________ 57 12.7 Cashiers ________________________________________________________________ 58 12.7.1 Defining ______________________________________________________________________ 58 10.7.2 Deleting ______________________________________________________________________ 61...
- Page 3 17.2.7 Special discount / margin ________________________________________________________ 84 17.2.8 Locking out after the receipt ______________________________________________________ 84 17.2.9 Logging out after the receipt ______________________________________________________ 84 17.3 Settings of barcodes _______________________________________________________ 84 17.3.1 Barcode prefixes _______________________________________________________________ 85 17.3.2 Check digit ____________________________________________________________________ 86 17.3.3 Length of barcodes with price/weight _______________________________________________ 86 17.4 Settings of the cash register _________________________________________________ 87 17.4.1 Clock correction ________________________________________________________________ 87 17.4.2 Communication module _________________________________________________________ 87...
-
Page 4: Chapter 1 - General Description
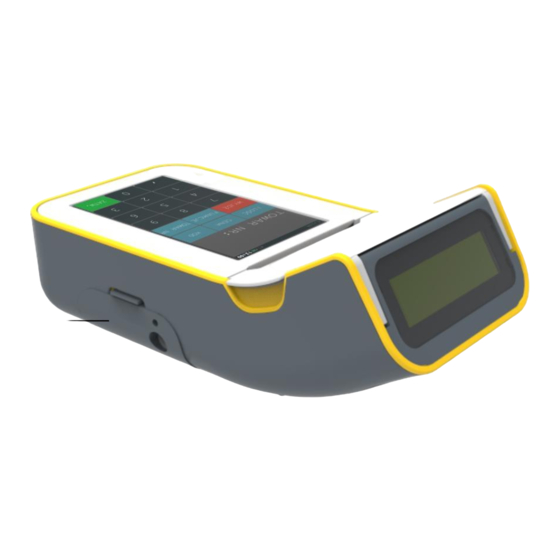
Chapter 1 – General description 1 Characteristics of the cash register Colour display that is well readable in all lighting conditions and enables working in extreme low temperatures. The housing of the cash register is finished with soft, anti-slip material. Touch keyboard adapts to the cashier's working context, enabling an intuitive operation. -
Page 5: The Contents Of The Package
Sale with a variable price (so-called open PLU). Possibility to change the basic currency, e.g. Euro. The functionality to automatically print the equivalent in another currency. 2 The contents of the package Cash register K10 The following accessories are enclosed wit the cash register: Strap... -
Page 6: Construction Of The Cash Register
utility programs among others to make a backup copy as well as to edit the article database. The book of the registering cash Form for reporting the cash An microSD card register. register to the tax office. (in the cash register) 3 Construction of the cash register The cash register has the following operating components accessible for the user. - Page 7 Touch screen Anti-slip surface Safety plug of the seal socket ON / OFF switch. Strap clip.
- Page 8 Printer cover Flexible shield of the Exchangeable interfaces battery port for connecting pendrive type Mini USB memory port for connecting computer.
-
Page 9: Cashier's Panel
4 Cashier's panel Cashier's Status of the number electronic journal Indicator for Status the level of battery loading and mains supply. Access key for functions and menu Confirm key, equivalent of enter key. 5 Description of graphical symbols Symbol Meaning The following symbols are present on the status bar of the cashier's panel. - Page 10 All the symbols below appear in the active part of the keyboard. The symbol “finish receipt” is used in the “quick sale” mode when the receipt is to be closed, whereas the symbol “change keyboard character set” is variable after each keystroke. Each keystroke changes the set of character available on the keyboard.
-
Page 11: Chapter 2 - Operation
Chapter 2 – Operation 1 Switching on the cash register To switch on the cash register, press the ON/OFF button once. ON / OFF button To switch the cash register off, press and hold the ON/OFF button longer than one second, but if you temporarily do not use the cash register and want to secure the touch screen against an accidental touch, press the ON/OFF button once and then the keyboard will be blocked. -
Page 12: To Start Working With The Cash Register
2 To start working with the cash register In order to start working with the cash register it is necessary to: Program the tax rates Done by Enter the NIP number service team and the header The following items have been described in the further part of the manual. Program the article database Program the quick sale keys... -
Page 13: Functions
3 Functions After the Functions key has been selected, a set of functions and settings will be displayed making the cashier's work easier. Choose FUNCTIONS The access to specific functions in the menu depends on the access rights granted to the (full access) –... - Page 14 The menu Functions is variable depending on where you are at the given moment while working with the cash register. Example below: Menu Functions in the sale Menu Functions in the subtotal Menu Functions outside the mode of the receipt sale mode...
-
Page 15: Defining The Articles
4 Defining the articles With this function, you can enter and correct the data on the articles in the memory of the cash register. You can define up to 3000 articles on the cash register. An article can be defined in any free place. A free place is a position where no article has been defined yet or an article defined earlier has been deleted. - Page 16 If a free position or an article is chosen, a screen will appear with a collection of options to edit the article. Using these options, you enter data for the article. Below is a description of the specific options. The article name and the tax rate are necessary to define an article. Enter article name max.
- Page 17 Choose DEFINING After the function Defining has been selected, a screen will appear enabling to choose an article to be sold automatically together with the first article. For each of the options, an appropriate screen will appear, example below:...
-
Page 18: Defining The Quick Sale Keys
After an article has been selected and confirmed, saving to the cash register's memory takes place confirmed with a sound signal. : In order to delete a previously defined links between two articles, it is enough ELETING INKS to choose the function Deleting, and a sound signal will confirm that this operation has been done. -
Page 19: Quick Function
Choice of the article The cash register will always sell one piece of the article. The cash register will ask you about the price After the sale of the article, the receipt will be closed. Save changes. In order to delete a previously defined quick sale key, the function Deleting should be chosen, then the position to be deleted and next confirm by choosing Yes. -
Page 20: Sale
7 Sale The sale with the cash register K10 gives the user a large working freedom, because it is simple, quick, flexible, and intuitive. Is allows among others to freely switch between the selling modes, i.e. switching from the basic mode that is switched on by default, to the quick sale mode and vice versa. -
Page 21: Defined Zero Price
Choose an article to be sold To exit the quick sale mode, press Is you want the quick sale mode to be permanently the default sale mode, in the cash register's settings enable the function On Start Quick Sale. Switching on this function causes that always after the cash register is started again, the quick sale mode is activated, independent where you were in the menu before switching off the cash register. - Page 22 Chose FUNCTIONS Choose S EARCH FOR Enter the first letters of the name, search with the arrows and confirm. If there is no article in the database with the entered name beginning, the article will not be displayed.
-
Page 23: Barcode
7.4 Barcode This function makes it possible to sell an article with the help of a barcode reader. While selling with the barcode reader, you can enter the price and quantity with the keyboard. The way of selling has bee presented below. 7.4.1 Selling with unit price and quantity Use the reader to read the barcode from the article. -
Page 24: Checking The Article's Price
Choose functions Q and/or P UANTITY RICE Enter the quantity and/or price. Use the barcode reader to read the barcode from the article. After the barcode has been read, a printout of the selling position is done, with the following information on the cashier's display. - Page 25 It is possible to use the barcode reader to view the article, e.g. in order to check its price. The way to do so is presented below. Choose C After the function C has been selected, a screen will be displayed with the possibility to enter the code.
-
Page 26: Discount Or Margin On A Sale Position
Information on the selected article. In case the article had not been entered in the article database, the following message will be displayed. 7.5 Discount or margin on a sale position The cash register has the possibility to grant a discount or margin (percentage or amount). Discounts cannot be given to returnable packages as well as articles being in the so-called “special groups”, if the option S has been enabled in the cash register's... - Page 27 Choose FUNCTIONS Choose D ISCOUNTS ARGINS Choose e.g. P ERCENTAGE ISCOUNT...
-
Page 28: Sale Of An Article With A Deposit
Enter the value of the discount and confirm. Information on the discount's value. Next, selling can be continued or the receipt finished by pressing Total. 7.6 Sale of an article with a deposit The cash register makes it possible to carry out the sale of articles with a deposit, i.e. selling the first article always with a defined other article. - Page 29 If the cash taken is in accordance with the amount to be paid, then only press C . But if ONFIRM the cash taken is not according or the option E is enabled, then NTERING AYMENT EQUIRED enter the amount of the cash taken and press C .
-
Page 30: With The Use Of Non- Cash Payment Or Currency
Enter the cash taken and Confirm. Information on the change given. 8.2 With the use of non- cash payment or currency The cash register makes it possible to finish the receipt with the use of means of payment e.g. occasional token, card, cheque, as well as currency forms of payment. The way to proceed is identical for each form of payment. - Page 31 Choose P AYMENTS Choose one of the forms of payment, e.g. currency. The cash register converts the amount to be paid into Euro. Confirm...
-
Page 32: Discount Or Margin For The Whole Receipt
If the cash taken is not according with the amount to be paid, then proceed as in case of cash payment with the amount not according. The cash register can give cash change another foreign currency or in basic currency, depending on the currency settings (option – Change in currency). -
Page 33: Additional Functions
Choose the appropriate discount or margin. 9 Additional functions 9.1 Viewing the receipt This function makes it possible to view an open receipt by displaying all the positions sold on the cashier's screen. The function is handy while editing the receipt, it enables to quickly delete receipt positions. - Page 34 Choose V ECEIPT Choose the position to be deleted.
-
Page 35: Electronic Journal Of Printouts
10 Electronic journal of printouts The cash register writes copies [journals] of printouts on a memory card of microSD type. This makes it possible to have access to journals of the printed documents directly from the cash register's keyboard or with the help of the program on a PC. Due to the durability of recording on a microSC card and to the required storage time of the copies of documents (including also the electronic journals) only the cards delivered by the cash register's manufacturer must be used. - Page 36 If the waiting time for completing the archiving process is too long because of the kind of operating the cash register, you should close the current microSC card and initiate a new one, thus decreasing the quantity of data on the card. At the moment of initiating, each card being used in the cash register is marked with a unique label that allows for its identification.
- Page 37 3. Next pull out the battery lightly. 4. Move the microSD card holder to unlock it. 5. Raise the microSD card holder and pull out the card lightly. While inserting the card, proceed the other way round. Make sure the card contacts are directed downwards, and then insert the card into the holder and lower it.
- Page 38 Status of electronic journal Journal Status Reason, way to proceed Normal working condition, the cash register can make out receipts and carry out a daily fiscal report. A correct and verified card is present in the cash register. Normal working condition, the card is being verified. The cash register starts verifying after data has been written onto the card, after each startup, or after the card has been inserted.
-
Page 39: Cashier's Functions
11 Cashier's Functions View of the cashier's functions menu 11.1 Logging in Working with the cash register does not require logging in, provided that only one cashier works on with it. In case more cashiers work with the cash register, logging in is required before starting the work. -
Page 40: Logging Out
Enter the password and confirm. Cashier logged in, choose OK 11.2 Logging out Choosing this function causes switching the cashier off. Switching off a cashier does not cause closing his/her shift – it is possible to switch on another cashier and then continue the work of the previous one. -
Page 41: End Of Shift
Choose L OGGING OUT Cashier logged out Choose L to log in another cashier OGGING IN 11.3 End of shift This function prints the data on the operations done by the cashier, such as sales, returns accepted, discounts, margins, and so on, as well as on the amounts obtained from selling. - Page 42 Choose the cashier's E ND OF SHIFT Enter the amount of cash counted and other kinds of payment. After the amount has been entered, the shift closing report is printed and switching off the cashier takes place as well as zeroing the shift counters of that cashier.
-
Page 43: Payment In The Cash Register
11.4 Payment in the cash register This function makes it possible to make a payment in the cash register with printing out a receipt from this operation. Chooser P AYMENT IN CASH REGISTER Enter the details of the person paying in. -
Page 44: Payment From The Cash Register
Choose the form of payment and enter the amount, or confirm if cash is being paid in. 11.5 Payment from the cash register This function makes it possible to make a payment out of the cash register with printing out a receipt from this operation. -
Page 45: Set Of Reports
Enter the details of the person receiving the payment. Choose the form of payment and enter the amount. 11.6 Set of reports This function makes it possible to print the set o reports. The contents of the set (list of reports) and type of the reports (zeroing or non-zeroing) depends on the type of the cashier and his/her access rights. -
Page 46: Configuration
Choose S ET OF REPORTS 12 Configuration The way to configure is identical as for all functions from the Configuration menu. Each of the functions in this menu has been divided into defining and deleting mode. Choosing the defining mode, you go to editing, whereas the deleting mode makes it possible to delete a previously defined function. -
Page 47: Articles
12.1 Articles 12.1.1 Defining The way to define has been described in the section Operation. 12.1.2 Deleting This function makes it possible to delete an article from the cash register's memory. Before deleting, the sales counters (and returns counters, if it is a package) of the article have to be zeroed. - Page 48 In case the option L is chosen, a screen will appear with a list of articles, you IST OF RTICLES should then choose the article to be deleted, and next confirm the deletion by pressing “Y ”. Choose the article to be deleted.
-
Page 49: Quick Sale Keys
Choosing one of the remaining options results immediately in displaying the question: “D ELETE ?” Example below: ARTICLE Confirm D ELETING ARTICLE 12.2 Quick sale keys 12.2.1 Defining This function makes it possible to assign an article to a quick sale key. The way to define it has been described in the chapter Operation. -
Page 50: Payments
Choose the position to be deleted. Confirm deletion of the quick sale key. 12.3 Payments This function makes it possible to define additional means of payment (apart from cash), that the customer can pay for goods. For example, they can be a credit card, cheque, occasional token. - Page 51 Choose DEFINING Choose the number of payment. Enter the name of payment and confirm. Deleting payments: In order to delete a payment, proceed in an analogous way as in case of defining, i.e. choose the function Deleting, then the position to be deleted and confirm by pressing Yes.
-
Page 52: Currencies
12.4 Currencies View of the currency menu 12.4.1 Name and exchange rates This function makes it possible to define eight currency forms of payment (having an exchange rate). It is recommended to enter abbreviations of the currencies used by the National Bank, e.g. EUR, USD. - Page 53 Choose the number of currency. Enter the currency name and confirm. Enter the exchange rate and confirm.
-
Page 54: Change In Currency
Deleting a currency: In order to delete a currency, proceed in an analogous way as in case of defining, i.e. choose the function Deleting, next the currency number to be deleted and confirm by pressing Yes, and then the currency will be deleted. A sound signal will confirm writing to the cash register's memory. -
Page 55: Change Of The Basic Currency
Change of the basic currency Enter the currency name and exchange rate. After the transition to the new currency, all The cash register will non-fiscal counters convert the article will be zeroed. prices acc. to the exchange rate defined in the cash register. Save changes. -
Page 56: Article Groups
Make shift closing reports of all cashiers in order to make their settlement. – If changing the prices was not done using the warehousing program and the option of ■ prices conversion by the cash register was not selected while defining the currency (see previous item), they should be converted and changed with the help of the function C in the cash register. -
Page 57: Units Of Measure
Choose the number of the article group. Enter the group name and confirm. Deleting article groups: In order to delete an article group, proceed in an analogous way as in case of defining, i.e. choose the function Deleting and enter the beginning number of the article group, then choose the number of the position and confirm the deletion by pressing Yes, then the group will be erased. -
Page 58: Cashiers
12.7 Cashiers 12.7.1 Defining This function makes it possible to define a cashier, his/her password, and assign him/her to one of the cashier types. From the type to which a cashier is assigned to, the following result: this cashier's authorizations, contents of the set of reports, as well as the maximal discount and margin that the cashier can grant. - Page 59 Choose N Choose the name (max. 19 characters) and confirm. Choose P ASSWORD...
- Page 60 Choose the password (max. 13 characters). Choose T Choose to which cashier type the cashier being defined is to be assigned.
-
Page 61: Deleting
Press Confirm. 10.7.2 Deleting This function makes it possible to delete a cashier from the cash register's memory. This cashier must have his/her shift closed. Deleting casher definition: In order to delete a cashier definition, proceed in an analogous way as in case of defining, i.e. choose the function Deleting and next choose the number of the cashier position and confirm the deletion by pressing Yes, then the cashier will be erased. - Page 62 Choose DEFINING Choose an existing type or define your own by choosing an empty position, e.g. no. 5. Enter the type name. Authorizations Maximum 19 characters Defining the access level to the cash register's Choose the set of reports functions, max. 35 and define the set's authorizations can be assigned.
- Page 63 Type of cashier Authorization for functions Cashier Senior cashier Administrator Manager Sale End of shift Report state of cash reg. for the cashier Payment into cash register Payment from cash register Set of reports Opening of drawer Manager functions Service functions Daily fiscal report Tax financial report Detailed zeroing report of sale...
-
Page 64: Deleting
12.8.2 Deleting With this function, a previously defined type of cashier can be deleted. 12.8.3 Copying This function makes it possible to copy the settings of cashier type to another previously defined cashier. The function is useful if we want to grant another cashier the same authorizations and access to a set of reports. -
Page 65: Zeroing Reports
13 Zeroing reports View of the menu Zeroing Reports 13.1 Daily fiscal report A daily report should be made every day after finishing selling on the given day, but not later than before carrying out the first sale on the next day. If new articles have been defined since the last daily report made, then the R is printed first. -
Page 66: Detailed Sales Report
“Changes were made in article database” – this is the sum of changes in the article database of newly defined articles, changed names or rates as well as deleted articles since the latest daily report. If there have been cancelled receipts since the latest daily report, then their quantity and summary amount are printed. -
Page 67: End Of Shift
13.5 End of shift This prints data on operations done by the cashier such as sales, returns received, discounts, margins, and so on, as well as on the amounts obtained from the sales. Carrying the function of shift closing results in switching off the cashier and zeroing the counters of this cashier's sift. -
Page 68: Non-Zeroing Reports
Enter the amount counted. 14 Non-zeroing reports Non-zeroing reports can be made many times because they do not erase the data in the cash register and serve only for viewing purposes. View of the menu N EROING EPORTS 14.1 Financial tax report This prints the current state of fiscal counters. -
Page 69: Detailed Sales Report
14.2 Detailed sales report This prints the report of article sales based on non-fiscal sale counter (quantity and value of the sale). In the report, quantities and values of sales for each article are specified. The content of the report is identical with the corresponding zeroing report with the difference that the counters are not zeroed and the line C does not appear. -
Page 70: Configuration Report
Give the beginning article number. You can abort the printout any time. 14.7 Configuration report The report of the cash register's configuration contains data on the cashiers introduced to the cash register's memory, article groups, payments, units of measure, and the defined quick sale keys. -
Page 71: Electronic Journal
15 Electronic journal View of the menu Electronic Journal The menu contains functions enabling to print out on the cash register the printout journals saved in the EJ memory of the cash register itself, as well as on the memory card inserted in the cash register. -
Page 72: Settings Of The Electronic Journal
Printout of the copies of all fiscal documents from the chosen ■ F ISCAL range. Printout of the copies of all cancelled receipts from the chosen ■ C ANCELLED ECEIPTS range. ■ R Printout of the copies of all receipts from the chosen range. ECEIPTS BY ■... -
Page 73: Usb
16 USB View of the USB menu In order to use these functions correctly, you should first connect an external data medium, and then choose an appropriate function. 16.1 Copy of EJ card This function makes it possible to make a backup copy, it is designed to restore the original data in case the data are lost or damaged. -
Page 74: Automatic Copy Of Ej Card
16.2 Automatic copy of EJ card Enabling this option allows to automatically make a copy onto an external data medium. After the medium has been connected, a backup copy of the EJ card will be made. But, if the medium is located permanently in the cash register, an automatic copy of the EJ card will be made always after a fiscal daily report is done. -
Page 75: Readout Of Counters From The Cash Register
16.5 Readout of counters from the cash register After the data medium has been connected and the option is chosen, the counters of sales quantity and value, and package returns are written onto the external data medium. The writing zeroes the counters of sales quantity and value. After the function is selected, a screen about the reading status will appear, do not switch off the cash register. -
Page 76: Settings
For the graphics to be readable for the cash register and printed correctly, it has to meet the following parameters: Make a directory on an external data medium, with the name graphics, next in this directory – a directory with the name printer. The directory printer is the target directory where you locate the files of the graphic heading of the printouts. - Page 77 The default settings of the cash register are presented in the following table. If in doubt, you can use this table. RAPHICS EADING ENTRE LIGNMENT – F IRST OURTH ENTRE LIGNMENT ECEIPT ETTINGS – S IRST IXTH ENTRE LIGNMENT 10 % ISCOUNT 10 % ARGIN...
- Page 78 ODES WITH IGITS RICE EIGHT EGISTER ETTINGS CLOCK CORRECTION COMMUNICATION MODULE NET STATUS COMMUNICATION MODULE /ADDITIONAL/ WIFI SETTINGS WIFI ON MODE CLIENT / SERVER SECIURITY MODE DISABLES/ WPA/WPA2 / WEP KEY1…4 WEP KEY INDEX SSID ELZAB PASSWORD 12345678 POWERSAVE DHCP...
- Page 79 XXX.XXX.XXX.XXX GATEWAY XXX.XXX.XXX.XXX MASK XXX.XXX.XXX.XXX SERVER IP XXX.XXX.XXX.XXX SERVER PORT 1001 IP DNS XXX.XXX.XXX.XXX ASHIER ISPLAY ACKLIGHT EVEL OWER IF ON ATTERY 2 MIN ACKLIGHT OLOURS OLOUR USTOMER ISPLAY ACKLIGHT EVEL OWER IF ON ATTERY 2 MIN ACKLIGHT CREENSAVER CREENSAVER SOUNDS RROR ONFIRM...
-
Page 80: User Data
AUTO SWITCHING OFF 30 MIN IME ON ATTERY 30 MIN IME ON OWER UPPLY CTIVATE ON OWER UPPLY ASHIER SAGE UMMATION ASHIERS HANGES ONLY IN OURNAL RAWER PENING PC C OUNTERS ONTROL ARKING ECEIPT UICK AFTER TART 17.1 User data... - Page 81 This group of functions allows to enter user data to the cash register's memory. The function Graphics Heading makes it possible to place graphics on the printout, e.g. the shop's logo, and so on. Having entered the function, you can choose one of four headings. The heading can be changed once a day, only after the daily fiscal report is made.
-
Page 82: Receipt Settings
Enter the text and confirm. 17.2 Receipt settings This group of functions allows you to change the settings connected with the receipt and the sale. 17.2.1 Receipt additions This function allows you to add an advertising text to be printed at the end of the receipt. The receipt additions have six text lines, in each line can contain a maximum of normal-wide 42 characters or 21 double-wide characters. -
Page 83: Maximum Sum Of The Receipt
This function allows you to establish the maximum level of the margin that may be entered by the cashier while making out the receipt. In order to enter the maximum margin, choose the function and then, using the numeric keyboard, enter the percentage of the maximum margin, and confirm. -
Page 84: Special Discount / Margin
Enabling this function means an obligation to enter the amount to be paid while finishing the receipt. The obligation to enter the payment is signalled by a tone after the Confirm key is pressed in the sub-sum of the receipt. You should then enter the proper amount and confirm. 17.2.7 Special discount / margin Enabling this function causes that the articles that were defined as belonging to the groups number 15, and 90 to 99, will not be covered by discount/margin for the position and for the... -
Page 85: Barcode Prefixes
17.3.1 Barcode prefixes This function applies to the barcodes containing the quantity (mass) or price (value) of the given article. In the cash register, you can define five prefixes for the barcodes with quantity and five prefixes for the barcodes with the price. By default, the prefixes defined in the cash register are 27 and 29 for the barcodes with quantity, and 23 and 24 for the barcodes with price. -
Page 86: Check Digit
Choose the prefix number, e.g. 3 Change the keyboard characters to digits by pressing 1/3, enter the prefix digits, and confirm. To delete a prefix, it is enough to confirm an empty prefix. 17.3.2 Check digit This function makes it possible to activate the internal check digit control for the barcodes with quantity and value. -
Page 87: Settings Of The Cash Register
The default setting is six digits. This option should be set depending on the capabilities of the labelling scales whose barcodes are to be used for working with the cash register. For working with the labelling scales ELZAB Eta-Prima, it is recommended to set 6 digits. -
Page 88: Sound Settings
17.4.5 Sound settings With this function, you set the tone signalling in the cash register. Signals a press of a key Signals a problem Signals an operation completed correctly. Signals the battery level is low. 17.4.6 COM port setting This function allows to change mode of working COM port (mini USB) 17.4.7 Keyboard locking This function makes it possible to set the time for the keyboard to be locked. -
Page 89: Auto Off Function Of The Cash Register
The minimal time of the setting is 15 seconds, and the maximum time is 60 enabling the option minutes. The minimal time of the setting is 15 seconds, and disabling the option the maximum time is 60 minutes. If the auto-lock function is enabled, the cash register will lock the keyboard after the time set, and display the following message: [keyboard locked] In order to unlock the keyboard, you should press short the “switch on”... -
Page 90: Tax Rates
The minimal time of the setting is 15 seconds, and The minimal time of the the maximum time is 60 setting is 15 seconds, minutes. and the maximum time is 60 minutes. enabling the option 17.5 Tax rates Choosing this function makes it possible to enter to the cash register's memory the tax rates (PTU) that will be effective while selling articles. -
Page 91: Summation Cashiers
This function makes it possible to choose if, after the cash register is switched on, the cashier is to be activated automatically to whom the administrator rights will be assigned. ANAGER Enabling this function is useful if the cash register is operated by more than one person. 17.7 Summation cashiers This function makes it possible to carry out a report containing the sum of turnover, payments in and out, discounts, and other values for all cashiers. -
Page 92: Parking Receipt
17.12 Parking receipt This option makes it possible to print out the confirmation in form of a parking receipt for a customer who has begun parking his/her car. The parking receipt is a non-fiscal printout and it does not contain information on the parking fares, only the date, drive-in time, and identifier (registration number). -
Page 93: Quick Sale Mode After Switching On
Enter the registration number and confirm. 17.13 Quick Sale mode after switching on Enabling this functions sets the Quick Sale mode as the default mode right after the cash register is switched on. The advantage of this function is that the cash register comes back to the main screen of the Quick Sale mode even if it was in the menu before switching off the cash register. -
Page 94: Parameters Of Paper
II class of electric shock protection acc. to PN-EN 60950-1:2007. 2 Parameters of paper Paper for thermal printer recommended paper make ELZAB width –0 form roll 18 m long outer diameter... -
Page 95: Climatic Ambient Conditions
Paper with ELZAB marks has a 6-year certificate for storage provided the conditions reserved by the paper manufacturer are met. -
Page 96: Connecting The Cash Register's Drawer
blanked after two minutes). If the cash register remains in an idle state, it will be automatically switched off after 30 minutes. Requirements for the network power supply 220V – 230V Rated voltage Frequency 47 - 63 Hz Power consumption Max 12W from internal battery: 7,4V/2,0Ah... -
Page 97: Connecting The Wireless Barcode Reader
Power supply unit Opening with lever of the cash to open the drawer manually. register k10 View from the top of the drawer Cable from the drawer, supplying the cash register 6 Connecting the wireless barcode reader The cash register works with barcode readers. The condition is to have a cash register... -
Page 98: Sealing The Cash Register
The configuration consists of three stages, i.e. in the first place you configure the connection between the cash register and the reader (pairing), next you configure the reader itself, entering the prefix and suffix. The wary to configure is following: 1. - Page 99 air in spay. The maintenance activities should be entrusted to a person having suitable qualifications or technical skills, or commission to the technical service. Among the maintenance activities, that are in the scope of the authorized service's responsibility, is – during each visit at the client's place – to precisely clean the thermal head and the rubber roll of the paper transport in the printing mechanism, as well as to clean the whole paper feeding path.
Need help?
Do you have a question about the K10 and is the answer not in the manual?
Questions and answers