Table of Contents
Advertisement
Available languages
Available languages
Quick Links
Advertisement
Table of Contents

Subscribe to Our Youtube Channel
Related Manuals for Steren INT-200


Summary of Contents for Steren INT-200
- Page 1 INT-200 Intercomunicador para puerta Manual de instrucciones V0.1 V0716a...
- Page 2 Intercomunicador para puerta Steren. Por favor revise este manual completamente para estar seguro de instalar y poder operar apropiadamente este producto. Para apoyo, compras y todo lo nuevo que tiene Steren, visite nuestro sitio Web en: www.steren.com...
- Page 3 IMPORTANTE • El equipo debe ser colocado en un lugar con ventilación adecuada, para prevenir humedad, polvo o la luz directa del sol. • Siempre utilice un paño suave y seco para limpiar el equipo. No utilice solventes. • No intente abrir su equipo puede dañarlo y anulará la garantía. •...
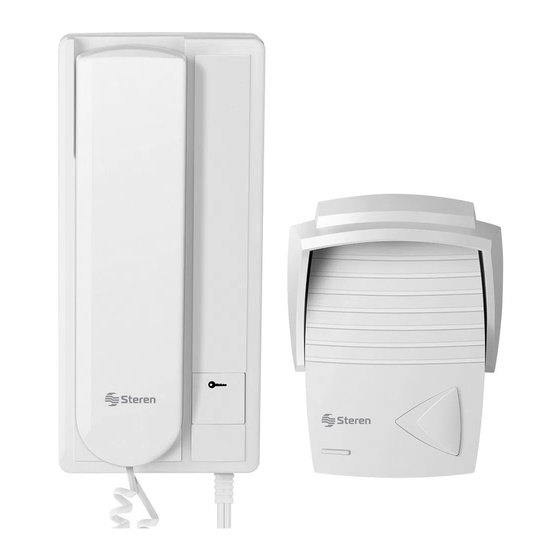
- Page 4 CONTROLES 1. Botón de apertura de puerta. 2. Auricular. 3. Interruptor de volumen. 4. Entrada para conectar el auricular. 5. Entrada de cable de corriente. 6. Botón de llamada. 7. Bocina. 8. Micrófono.
-
Page 5: Instalación
INSTALACIÓN INSTALANDO EL TIMBRE Se recomienda que fije el timbre a una altura de 1,45 m a 1,6 m. 1. Seleccione el lugar donde desee instalar el timbre y realice las perforaciones correspondientes de acuerdo a la placa de plástico. Posteriormente fije la placa con tornillos. 2. En el timbre instale un cable de 2 vías (se recomienda cable de 2 vías calibre 22). Oprima los botones hasta sujetar firmemente el cable. - Page 6 INSTALANDO EL INTERCOMUNICADOR Se recomienda que fije el intercomunicador a una altura de 1,45 m a 1,6 m. 1. Fije la base de plástico utilizando tornillos y taquetes a la altura deseada. 2. En el intercomunicador, una el cable del timbre de acuerdo al número correspondiente.
- Page 7 CONEXIONES INTERCOMUNICADOR TIMBRE CERRADURA ELÉCTRICA (NO INCLUIDA)
-
Page 8: Operación
OPERACIÓN 1. Cuando el visitante oprima el botón de llamada, se escuchará un timbre en el intercomunicador. 2. Levante el auricular para hablar con el visitante. 3. Después de hablar con el visitante, presione el botón de apertura de puerta en caso de tener instalada una cerradura eléctrica. - Page 9 Esta póliza garantiza el producto por el término de un año en todas sus partes y mano de obra, contra cualquier defecto de fabricación y funcionamiento, a partir de la fecha de entrega. CONDICIONES 1.- Para hacer efectiva la garantía, presente ésta póliza y el producto, en donde fue adquirido o en Electrónica Steren S.A. de C.V. 2.- Electrónica Steren S.A de C.V. se compromete a reparar el producto en caso de estar defectuoso sin ningún cargo al consumidor.
- Page 10 INT-200 Door intercom system Instruction Manual v0.1 V0716a...
- Page 11 Steren product. This manual includes all the feature operations and troubleshooting necessary to install and operate your new Steren´s Door intercom system. Please review this manual thoroughly ensure proper installation and operation of this product. For support, shopping, and everything new at Steren, visit our website:...
- Page 12 IMPORTANT • This device must be placed in an area with adequate ventilation in order to avoid humidity and dust. • Always use a soft dry cloth in order to clean this device. • Do not attempt to open this device. Doing so could cause malfunctions and the voiding of the warranty. • If the power cord is damaged, it must be replaced. See the manufacturer, a service agent, or qualified personnel in order to replace the power cord. • If you will not be using this device for an extended period of time, make sure to disconnect the power cable from the electrical outlet. HIGHTLIGHTS • Allows for the identification and communication with people outside your home or office. •...
- Page 13 CONTROLS 1. Unlock button. 2. Handset. 3. Volume. 4. Input handset 5. Power cable. 6. Call button. 7. Speaker. 8. Microphone.
-
Page 14: Installation
INSTALLATION INSTALL DOOR BELL It is recommended that you install the camera at a height of 4.5 – 5 feet. 1. Select the location where you want to install the door bell and make corresponding drilling according to the plastic sheet. Then fix the plate with screws. 2. Install a 2-way cable (recommended cable caliber 22). Press the buttons to firmly hold the cable. - Page 15 INSTALLING INTERCOM It is recommended that you install the camera at a 4.5 – 5 feet height. 1. Select the location where you want to install the intercom and make corresponding drilling according to the plastic sheet. Then set the plate with screws.
- Page 16 CONECTIONS INTERCOM DOOR BELL ELECTRIC LOCK (NOT INCLUDED)
-
Page 17: Operation
OPERATION 1. When visitors push the call button will hear a bell on the intercom. 2. Pick up the handset to talk with the visitor. 3. After talking with visitors, press the button for opening door in case you have an electric lock installed. - Page 18 NOTAS / NOTES...
-
Page 19: Warranty
Part number: INT-200 Brand: Steren WARRANTY This Steren product is warranted under normal usage against defects in workmanship and materials to the original purchaser for one year from the date of purchase. CONDITIONS 1.- This warranty card with all the required information, invoice, product box or package, and product, must be presented when warranty service is required. - Page 20 Este instructivo puede mejorar con tu ayuda, llámanos a: Help us to improve this instruction manual, call us to: 01800 500 9000 Centro de Servicio a Clientes Customer Service Center...
Need help?
Do you have a question about the INT-200 and is the answer not in the manual?
Questions and answers