
Related Manuals for Steren CCTV-060


Summary of Contents for Steren CCTV-060
- Page 1 CCTV-060 Video intercomunicador con monitor a color de 4” SEGURID V0.1 Manual de instrucciones 1015v...
- Page 2 4”. Por favor, revíselo completamente para estar seguro de cómo utilizar apropiadamente el producto. Para apoyo, compras y todo lo nuevo que tiene Steren, visite nuestro sitio web: www.steren.com La información que se muestra en este manual sirve únicamente como referencia sobre el producto.
- Page 3 IMPORTANTE • No instale el producto en lugares con altas temperaturas, humedad alta, bajo luz solar directa o cerca de equipos que generan calor. • Siempre utilice un paño suave y seco para limpiar el monitor y el lente de la cámara. •...
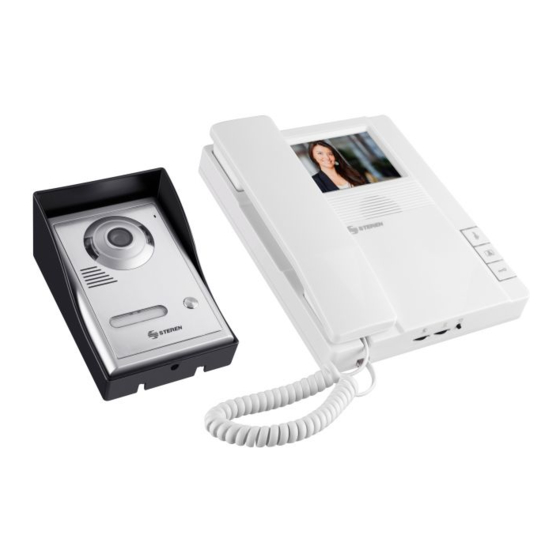
- Page 4 CONTENIDO Video intercomunicador Cámara Protector botagua Placa de soporte Convertidor de voltaje Cable auricular Cable de interconexión Tornillos y taquetes...
- Page 5 PARTES Cámara Panel frontal 1. Lente 2. LED IR 3. Altavoz 4. Placa para nombre 5. Botón de timbre 6. Micrófono Panel trasero a) Terminales de conexión b) Terminales para cerradura eléctrica...
- Page 6 Intercomunicador 1. Auricular 2. Pantalla 3. Altavoz 4. Selección de tono 5. Monitoreo 6. Apertura de cerradura 7. Control de contraste 8. Control de brillo 9. Volumen (3 niveles) 10. Terminales de conexión...
-
Page 7: Instalación
INSTALACIÓN Intercomunicador 1. Seleccione el lugar para instalar el intercomunicador. Se recomienda que sea sobre un muro o superfi cie sólida y fi ja. Consulte la página 10 para la instalación de cables. Después siga estos pasos. Mientras esté conectado, el intercomunicador permanecerá... - Page 8 Cámara Instalación en muro La altura óptima para instalar la cámara es entre 1,40 a 1,70 cm, desde el centro de la cámara al piso (esto es sólo como referencia). Para que la cámara sea resistente a las condiciones de sol o de lluvia es imprescindible instalarla con el protector botagua.
-
Page 9: Diagrama De Conexión
4. Realice la conexión de los cables de acuerdo con el siguiente diagrama: DIAGRAMA DE CONEXIÓN Cables 1) Café 2) Negro 3) Azul 4) Verde *La cerradura eléctrica se vende por separado. Consulte a su distribuidor para obtener información acerca de las cerraduras compatibles con este producto. Nota: Si desea agregar más cable, tome en cuenta que el calibre mínimo debe ser de 18 AWG y que no debe exceder los 100 m de longitud. -
Page 10: Modo De Operación
Ajustes 1. Pulse para escuchar los 15 tonos predeterminados. El último tono que reproduzca se guardará como timbre. 2. Presione para seleccionar el volumen. 3. Ajuste los controles de contraste y brillo. ( MODO DE OPERACIÓN Llamada del visitante Cuando un visitante presione el botón de timbre, el intercomunicador sonará y en la pantalla aparecerá... -
Page 11: Problemas Y Soluciones
PROBLEMAS Y SOLUCIONES No hay sonido o imagen • Asegúrese de que el equipo se encuentre conectado a la energía eléctrica. • Revise las conexiones de acuerdo con el diagrama. • Verifi que el estado de los cables; podrían estar dañados o cortados Imagen con ruido o poco clara •... - Page 12 1.- Para hacer efectiva la garantía, presente esta póliza y el producto, en donde fue adquirido o en Electrónica Steren S.A. de C.V. 2.- Electrónica Steren S.A de C.V. se compromete a reparar el producto en caso de estar defectuoso sin ningún cargo al consumidor. Los gastos de transportación serán cubiertos por el proveedor.
- Page 13 CCTV-060 4” screen video door phone SEGURID V0.1 Instruction manual 1015v...
- Page 14 4” screen video door phone CCTV-060 Thank You on purchasing your new Steren product. This manual includes all the feature operations and troubleshooting necessary to install and operate your new Steren´s 4” screen video door phone. Please review this manual thoroughly to ensure proper installation and operation of this product.
- Page 15 IMPORTANT • Don’t place the product into areas with high temperatures, humidity, under the sun light or close to heaters. • Clean the lens with a soft, dry clot. • Do not use solvents or other chemicals for cleaning. • Avoid dropping the unit as this may cause damages. •...
- Page 16 CONTENT Camera Protector cover Intercom Bracket AC converter Handset cable Interconnection cable Anchors and screws...
- Page 17 PARTS Camera Front panel 1. Len 2. IR LED 3. Speaker 4. Name plate 5. Ringtone button 6. Microphone Rear panel a) Connections terminals b) Terminals to electric lock...
- Page 18 Intercom 1. Handset 2. Screen 3. Speaker 4. Ringtone selector 5. Monitoring 6. Open lock 7. Contrast 8. Brightness 9. Volume (3 levels) 10. Connections terminals...
-
Page 19: Installation
INSTALLATION Intercom 1. Select a place to install the intercom. We recommend that be onto a wall or fi xed and solid surface. Please, refers to page 24 for wire installation. Then follow next steps. While it’s connected, the intercom remains in wait mode and the light of the buttons panel Don´t forget to consider the will remain turn on. - Page 20 Camera Installation into wall The optimal height to install the camera is between 1.40 and 1.70 cm, from the center of the camera to the fl oor (this is a reference). Place the protector cover to protect the camera against water and sun. 30 cm...
-
Page 21: Connection Diagram
4. Make the wires connection in according with the next diagram: CONNECTION DIAGRAM Wires 1) Brown 2) Black 3) Blue 4) Green *The electric lock is sold separately. Ask to you supplier for locks compatible with this product. Note: If you need to add more cable, note that the minimum cable caliber should be 180 AWG and don’t exceed the 100m of length. -
Page 22: Operating Mode
Settings 1. Press to listen to the 15 default tones. The last that you play it’s stored as tone. 2. Press to select the volume level. 3. Adjust the brightness and contrast controls. ( OPERATING MODE Incoming call When a visitor press the ringtone button, the intercom will sound and in the screen appears the preview of the outdoor camera. -
Page 23: Troubleshooting
TROUBLESHOOTING Not audio or image • Be sure that the device is connected to energy supply. • Review the connections in accord with the diagram. • Verify the wires status; may be damaged or cutted. Image with noise • Verify the connections, some cable may be disconnected. - Page 24 Product: 4” screen video door phone Part number: CCTV-060 Brand: Steren WARRANTY This Steren product is warranted under normal usage against defects in workmanship and materials to the original purchaser for one year from the date of purchase. CONDITIONS 1. This warranty card with all the required information, invoice, product box or package, and product, must be presented when warranty service is required.
- Page 26 Este instructivo puede mejorar con su ayuda, llámenos al: Help us to improve this instruction manual, call us to: 01 800 500 9000 Centro de servicio a clientes Customer Service Center...
Need help?
Do you have a question about the CCTV-060 and is the answer not in the manual?
Questions and answers