Advertisement
Quick Links
Mini-P
User manual
CONTENTS
EN.........................................................................................................1
FRA.....................................................................................................11
KOR....................................................................................................21
DE.......................................................................................................31
RUS.....................................................................................................41
PTG.....................................................................................................51
ESP.....................................................................................................61
JAP.....................................................................................................71
繁體....................................................................................................81
Battery and Charging
The MOZA Mini-P has a built-in lithium battery. Fully charge the
battery before first use. The LED power indicator blinks when the
battery level is less than 20%. Charge it with an universal USB-C
cable, Mini-P can be charged through a phone charger and
mobile power supplier. The charging stops automatically when
the battery is fully charged.
Notes:
1. Please do not over-charge or over-discharge the battery.
Otherwise the battery will be damaged.
2. Recharge and discharge the battery every 3 months to keep it
intact if it is left unused for a long time.
1
Advertisement

Related Manuals for Gudsen Moza Mini-P


Summary of Contents for Gudsen Moza Mini-P
- Page 1 JAP.....................71 繁體....................81 Battery and Charging The MOZA Mini-P has a built-in lithium battery. Fully charge the battery before first use. The LED power indicator blinks when the battery level is less than 20%. Charge it with an universal USB-C cable, Mini-P can be charged through a phone charger and mobile power supplier.
- Page 2 Contacts Official Website Sina Weibo WeChat Twitter Facebook YouTube Instagram MOZA Genie Download Android Tutorial Firmware Upgrade Firmware Upgrade Shenzhen Gudsen Technology Co., Ltd and Calibration and Calibration Web: www.gudsen.com WeChat QR YouTube QR...
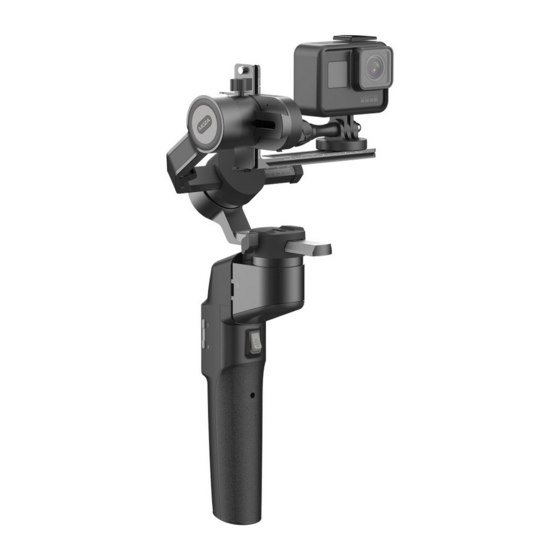
- Page 3 Mini-P Overview L-Bracket Quick Release Plate Camera Control Port Lock Knob L-Bracket Quick Release Plate Tilt Storage Lock Roll Storage Lock Pan Motor Lock Slide Lock Joystick Power Button Dial Wheel USB-C Charging Port Battery Level Indicator Tilt Knob 1/4″ Port Roll Knob Pan Knob Trigger...
- Page 4 Mini-P Installation • Expanding and Folding the Mini-P main body a. Folded Status Slide the slide lock and rotate the gimbal 180° anticlockwise.Then it locks automatically. b. Expanded Status Slide the slide lock and rotate the gimbal 180° clockwise. Then it locks automatically.
- Page 5 • Mounting the Camera Horizontal Mounting a. Place the longer side of the L-Bracket under the camera, and secure the camera with a 1/4”screw. b. Loosen the L-Bracket quick release plate lock knob, slider the shorter side of the L-Bracket quick release plate into center of the quick-release base, then lock the knob.
- Page 6 Balancing a. Loosen the tilt knob, and adjust the tilt arm back and forth until the lens is horizontally forward, then lock the knob. b. Rotate the camera until the lens is facing up, loosen the L-Bracket quick release plate lock knob, and adjust the L-Bracket quick release plate back and forth until the lens is straight up (leveled), then lock the knob.
- Page 7 Button Features Simplified Operation Down Button ● Double press: Sports gear mode, double press again to exit sports gear mode ● Triple press: Inception mode, Triple press again to exit inception mode Joystick ● Move upwards: phone camera turns up ●...
- Page 8 W-T Button Triple press W button: Auto tune Power Button Press once : Sleep mode Long press: Turn on / off MOZA Genie App Control Press the center button on the camera interface: Video mode: start/stop recording; photo mode: take a photo Double press the center button in video mode: take a photo during recording Long press the center button: confirm the timelapse...
- Page 9 a. Place the smartphone on the Gimbal through the phone holder; b. Use a 2nd smartphone and open the “MOZA Master” App, connect it to the gimbal and enter Mimic Motion Control Mode; c. Rotate the 2nd phone and it will control the movement of the gimbal.
- Page 10 ● Calibration The MOZA Mini-P needs to be calibrated when: a. The device works abnormally; b.There is a deviation in the horizontal angle after the gimbal is turned on (not leveled), and it is unable to resolve after one-click re-center;...
-
Page 11: Product Specification
If you use a mobile phone on the gimbal, you can directly scan the QR code to download "MOZA Genie "(Android 5.0 or higher, IOS 9.0 or higher), or you can search for" MOZA Genie "directly in the mobile app store to download. (See the QR code at the end of the page) Note 1.
Need help?
Do you have a question about the Moza Mini-P and is the answer not in the manual?
Questions and answers