Table of Contents
Advertisement
Quick Links
Download this manual
See also:
User Manual
Advertisement
Table of Contents

Related Manuals for Gudsen MOZA Air


Summary of Contents for Gudsen MOZA Air
- Page 1 MOZA Air User Manual...
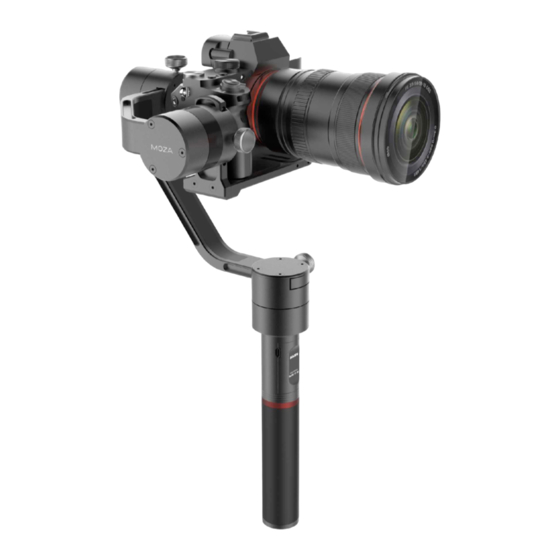
- Page 2 The 2. Packing list MOZA Air can support all mirrorless cameras and DSLRs up to 5.5 pounds. 3. Getting to Know the MOZA Air The MOZA Air features advanced motor control technology, high-quality materials, and industry leading software.
-
Page 3: Main Handle Of The Moza Air
Wireless Thumb Controller(Optional) X 1 MOZA Air Gimbal. Remote control of the gimbal. Handgrip X 1 Lens Support X 1 Main handle of the MOZA Air, Lens support. battery holder. Moza Air Modified Batteries X 3 Lens Support Screw X 1 MOZA batteries. -
Page 4: Instruction
3. Getting to Know the MOZA Air MOZA Air User Manual Control Cable X 3 camera control cables. [10] ①Panasonic Control Cable ②Sony Control Cable [11] ③Canon Control Cable [12] [13] USB cable X 1 [14] For firmware update or modification of parameters. -
Page 5: Getting Started
5. Never use or charge swollen, leaky, or damaged batteries. If your Please charge the batteries with the MOZA charger to ensure the best battery batteries are abnormal, contact Gudsen technical support or Gudsen life for your MOZA Air. authorized vendor for further assistance. - Page 6 1. DO NOT attach the batteries to wall outlets or car charger sockets directly, otherwise it will over discharge and lead to permanent damage. always use a MOZA official charger. Gudsen takes no responsibility if the battery is charged using a non-MOZA official charger, Battery Maintenance 1.
- Page 7 MOZA Air User Manual MOZA Air User Manual 4.3 Mounting your camera 4.4 Balance the Tilt Axis Please place the camera in parallel with the mounting plate, aim the 1/4" 1. Please loosen Tilt Adjustment Screw and adjust the Tilt Axis until it threaded hole at the bottom of the camera with the empty slot of the remains still with the lens facing vertical or toward the ground.
- Page 8 MOZA Air User Manual MOZA Air User Manual 4.5 Balancing the Roll Axis 4.6 Balancing the Yaw Axis 1. Please loosen the Roll Adjustment Screw and adjust the Roll Axis until 1. Please loosen the Roll Adjustment Screw and adjust the Roll Axis until the camera remains still and level with the horizon.
- Page 9 Loosen the lock-screw in the middle of the handle clamp. motor with the control cable. Please make sure the cable doesn't affect the Then clamp onto the handgrip of the MOZA Air, adjust desired position and movement of the gimbal. When finished, test by pressing the Power on/Off secure the lock-screw.
-
Page 10: Gimbal Control
3. Triple quick press: All-lock mode. 4. Four times quick press: Roll-follow mode. Power button 1. One quick press: Start/Stop recording 2. double quick press: Photo-taking 3. Triple quick press: auto-center 4. Four times press: Roll control 5. Long press: Power on/off the MOZA Air... -
Page 12: Wireless Thumb Controller
6. Wireless Thumb Controller JOYSTICK (Optional Accessory) 1. MOZA Air gimbal remote control; 2. Up/down scrolling: Select the item at the menu. 3. Left scrolling: Go back to the upper menu. 4. Right scrolling: Go to the next menu or save the changes. - Page 14 Move the joystick down to choose the YES option, and move the joystick right again to enter the Pairing mode. The interface of Pairing will appear. Then turn on MOZA Air gimbal, the screen of the thumb controller shows OK in 5 seconds.
- Page 15 MOZA Air User Manual MOZA Air User Manual still fails, please check and update the firmware of your gimbal and Power:Motor torque adjustment, please keep the original parameters. wireless controller then try to pair them again (both devices must have the newest firmware installed).
-
Page 16: Mimic Motion Control
7. Mimic Motion Control MOZA Air User Manual 7.1 Parts schematic 7.3 Steps to upgrade the firmware of MOZA thumb controller 1. With the thumb controller off, long press “SPEED” without releasing it, connect controller to computer through USB port, release “SPEED”... - Page 17 MOZA Assistant App This process takes around 20 minutes to complete by smartphone. Press and hold the joystick in and then power on the MOZA Air to enter the firmware upgrading mode. Turn on your smartphone's Bluetooth, open the MOZA APP. The MOZA Assistant App will recognize MOZA Air's status and enter the firmware upgrading interface.
- Page 18 If “Error” displays, please check the thumb controller code or try it again. 6. If the horizon of MOZA Air is inconsistent with the thumb controller in mimic control mode, long press “SPEED” button to pause mimic control, turn the thumb controller to a desired position, then release “SPEED”...
-
Page 20: App Installation
MOZA Assistant App is available both in Apple Store and Google Play Store. Use keyword “MOZA Assistant” to search or scan the QR Code to Make sure you have the most up to date MOZA Air firmware. download it on your phone. - Page 21 MOZA Air User Manual MOZA Air User Manual Then begins the upgrade by hit the upgrade button on the software page: When it is done, the turn off the gimbal, unplug it, balance the camera again, here is a video about how to balance your camera: (1).
- Page 22 10. App Instruction MOZA Air User Manual 10.1 Home Page 10.2 Device page [10] [1] MOZA Air firmware version Re-center the gimbal At this page you can select the right gimbal model for the Bluetooth [2] Battery Level Remote Control & Normal connection.
- Page 23 MOZA Air User Manual MOZA Air User Manual 10.3 Remote Control &Normal Motion Time-lapse 10.4 Parameter setting [1] Joystick [2] Re-center the gimbal [3] Roll control [4] Normal time lapse After you click on the time lapse on the app you will see this page. You can set a basic time lapse motion for your gimbal but the gimbal can't control the camera shutter.
- Page 24 4. BMD profile for Blackmagic Design camera (BMPCC/BMCC/BMPC). Canon 5DⅣ is available as well, but it needs consumer to purchase an extra camera control wire, please contact support@gudsen.com for the solution. Balance Parameter There are four groups parameters to select and balance your camera, they are: 1.
- Page 25 MOZA Air User Manual MOZA Air User Manual Follow Speed Gyro and accelerometer calibration The speed of the gimbal motion movement. There are three levels are Click on the calibration button on the device page and you will see available: this notification, please hit ok to go on the calibration.
- Page 26 MOZA Air User Manual MOZA Air User Manual Then begin with the Gyro calibration first as the pictures shown below, you can go back to the device page by clicking on the white triangle button. Please keep the gimbal still during the calibration.
- Page 28 MOZA Air User Manual MOZA Air User Manual After the gyro is done and then begin with the accelerometer. Here is a recommend position for accelerometer calibration. Keep the gimbal still while it is working. More information please check the video here: https://www.youtube.com/watch?v=m7Hcfu_gbgM...
- Page 30 Steps to use the advanced motion time-lapse mode: 1. Balance the Camera on the gimbal, use the correct camera connection cable to connect the camera to MOZA Air. 2. Turn on Bluetooth. Open the MOZA Assistant App and connect it to the gimbal via Bluetooth.
- Page 31 MOZA Air User Manual MOZA Air User Manual Tap setup to set 'Shutter Interval', 'Shutter Duration'(shorter than 'Shutter Interval'),'Target Clip FPS 'and ' Target Clip Length'. 4. Use the joystick to create your shot path by controlling the movement of the gimbal and adding points.
-
Page 32: Specifications
11.Specifications MOZA Air User Manual Gimbal Weight 1100g(without battery) Dimensions 90*88*294mm Max Payload 2500g Till Rotation Range 360° Roll Rotation Range 360° Yaw Rotation Range 360° Working Voltage 10-15V Dynamic Current 300mA Static Current 100mA Battery Life ≥8hrs Bluetooth Bluetooth 4.0 6. -
Page 33: Warranty
Battery Capacity 600mAh examine and identify the problem and responsibility; If the issue or issues Battery Voltage 3.7V are a manufacturing defect Gudsen will cover all testing costs, material Working Current 50mA costs, labor costs, and return shipping. Rest Current...
Need help?
Do you have a question about the MOZA Air and is the answer not in the manual?
Questions and answers