
Related Manuals for Brill 32 EH Hattrick Basic


Summary of Contents for Brill 32 EH Hattrick Basic
- Page 1 Elektro Rasenmäher Electric Lawnmower Tondeuses électriques Elektrische gazonmaaier Elektrická sekačka 32 EH Hattrick Basic 32 ED Basic...
- Page 2 Mocht u desondanks eens reden tot klachten hebben, complaint, contact your dealer directly or the Brill wendt u zich dan rechtstreeks tot uw dealer of tot Brill Service. We are always grateful for feedback - Service. Wensen, kritiek en tips zijn bij ons altijd van requests, criticism and suggestions.
-
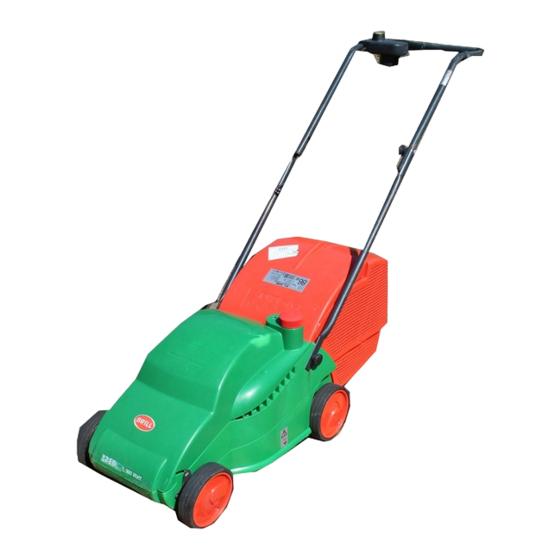
Page 4: Funktionsteile
Funktionsteile (Abbildung Modell 32 EH) 1 Holmspannschraube zur Arretierung des Führungsholmes 6 Führungsholm 2 Gelenkspannschraube zur Arretierung des Griffgestänges 7 Kabelzugentlastung 3 Zentralverstellschraube für die Schnitthöheneinstellung 8 Grasfangkorb 4 Zweihand-Sicherheits-Startschalter 9 Drehknopf für Zu-/Abschalten der Lüfterwalze 5 Elektro-Bremsmotor Function parts (Fig. model 32 EH) 1 Frame clamping screw to fix guide transom 6 Frame 2 Joint clamping screw to fix handle rod... -
Page 5: Technische Daten
Technische Daten Modell 32 ED 32 EH Motor Elektro-Bremsmotor Elektro-Bremsmotor Aufnahmeleistung 900 Watt 1300 Watt Netzspannung 230 V 230 V Frequenz 50 Hz 50 Hz Gehäuse PP-Kunststoff PP-Kunststoff Schnittbreite 32 cm 32 cm Schnitthöhe 25-55 mm 25-55 mm Gewicht 13,7 kg 15,5 kg Volumen Fangkorb 32 l... -
Page 6: Technické Údaje
Technische gegevens Model 32 ED 32 EH Motor Elektro-remmotor Elektro-remmotor Opgenomen vermogen 900 Watt 1300 Watt Netspanning 230 V 230 V Frequentie 50 Hz 50 Hz Omkasting PP-kunststof PP-kunststof Maaibreedte 32 cm 32 cm Maaihoogte 25-55 mm 25-55 mm Gewicht 13,7 kg 15,5 kg Volume grasopvangbox... -
Page 7: Safety Instructions
Beachten Sie bitte die Sicherheitshinweise auf dem Gerät: Please adhere to the following safety instructions on the casing: Veuillez faire attention aux consignes de sécurité figurant sur l'appareil: Houd rekening met de veiligheidsaanwijzingen op het apparaat: Dodržujte bezpečnostní upozornění uvedené na přístroji: Vor Inbetriebnahme Gebrauchsanweisung lesen. -
Page 9: Table Of Contents
Inhaltsverzeichnis - Contents - Contenu - Inhoudsopgave - Obsah Bitte lesen Sie diese Gebrauchsanweisung vor Montage und Nous vous remercions de bien vouloir lire attentivement ces Inbetriebnahme Ihres Gerätes sorgfältig instructions d´ u tilisation avant le montage et l´ u tilisation de votre tondeuse Funktionsteile Composantes... -
Page 10: Sicherheitshinweise
1. Hinweise zur Gebrauchsanweisung Bitte lesen Sie diese Gebrauchsanwei- richtigen Gebrauch sowie den Sicher- nicht kennen, den Rasenmäher zu sung sorgfältig und beachten Sie deren heitshinweisen vertraut. benutzen. Örtliche Bestimmungen Hinweise sowie die beiliegenden können das Mindestalter des Sicherheitshinweise. Machen Sie sich Erlauben Sie niemals Kin- Benutzers festlegen. -
Page 11: Hinweise Zum Richtigen Mähen
4.3 Bedienung des Gerätes Falls erforderlich - nur so schrägstellen, (z.B. Fliesen, Bodenplatten, dass das Schneidwerkzeug in die vom geteerte oder gepflasterte Wege, 4.3.1 Anbringen der Anschluss- Benutzer abgewandte Richtung zeigt. Hofeinfahrten etc.) starten, da die leitung Lüfterfedern Bodenkontakt haben. Halten Sie bei laufendem Motor Bild 4 + 5 Darauf achten, dass beim Starten... - Page 12 5.2.1 Der Einsatz im Frühjahr 5.2.2 Der Einsatz im Sommer 5.2.3. Der Einsatz im Herbst Nach der Winterperiode braucht der Bei Trockenheit ist es wichtig, die Um die Rasenfläche ideal auf den Rasen Luft. Bei starkem Moosbefall Rasenpflanze vor einer Austrocknung kommenden Winter vorzubereiten, und Filz im Rasen können Sie die Lüf- oder Braunfärbung zu bewahren.
-
Page 13: Wartung, Pflege Und Aufbewahrung
Unwucht ausgewechselt werden. Lagern Sie das Gerät an einem trockenen, frostsicheren Ort. Der Aus Sicherheitsgründen ist dies Aufbewahrungsort muss für Kinder von einer Brill Servicestelle oder unzugänglich sein. dem von Brill autorisierten Fach- Beachten Sie die Einbauhinweise händler durchzuführen. beim Austausch der Messer. -
Page 14: Behebung Von Störungen
Teile verwendet werden und die Hersteller autorisierte Servicestelle Reparatur nicht vom autorisierten Achtung! Aus Sicherheits- oder der autorisierte Fachhändler auf- Brill Service oder einem autorisier- gründen sind nur Original Brill zusuchen. tem Fachmann durchgeführt wird. Ersatzteile oder von Brill freige- Entsprechendes gilt für Ergän-... -
Page 15: Notes To The Instructions For Use
1. Notes on the operating instructions Please read through these operating the user. Keep these operating instructions carefully and comply with instructions in a safe place. them as well as with the enclosed ! Never permit children safety instructions. You should use or other persons who are not these operating instructions to fami- familiar with the operating... -
Page 16: Instructions For Correct Mowing
4.3 Operation of mower sary tilt slightly so that the cutter is less than 55 mm, the Hattrick pointing away from yourself. should never be started up on sta- 4.3.1 Connecting extension lead bilised surfaces (e.g. tiles, paving, Fig. 4 + 5 When the motor is running, keep tarmac or paved paths, drives, your hands and feet away from... - Page 17 5.2.1 Use in the spring 5.2.2 Use in the summer 5.2.3 Use in autumn Your lawn is in need of air after the When the weather is dry, it is impor- To ideally prepare the lawn surface for winter period. If your lawn contains tant to protect the grass from drying the winter we recommend cutting the large amounts of moss and matted...
-
Page 18: Maintenance, Care And Storage
2. Unscrew the two fastener nuts by after-sales service centres or dealers holding fast the screws (Fig. 7). authorised by Brill. A list of after-sales service centres is enclosed with the 3. Turn the blades or fit a complete set 6.7 Putting into storage (laying up... -
Page 19: Remedies For Malfunctioning
Faults generally only occur when the ! Attention! For safety rea- and accessories. mower has not been handled, cared sons only original Brill spare parts for or maintained properly. The follo- or parts authorised by Brill should wing table lists the most frequent faults be used for this purpose. -
Page 20: Conseils Concernant Les Instructions D'utilisation
1. Conseils concernant les instructions d'utilisation Veuillez lire attentivement ce mode minimum de l'utilisateur. d'emploi et observez les indications Veuillez conserver précieusement ainsi que les consignes de sécurité ci- Ne permettez jamais à ces instructions d'utilisation. jointes. Ces instructions d'utilisation des enfants ou à... -
Page 21: L'entretien De La Pelouse
4.3. Manipulation de la tondeuse cylindre de coupe montre la direction 55 mm, ne mettez jamais pas la opposée au manipulateur. tondeuse Hattrick en marche sur un 4.3.1 Branchement de l'appareil fond ferme (p.ex. du carrelage, des Lorsque le moteur tourne, tenez Figure 4 + 5 plaques de ciment, des entrées ou mains et pieds éloignés du carter... - Page 22 5.2 Tondre avec le rouleau 5.2.1 Utilisation au printemps Enclenchez le rouleau d'aération une d'aération fois sur deux ou sur trois puis enlevez Après la longue période hivernale, la (seulement 32 EH) au râteau les restes d'herbe coupée ou pelouse a besoin d'être aérée. Si il y a de touffes d'herbe.
-
Page 23: Maintenance, Entretien Et Entreposage
Lors du changement des couteaux, couchez la tondeuse sur le côté. La risés et des distributeurs agréés par Brill. utilisez toujours les nouveaux nettoyer avec une brosse et un chiffon. Une liste des services après-vente est vissages joints aux couteaux de Débarrassez également le rouleau... -
Page 24: Dépannage
Il en est de ces d'origine Brill ou agréés par même pour les pièces complémen- Brill. Nous indiquons expressément taires et accessoires. -
Page 25: Aanwijzingen Betreffende De Gebruiksaanwijzing
1. Aanwijzingen bij de gebruiksaanwijzing Deze gebruiksaanwijzing aandachtig veiligheidsaanwijzingen vertrouwd te toestemming de gazonmaaier te doorlezen en vooral de hierin maken. gebruiken. In lokale bepalingen opgenomen verwijzingen alsmede de kan de minimum leeftijd van de bijgevoegde veiligheidsaanwijzingen in gebruiker worden voorgeschreven. acht nemen. -
Page 26: Aanwijzingen Om Goed Te Maaien
4.3 Bediening van het apparaat 4.3.2 Starten (Afb. 4) (bijv. tegels, grondplaten, geasfal- teerde of bestrate wegen, opritten 4.3.1 Aanbrengen van het De gazonmaaier op een horizontale enz.) starten, omdat de verticuteer- aansluitsnoer plaats van het gazon opstellen. Tijdens pennen dan contact maken met de Afb. - Page 27 5.2 Maaien met de verticuteerrol 5.2.1 Inzet in het voorjaar maaibeurt worden ingeschakeld en ver- (alleen 32 EH) wijdert zowel maairesten als vilt dat zich Na de winterperiode heeft het gazon aan de oppervlakte bevindt. Tijdens het De Hattrick beschikt als enige lucht nodig.
-
Page 28: Onderhoud En Opslag
Met borstel en doek reini- lers die door Brill zijn erkend. Een gebruiken dat bij de reservemes- gen. Ook de afzettingen op de verticu- overzicht van de servicepunten is bij sen wordt meegeleverd! teerrol (alleen 32 EH) verwijderen. -
Page 29: Verhelpen Van Storingen
Waarschuwing! erkende service-afdeling van Brill Om veiligheidsredenen moeten of een erkend vakman zijn uitsluitend originele reserve-onder- uitgevoerd. Hetzelfde geldt voor delen van de fabrikant of onderde-... -
Page 30: Informace K Použití
1. Informace k použití Přečtěte si pozorně tento návod použitím, jakož i s bezpečnostními návod k použití, aby používali k použití a dodržujte v něm uvedená upozorněními. sekačku na trávu. Místní předpisy upozornění, jakož i přiložená mohou určovat věkovou hranici bezpečnostní... -
Page 31: Informace Ke Správnému Sekání
4.3 Obsluha přístroje naklonit jen tak, aby sekací nástroj dlaždičkách, betonových deskách, směřoval od uživatele. asfaltovaných nebo vydlážděných 4.3.1 Napojení přívodky chodnících, vjezdech do dvorů Při běžícím motoru se nepřibližujte Zobrazení 4 + 5 atd.), poněvadž kultivační péra rukama nebo nohama vnitřní mají... - Page 32 5.2 Sekání s rekultivačním válcem pracují v zemi a odstraní mech a rekultivační válec pracuje v zemi a zfilcovatělou trávu. Vzduch, voda a odstraní mech a zfilcovatelou trávu, (jen 32 EH) živiny se můžou znovu dostat do jakož i mokré nebo pošlapané listí. Hattrick má...
-
Page 33: Údržba, Starostlivost A Skladování Přístroje
Použijte prosím výlučně jen originální prodejnou. kde teplota neklesne pod bod mrazu. náhradní díly od Brill, jinak se nedá zaručit funkčnost a bezpečnost. Náhradní nože obdržíte ve Vaší 6.4 Výměna rekultivačního válce odborné prodejně. -
Page 34: Odstranění Poruch
Pozor! Z bezpečnostních servisní službě Brill, nebo autori- výrobcem autorizovanou odbornou důvodů se smí používat jen zovaným odborníkem. To platí i prodejnu. originální náhradní díly, nebo od pro doplňky a příslušenství. -
Page 35: Garantie
Gewährleistungs- und Garantieur- guarantee card and this be sent to fiche de prestation et de garantie Brill kunde vollständig ausfüllen und dem the manufacturer within three weeks dont il dispose, et si cette fiche est... -
Page 36: Záruka
Garantie - Guarantee - Garantie - Garantie - Záruka Garantie Záruka De fabrikant verleent voor dit produkt 12 Výrobce dává na přístroj 12ti měsíční maanden garantie (vanaf de aankoop- záruku (od datumu prodeje). Tato datum). Deze garantie heeft betrekking záruka se vztahuje na podstatné op alle belangrijke gebreken van het nedostatky přístroje, které... - Page 37 Fill in the opposite guarantee card and you can take part in the annual Brill draw. At the end of every year, Brill organizes a prize raffle of garden appliances to the value of DM 5.000,-. Make sure of your chances of winning now.
-
Page 38: Garantiekarte
IRL- Waterford, 36-80 O´ C onnell ST Dungarvan Phone: (03 58) 4 46 44 (03 58) 4 54 00 Brill Gartengeräte GmbH - Postfach 31 61 - D-58456 Witten Telefon: (0 23 02) 7 00-0 - Telefax (0 23 02) 7 00-66...
Need help?
Do you have a question about the 32 EH Hattrick Basic and is the answer not in the manual?
Questions and answers