Table of Contents
Advertisement
Advertisement
Table of Contents

Related Manuals for dji RONIN-MX


Summary of Contents for dji RONIN-MX
- Page 1 RONIN-MX User Manual V1.0 2016.04 ©2016 DJI. All Rights Reserved.
-
Page 2: Disclaimer And Warning
Failure to read and follow instructions and warnings in this document may result in serious injury to yourself or others, or damage to your DJI product or damage to other objects in the vicinity. This User Manual and all other collateral documents are subject to change at the sole discretion of DJI. -
Page 3: Table Of Contents
Download DJI Ronin Assistant App Download and install the DJI Ronin Assistant App. Search “DJI Assistant” on the App Store and then follow instructions for iOS installation. Search “DJI Ronin” on Google Play and then follow instructions for Android installation. -
Page 4: Introduction
Using with the DJI SRW-60G, the Ronin-MX can rotate 360 degrees continuously while obtaining the HD video link. It can also be connected to DJI Lightbridge 2 during aerial shot for video link. The Ronin-MX is compatible with DJI Focus, too. -
Page 5: In The Box
In the Box Gimbal x1 The gimbal includes built-in DJI motor drive modules, an independent IMU module, a 32- bit DSP processor, a power supply module, a Bluetooth module, a transmitter/receiver module, a camera shelf, a power breakout box and slip ring. - Page 6 Camera Screw C (1/4”) x2 Camera Screw D (3/8”) x2 Lens Support Screw x1 Lens Support x1 Allen Wrench x3 (2 mm, 3 mm, 3/16”) Vibration Absorber Screw X1 Camera Upper Mounting Plate Screw x2 ©2016 DJI. All Rights Reserved.
-
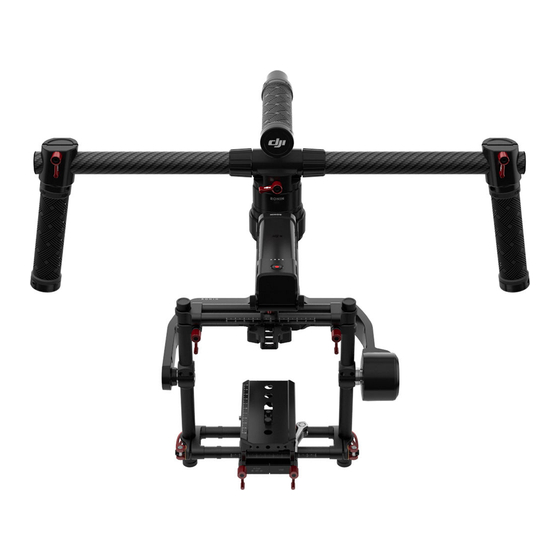
Page 7: Ronin-Mx Diagram
[10] USB Port & CAN1 Bus Port [11] Bind Button [12] Gimbal LED Indicator Light [13] Camera Upper Mounting Plate [14] Roll Motor [15] Tilt Motor [16] Fore and Aft Adjustment [17] Tilt Vertical Adjustment ©2016 DJI. All Rights Reserved. -
Page 8: Getting Started
Getting Started Tuning Stand You can use the tuning stand to hold the Ronin-MX during setup or for storage. To unfold the tuning stand, follow the steps below. 1. Hold the stand in the upright position as shown in the picture below. -
Page 9: Installing The Handle Bar Onto The Gimbal
Before you start using your Ronin-MX, be sure to charge the battery. The DJI Intelligent Battery was specially designed for the Ronin-MX. It has a capacity of 1580 mAh, a voltage of 14.4 V, and a variety of power management functions. Only charge the DJI Intelligent Battery with DJI approved charger (MODEL BC235144015). -
Page 10: Charging The Dji Intelligent Battery
1. Connect the charger to a wall socket (100-240V, 50/60Hz). 2. Connect the DJI Intelligent Battery to the charger. 3. The battery level indicator lights display the current charge level as the DJI Intelligent Battery charges. 4. The DJI Intelligent Battery is fully charged when the battery level indicator lights turn off. -
Page 11: Using The Dji Intelligent Battery
1 second to turn off the DJI Intelligent Battery. DJI Intelligent Battery Installation 1. Loosen the screws on either side of the DJI Intelligent Battery. Slide the DJI Intelligent Battery directly into the gimbal and then slide it down. Be sure the battery’s thumb screws go fit into their locating slots, so that the DJI Intelligent Battery makes full contact with the gimbal’s... -
Page 12: Mounting The Camera
Mounting the Camera The Ronin-MX uses an adjustable camera mounting plate that allows you to easily balance, install, and remove the camera. The Ronin-MX has been tested with the following types of cameras. -
Page 13: How To Mount The Camera
Certain cameras have a very tight lens securing system, and some cameras such as the Canon 5D MKII and MKIII have very loose lens securing systems. The Ronin-MX balances the camera as one solid unit. If the mounted camera has a loose lens securing system, the lens support must be used. -
Page 14: Configuring The Handle Bar
Note: You can adjust the tightness of the clamp with an M3 Allen wrench. Configuring the Handle Bar The customizable handle bar of the Ronin-MX can be removed, if necessary. Loosen the two grip screws where the handle bar meets the gimbal then remove the grips from the handle bar. You can remove one or both sides of the handle bar. -
Page 15: Balancing
Balancing To obtain the best performance from the Ronin-MX, proper balancing is a must. Accurate balance is critical for shots where the Ronin-MX will be subjected to extreme movements or accelerations (running, horseback riding, biking, car mounts, helicopters, etc.) Proper balance will also offer a longer battery runtime. -
Page 16: Step 3: Balancing The Tilt Axis
1. Open the clamp [1] on the pan axis and turn the knob [2] to slide the assembly. Identify if the Ronin-MX is front heavy or rear heavy. Rotate the Ronin-MX on the stand so one side is higher than the other, if the front end rotates from the higher position to the lower position and that means the Ronin-MX is currently front heavy, then you will need to slide the gimbal backward, otherwise you need to slide the gimbal forward. -
Page 17: Advanced Roll Adjustment
2. Ensure that Bluetooth is enabled on your mobile device and orient the camera in the standard operating position (facing forwards). Turn on your Ronin-MX, then launch the DJI Assistant App. 3. When using the DJI Assistant app for the first time, you will be prompted to register using a valid e-mail address. -
Page 18: Basic Settings
The green LED on the Ronin-MX will also light up. 5. Activation is required when use the Ronin-MX for the first time, otherwise the gimbal will not work. To activate your Ronin-MX, connect your mobile device to Internet, then enter the ‘More’... - Page 19 The steering/translation speed can be adjusted for each axis independently. When the Ronin-MX's top bar is rotated left or right, the camera will move, smoothly following the user’s input, and stop at the appropriate angle. In the SmoothTrack options menu, the settings for the pan axis, roll axis and the tilt axis can be independently adjusted.
-
Page 20: Advanced Settings
Stiffness, Strength, Outfilter and Control value. The Auto Tune Stability button allows for automatic adjustment of each motor’s stiffness (as relayed from the sensors and interpreted by the Ronin-MX) to accomplish an optimized setting. Besides the stiffness, there are other electronic settings being tuned. - Page 21 Maximum Speed is a function that prevents the control stick response from being a linear response, which is also known as an increasing response curve. This means the amount that the gimbal moves on the pan or tilt axis is not directly proportional to control stick manipulation. ©2016 DJI. All Rights Reserved.
- Page 22 The channel indicator provides feedback during remote operator configuration. Pan, tilt, and roll can be re-assigned to either of the remote control sticks. Each axis can also be reversed. 6. Settings Controller Priority: If both input devices simultaneously send control signals to the gimbal, the input ©2016 DJI. All Rights Reserved.
- Page 23 Power is indicated for each axis. The current angle of each axis is also indicated. The voltage of the battery, temperature of the main electronics, and also current uptime can also be monitored via this menu. ©2016 DJI. All Rights Reserved.
- Page 24 Ronin-MX is tilted past the standard roll axis parameters. Motor Kill When the motor kill switch is activated, the Ronin-MX is still powered on, but the motors will be powered off. This will allow an adjustment to the gimbal or camera without having to turn it off completely.
-
Page 25: Dji Pc / Mac Assistant Tuning
Car Mode Enable the Car Mode when use the Ronin-MX on a car or jib. In this mode, the gimbal will not drift when the car is turning at high speed, so that the footage will be stay steady. Ensure the Ronin-MX is working on Underslung Mode when using Car Mode. -
Page 26: Install Dji Pc / Mac Assistant
1. Download the DJI WIN DRIVER INSTALLER from the Ronin-MX product page on DJI.com. Connect the Ronin-MX to your PC via the provided USB cable and be sure the Ronin-MX is powered on prior to installing the DJI WIN DRIVER. -
Page 27: Settings
Adjust the following basic functions before using the Ronin-MX: Camera Type, Briefcase Mode, SmoothTrack, and Maximum Speed Adjustment. The definition and function of every button in the DJI Assistant app and DJI PC Assistant are the same, refer to the section describing the DJI Assistant app for more details. - Page 28 Reset Password: If you forgot your Bluetooth connection password, click here to reset your password. Calibrate Center: If the Ronin-MX’s pan axis is off center, you can recalibrate the true center of the Ronin-MX using this switch. Using a remote control, position the pan axis at dead center, then click the Calibrate Center button.
- Page 29 Speed Toggle Presets for SmoothTrack will take precedence over the Assistant settings. Once the remote control is turned off, the SmoothTrack settings in the Assistant will take over. 3. Channels ©2016 DJI. All Rights Reserved.
- Page 30 This is a channel indicator to provide feedback during remote operator configuration. Pan, tilt, and roll can be re-assigned to either of the remote control sticks. The controlled axis can also be reversed. 4. Battery This page provides all of the essential information regarding the Ronin-MX’s battery. ©2016 DJI. All Rights Reserved.
- Page 31 You can view the latest firmware version information on this page. Upgrade the firmware by following the steps below: 1. Connect the Ronin-MX to your computer via the Micro USB cable and wait until the indicator LED in the DJI Assistant blinks blue.
- Page 32 Info The Ronin-MX must be activated for the first time usage. Click the Activate button to activate your Ronin-MX, otherwise the gimbal will not work. You can check which version of the DJI Assistant you are using in the Info tab.
-
Page 33: Remote Control Operation
Connecting the Remote Control to the Ronin-MX 1. Turn on the Ronin-MX. 2. Press the Bind Button (shown below) of the Ronin-MX once. The Ronin-MX’s LED indicator will blink green quickly at that time. 3. Slide the power switch to the right to power on the remote control. If the LED of gimbal turns solid green light, the remote control and the Ronin-MX have been successfully bound. -
Page 34: Remote Control Power Led Indicator Status
Charge the battery as soon as possible when the low voltage alert appears or sounds. Remote Control Battery Level Indicator Status The battery level indicator displays the current battery level. The following is a description of the indicators. ©2016 DJI. All Rights Reserved. -
Page 35: Remote Control Features
There are three operation modes for the Ronin-MX: Underslung Mode, Upright Mode and Briefcase Mode. Underslung Mode Underslung Mode is the standard, default mode. The Ronin-MX can be used in this mode without any adjustments. ©2016 DJI. All Rights Reserved. -
Page 36: Upright Mode
Briefcase Mode Briefcase Mode allows you to hold the Ronin-MX in a slim profile close to your body. To use Briefcase Mode, tilt the gimbal 90˚ to the left or right on the roll axis. You can turn Briefcase Mode off in the DJI Assistant app, in which case the Ronin-MX will never automatically transform into Briefcase Mode. -
Page 37: Using With Matrice 600
Using with Matrice 600 Mounting the Ronin-MX onto Matrice 600 Before mounting the Ronin-MX onto a Matrice 600, ensure the camera is mounted securely on the Ronin-MX and the balancing is adjusted properly. 1. Remove the Matrice 600 ‘s upper cover and lower cover of the center frame and the expansion mounting kit. - Page 38 3. Mount the vibration absorber onto the bottom of the Matrice 600 with the lock-Knob facing forward, then tighten the 12 vibration absorber screws. 4. Slide the gimbal into the gimbal connector of the vibration absorber, then tighten the lock- knob. ©2016 DJI. All Rights Reserved.
-
Page 39: Dji Go App Tuning
5. Connect the CAN 2 port on the Ronin-MX and the CAN 1 port on the Matrice 600’s main controller by using the CAN bus cable. Note that the CAN bus cable must be pulled through the hole on the center frame. - Page 40 The Deadband, Maximum Speed and the Smoothing can be adjust separately for pan and tilt axis control. Endpoint Settings The endpoint for the pan and tilt axis can be adjust to limit the maximum left/right or up/down angle. ©2016 DJI. All Rights Reserved.
-
Page 41: Remote Controller Operation
Tap to allow the camera mounted invert on the gimbal. Motor Kill When the motor kill switch is activated, the Ronin-MX is still powered on, but the motors will be powered off. This will allow an adjustment to the gimbal or camera without having to turn it off completely. -
Page 42: Adding A Third-Party Transmitter/Receiver
Ronin-MX on again. The Ronin-MX is a precise machine and is not waterproof. Keep it away from sand and dust when in use. After use, it is recommended that you wipe the Ronin-MX down with a soft dry cloth. Never spray any cleaning liquids onto the Ronin-MX. -
Page 43: Troubleshooting
Calibrate Center and follow the on-screen instructions. Ronin-MX seems to be Place the Ronin-MX on the Tuning Stand and enter the DJI drifting Assistant App or the DJI PC/MAC Assistant. Tap/click the Calibrate System button and let the process finish before picking up the Ronin-MX. -
Page 44: Specifications
Maximum height measured from top of the camera base plate: 130 mm Maximum width: 160 mm Accessory Power Connections 12V Regulated P-Tap x 2; USB 500mW x 1; DJI Lightbridge x 1 GCU Input Power Intelligent Battery: 423496-1580 mAh-14.4 V Connections 2.4 GHz Remote Control;... -
Page 45: Compliance Notice
—Consult the dealer or an experienced radio/TV technician for help. RF Exposure Information This equipment complies with FCC radiation exposure limits set forth for an uncontrolled environment. In order to avoid the possibility of exceeding the FCC radio frequency exposure limits, ©2016 DJI. All Rights Reserved. -
Page 46: Ic Rss Warning
KCC Warning Message “해당무선설비는 운용 중 전파혼신 가능성이 있으므로 인명안전과 관련된 서비스는 할 수 없습니다.” “해당 무선설비는 운용 중 전파혼신 가능성이 있음” NCC Warning Message 低功率電波輻射性電機管理辦法 第十二條 經型式認證合格之低功率射頻電機,非經許可,公司、商號或使用者均不得擅自 變更頻率、加大功率或變更原設計之特性及功能。 ©2016 DJI. All Rights Reserved. -
Page 47: Eu Compliance Statement
率射頻電機須忍受合法通信或工業、科學及醫療用電波輻射性電機設備之干擾。 EU Compliance Statement SZ DJI TECHNOLOGY CO., LTD. hereby declares that this device is in compliance with the essential requirements and other relevant provisions of the R&TTE Directive. A copy of the EU Declaration of Conformity is available online at www.dji.com/euro-compliance...
Need help?
Do you have a question about the RONIN-MX and is the answer not in the manual?
Questions and answers