
Subscribe to Our Youtube Channel
Related Manuals for Edwards AIM-SI1-NW25


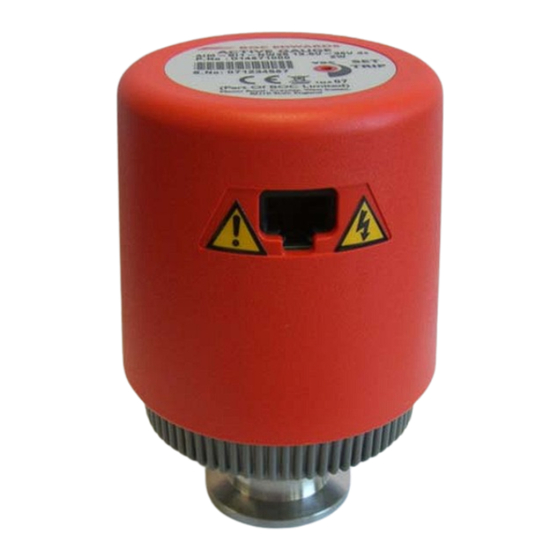
Summary of Contents for Edwards AIM-SI1-NW25
- Page 1 D146-71-880 Issue E Instruction Manual Industrial Active Inverted Magnetron Gauge Description Item Number AIM-SI1-NW25 D146-71-000 AIM-XI1-NW25 D146-72-000 AIM-SLI1-NW25 D146-74-000 AIM-XLI1-NW25 D146-75-000 Original Instructions...
- Page 2 Declaration of Conformity Edwards Limited, Crawley Business Quarter, Manor Royal, Crawley, West Sussex, RH10 9LW, UK declare under our sole responsibility, as manufacturer and person within the EU authorised to assemble the technical file, that the product(s) AIM-SI1-NW25 D146-71-000 AIM-XI1-NW25...
- Page 3 Spares ........................19 Accessories ....................... 19 Index ....................21 For return of equipment, complete the HS Forms at the end of this manual. © Edwards Limited 2015. All rights reserved. Page i Edwards and the Edwards logo are trademarks of Edwards Limited.
- Page 4 Page Pins on the AIM gauge electrical connector socket ..............7 Pressure and voltage characteristics for nitrogen and dry air ...........10 Page ii © Edwards Limited 2015. All rights reserved. Edwards and the Edwards logo are trademarks of Edwards Limited.
- Page 5 The AIM Gauge requires a 13.5 to 36 V d.c. power supply; it has a 2 to 10 V d.c. analogue output which is related to pressure. The AIM Gauge is compatible with all of the Edwards TIC (Turbo Instrument Controller), ADD (Active Digital Display) and with the appropriate versions of the Edwards AGD’s (Active Gauge Displays).
- Page 6 D146-71-880 Issue E Note: If you use an Edwards TIC Controller, ADD Controller or AGD Display, the AIM Gauge set-point output signal is not used. Gas dependency The ionisation of the gas in the vacuum system is dependent on both the pressure and the physical properties of the gas.
- Page 7 40 V d.c., 100 mA max Set-point trip level Range 1.8 to 10.0 V Minimum load impedance 200 k Hysteresis 500 mV © Edwards Limited 2015. All rights reserved. Page 3 Edwards and the Edwards logo are trademarks of Edwards Limited.
- Page 8 Stainless steel (AISI 304, 416 and 347) Fluoroelastomer Soda lime glass Figure 2 - Dimensions (mm) 1. Clearance required for electrical cable Page 4 © Edwards Limited 2015. All rights reserved. Edwards and the Edwards logo are trademarks of Edwards Limited.
- Page 9 Connect the AIM Gauge to the controller or display with a cable which is terminated in suitable connectors. Suitable cables are available from Edwards (refer to Section © Edwards Limited 2015. All rights reserved. Page 5 Edwards and the Edwards logo are trademarks of Edwards Limited.
- Page 10 7. Gauge enable switch 2. Cable electrical connector plug 8. Voltmeter (set-point trip level) 3. Electrical supply 4. Voltmeter (pressure signal) Page 6 © Edwards Limited 2015. All rights reserved. Edwards and the Edwards logo are trademarks of Edwards Limited.
- Page 11 Electrical supply positive voltage Electrical supply common Pressure measurement output signal Gauge identification signal Signal common Set-point output signal Gauge enable Set-point trip level © Edwards Limited 2015. All rights reserved. Page 7 Edwards and the Edwards logo are trademarks of Edwards Limited.
- Page 12 D146-71-880 Issue E This page has been intentionally left blank. Page 8 © Edwards Limited 2015. All rights reserved. Edwards and the Edwards logo are trademarks of Edwards Limited.
- Page 13 Gauge, disconnect pin 7 from pin 2 (or from ground). Pressure measurement If you connected the AIM Gauge to an Edwards Controller, the pressure measured by the AIM Gauge is shown on the display. If you connected the signal output of the AIM Gauge to a voltmeter, convert the measured voltage to the corresponding pressure value: for AIM-SI1 and AIM-SL1, refer to Table 2;...
- Page 14 Set-point Note: The set-point is not used if you connect the AIM Gauge to an Edwards Controller. To adjust the voltage at which the set-point output signal goes on, turn the set-point potentiometer, which is accessible through an access hole in the end cap of the gauge: see Figure 1.
- Page 15 1.7 x 10 9.80 1.3 x 10 3.6 x 10 9.90 2.7 x 10 1.0 x 10 10.00 7.5 x 10 © Edwards Limited 2015. All rights reserved. Page 11 Edwards and the Edwards logo are trademarks of Edwards Limited.
- Page 16 D146-71-880 Issue E This page has been intentionally left blank. Page 12 © Edwards Limited 2015. All rights reserved. Edwards and the Edwards logo are trademarks of Edwards Limited.
- Page 17 Refit the AIM Gauge to the vacuum system as described in Section 3.2 and refit the cable connector plug to the socket on the AIM Gauge (7). © Edwards Limited 2015. All rights reserved. Page 13 Edwards and the Edwards logo are trademarks of Edwards Limited.
- Page 18 Section 4. Fit the body tube to the new magnet housing and end-cap. Refit the AIM Gauge to the vacuum system. Page 14 © Edwards Limited 2015. All rights reserved. Edwards and the Edwards logo are trademarks of Edwards Limited.
- Page 19 If the AIM Gauge does not operate correctly, ensure that the electrical connections are correct (refer to Section and ensure that your electrical supply is suitable for the AIM Gauge (refer to Section © Edwards Limited 2015. All rights reserved. Page 15 Edwards and the Edwards logo are trademarks of Edwards Limited.
- Page 20 D146-71-880 Issue E This page has been intentionally left blank. Page 16 © Edwards Limited 2015. All rights reserved. Edwards and the Edwards logo are trademarks of Edwards Limited.
- Page 21 Dispose of the AIM Gauge and any components safely in accordance with all local and national safety and environmental requirements. Alternatively, you may be able to recycle the AIM Gauge and/or cables; Contact Edwards or your supplier for advice (also see below).
- Page 22 D146-71-880 Issue E This page has been intentionally left blank. Page 18 © Edwards Limited 2015. All rights reserved. Edwards and the Edwards logo are trademarks of Edwards Limited.
- Page 23 When you maintain this Edwards product, we recommend you use only Edwards maintenance and service kits. Order spare parts and accessories from your nearest Edwards company or distributor. When you order, please state for each part required: Model and Item Number of your equipment.
- Page 24 D146-71-880 Issue E This page has been intentionally left blank. Page 20 © Edwards Limited 2015. All rights reserved. Edwards and the Edwards logo are trademarks of Edwards Limited.
- Page 25 Remove the AIM gauge from the vacuum system ... 13 Replace the body tube ......... 13 Replace the electrode assembly ...... 14 Replace the electronics and magnet housing ..14 © Edwards Limited 2015. All rights reserved. Page 21 Edwards and the Edwards logo are trademarks of Edwards Limited.
- Page 26 D146-71-880 Issue E This page has been intentionally left blank. Page 22 © Edwards Limited 2015. All rights reserved. Edwards and the Edwards logo are trademarks of Edwards Limited.
Need help?
Do you have a question about the AIM-SI1-NW25 and is the answer not in the manual?
Questions and answers