Q-See QT Series Manual
High definition home and business security camera system ip hd
Hide thumbs
Also See for QT Series:
- User manual (89 pages) ,
- Remote monitoring setup manual (78 pages) ,
- Quick start manual (12 pages)
Table of Contents
Advertisement
Advertisement
Table of Contents

Related Manuals for Q-See QT Series


Summary of Contents for Q-See QT Series
- Page 1 QT IP HD High Definition Home and Business Security Camera System...
-
Page 2: Table Of Contents
Connect Mouse Wizard Glossary Connect to Router Troubleshooting Download Mobile App Technical Support and Resources Powering up the NVR Startup Wizard QT View Mobile App QT View on a Computer Installing Your Cameras Getting the Most Out of Your Q-See Cameras... - Page 3 On behalf of our entire team, thank you for trusting Q-See to be your choice for your personal surveillance needs.
-
Page 4: Warranty
Warranty To Activate Your 2-Year Limited Warranty You Must Create An Account At: www.Q-See.com/welcome We’re right here should you ever need assistance with your Q-See purchase. Creating an account gives you access to: 1. The free QT View mobile app 3. -
Page 5: Understanding Your System
Understanding Your System What’s Included In Your Smart Surveillance Bundle Camera Cables Cameras 100’/30m Ethernet Cables One for each camera NVR Cables Power Supply Your system will include one of the options below HDMI Cable Colors on the back of the NVR are for reference only. Network Cable This connects your... -
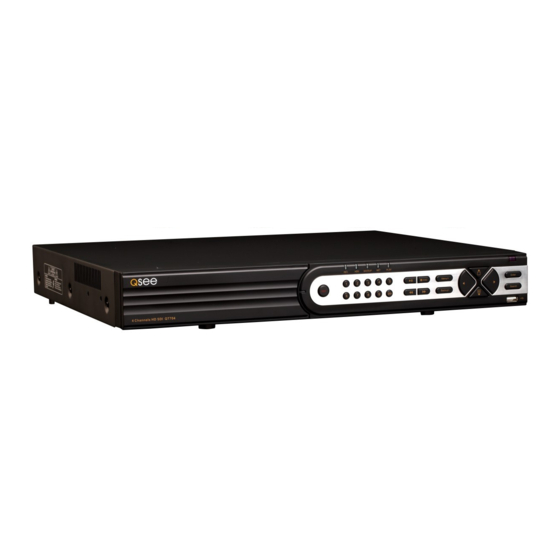
Page 6: Understanding Your Nvr: Front Panel
Understanding Your NVR: Front Panel NOTE: Your NVR model may differ from that shown in this illustration. LED Indicators: Show status Menu/+ : Increase the Direction: of power, HDD, record, etc. value in SETUP. Enter Navigate through menu in LIVE VIEW on-screen options Enter: BACKUP... -
Page 7: Understanding Your Nvr: Rear Panel
Understanding Your NVR: Rear Panel NOTE: Your NVR model may differ from that shown in this illustration. Not all features may be present. Colors are for reference only. Audio In: POE Ports: Powers Audio Output: RCA connection USB: Connect Single channel RCA High Definition cameras for audio output –... -
Page 8: Setting Up Your System
Setting Up Your System Step 1: Create Your Account Step 2: Connect Your Cameras Go to www.Q-See.com/welcome and follow the easy A. Plug one end of the camera cable into the network steps to create your account. socket on the camera. Make sure that you hear a “click”... - Page 9 B. Plug the RJ45 connector on the other end of the Repeat steps A-B for each camera. camera cable into an available Video-In POE port on the back of the NVR. You will hear a click when the Cameras will appear on screen in Live View in the cable is properly inserted.
-
Page 10: Connect Nvr To Display
Step 3: Connect NVR to Display Choose video display option A or B: Option B: VGA Monitor Option A: HDMI A. Plug a VGA cable (not included) into the A. Plug the included HDMI cable into the NVR’s VGA port. NVR’s HDMI port. -
Page 11: Connect Mouse
Step 4: Connect Mouse Step 5: Connect To Router Plug the mouse into the USB port on the back of the A. Plug the included Network (Ethernet) cable into the NVR. If your model has two USB ports on the back, Network (LAN) port on the back of the NVR. -
Page 12: Download Mobile App
Step 6: Download the Step 7: Powering up the NVR QT View Mobile App A. Plug the NVR power supply cord into the DC+48V Port on the back of the NVR. Before starting the NVR, download our free B. Plug the power supply or power adapter QT View mobile app to your mobile device. -
Page 13: Startup Wizard
Step 8: Startup Wizard Wizard ATTENTION: In order to effectively use the search function and maintain Language English accurate recordings, you must complete the Startup Wizard. Next A. Set your desired language in the first window. Wizard The NVR will restart and continue Admin Password Setup in your chosen language. - Page 14 password. Edit Security Question Previous Next Cancel Next Wizard Wizard Date and Time Admin Password Setup Time Zone GMT-12 West of the International User name admin System Time 01/24/2016 04:18:42 New Password 123456 Date Format Month/Day/Year Confirm Password 123456 Time Format 24-Hour Display Password Log in Automatically...
-
Page 15: Qt View Mobile App
Ethernet Port 1 (Online) Obtain an IP address automatically IP Address 1 9 2 1 0 1 8 1 9 9 6 2 Previous Next Cancel Subnet Mask 2 5 5 2 5 5 2 5 5 Step 9: QT View Mobile App Gateway 1 9 2 1 0 1... - Page 16 B. Once you have launched the QT View Mobile App, D. Once scanned, the App will return to the Login Tap on the QR Code Scan icon. Screen. The NVR’s ID will appear in the SN (serial number) section. Enter the Account (User Name) Add device Add device and your new password.
-
Page 17: Qt View On A Computer
D. Click on Login to begin viewing your cameras. G. In the Control Panel, click Add Device. H. QT View will automatically scan your network for any ATTENTION: Search “QT View” at NVRs connected to it. www.Q-See.com/support for more info. - Page 18 Get the Most Out of Your Q-See Cameras Follow these tips to maximize the life and performance of your cameras. Avoid direct exposure to weather Distance from viewing/recording device Mount your camera under an eave or awning if possible. Mounting surface thickness...
- Page 19 Light levels should be approximately the Do not place camera behind a window same between camera and target area Do not place near high voltage wires or other sources of electrical interference Legal Considerations Always check state and local laws before installing cameras. (2011 NEC 820.44)
-
Page 20: Understanding Your Menu Bar
Understanding Your Menu Bar Menu Bar Account: Shows which user is logged in. The NVR’s on-screen menus are accessed Search and Save: Search for recorded video, play through the Menu Bar which appears when the it back and save it to an external USB drive. mouse is moved to the bottom of the screen. -
Page 21: On-Screen Keyboard
On-Screen Keyboard When a field in a window needs text entered into Text is entered by pointing at each character with it - such as a password - the On-Screen Keyboard the cursor and clicking with the mouse. will open up when the field is clicked. Delete Enter Shift... -
Page 22: Video Search, Playback And Backup
Video Search, Playback and Backup Once you’ve found the desired video, you can play it back and then save your files to a removable USB flash drive Your NVR records video in a format that is easily playable on your computer. Admin captured by your cameras to its internal hard drive. - Page 23 Searching by Time Search and Save By Time By Event Snapshots A. Set the start and end times of your 01/24/2016 04:18:42 01/24/2016 04:38:42 search. Search and Save By Time By Event Snapshots B. Select which camera(s) to search. Camera001 Camera002 01/24/2016 04:18:42 C.
- Page 24 Searching by Event Search and Save By Time By Event Snapshots A. Set the start and end times of your 01/24/2016 04:18:42 01/24/2016 04:38:42 search. Search and Save Search and Save By Time By Event Snapshots By Time By Ev B.
- Page 25 01/24/2016 04:18:42 Searching by Snapshot 01/24/2016 04:38:42 Search and Save By Time By Event Snapshots A. Set the start and end times of your 01/24/2016 04:18:42 01/24/2016 04:38:42 search. Camera002 Camera002 B. Select which camera(s) to search. Camera002 Camera002 Camera002 Camera002 C.
-
Page 26: The Settings Menu
The Settings Menu D. Select the setting you want to change from the menu tiles. Most of the day-to-day functions use the icons in the Menu Bar. The Settings Menu is used to control how your Recorder operates - schedules, users, notifications, etc. Camera Record Alarm... -
Page 27: Date And Time
Date and Time B. Automatic time synchronizing must be disabled to modify specific time settings. Setting the Date and Time Click on Synchronous and select Manual ATTENTION: The date and time were C. Select your Time Zone set up in the Startup Wizard. If you have an incorrect date or time, first check the settings to see if the time zone is correct. - Page 28 G. A message will appear to confirm that any backups D. To modify the date and time, click the Clock icon or playback will stop in order to modify the time. General Settings Date and Time Output Settings Click OK. Date and Time General Settings Date and Time...
-
Page 29: Passwords And Users
Passwords and Users B. Enter the Current Password Record Alarm Default Password: 123456 Changing a Password Edit Camera Encode Parameters Sensor Alarm Alarm-Out C. Enter your New Password and re-enter in the Confirm Motion PTZ Record Schedule Advanced Motion Alarm A. - Page 30 Record Alarm Setting Up the Password Recovery Tool D. Enter the desired Question and Answer using the Edit Camera Encode Parameters Sensor Alarm Alarm-Out On-Screen Keyboard Motion PTZ Record Schedule Advanced Motion Alarm A. Select Account and Authority in the Account and Authority tile.
- Page 31 Recovering a Lost Password C. Select a Question and enter the answer you saved. D. Click OK ATTENTION: You must have already configured the Password Recover Tool. Admin Retrieve Password (see previous page) Question Dynamic Password Search and Save A. Click Login in the Start Settings Menu Question...
- Page 32 Record Alarm Edit Camera Encode Parameters Sensor Alarm Alarm-Out Adding a User B. Enter the new User Name Motion PTZ Record Schedule Advanced Motion Alarm A. Select Add User in the Account and Authority tile. C. Enter the New Password and re-enter in the Confirm Password field.
- Page 33 Password Enter Password Confirm Password Enter Password E. Select the desired group for this user. Add a comment about this user, if desired. Display Password E-mail G. Click Add. Group Admin Bind MAC Advanced Add User Remark Ordinary Username Enter Username ATTENTION: Each Group has a default Cancel set of accessible functions for its users:...
-
Page 34: Recording
Recording B. Choose which camera you want to modify by clicking its thumbnail image on the right. Motion Detection Area Motion Settings ATTENTION: Your system is factory-set Cam1 to record whenever motion is detected Cam2 by the camera. These instructions are to Cam3 help you specify the area(s) you want to Cam4... - Page 35 Cam4 Reverse Clear C. Click and drag with the mouse in the camera view to D. Repeat for any additional cameras and then click Apply. Cam5 remove or add areas of motion sensitivity. Camera Cam1 The blue animation below the camera view provides a Motion demonstration.
- Page 36 Setting the Motion Detection Recording Schedule To schedule ALL cameras B. Select Edit in the Motion Detection Schedule pull down. ATTENTION: Your system is factory-set Live Display Camera Record Alarm Network to record whenever motion is detected at Mode Settings Schedule Config Advanced any time.
- Page 37 G. Click Apply. D. Select the icon. E. Click and drag with the mouse to remove (turn off recording) specific times. Record Live Display Camera Record Alarm Network Account and Authority System Mode Settings Schedule Config Advanced Record Mode Settings Click OK.
- Page 38 To schedule ONE camera B. Select the icon. A. Click on the icon for the camera you want to schedule under the Motion Detection. C. Click and drag with the mouse to remove (turn off recording) specific times. D. Click OK. Edit Schedule Live Display Camera...
- Page 39 E. Click Apply. ATTENTION: When motion is detected, a yellow Motion Indicator and a red Recording Indicator will appear in the upper right corner of the camera’s Live Live Display Camera Record Alarm Network Account and Authority System edule Config Advanced Preview window.
-
Page 40: Qt View Mobile App
QT View Mobile App Settings: Change settings on your system, change app settings, find saved files and more. Understanding the Controls Favorites: Saved selected channels or channel combinations as favorites and select those when opening the app. Settings Favorites Live System: Choose which DVR/NVR to view. - Page 41 Remote Playback C. Scroll left or right to find the desired time. Tap on the To access video on your system’s hard drive: date to choose a different day. Recorded events are shown as color blocks on the timeline (see below). A.
-
Page 42: Resources / Appendix
Resources / Appendix Wizard Glossary DST (Daylight Savings Time): Set DST to change where applicable. Click “Set” to enter the start and end dates. Make sure the box is checked. NTP (Network Time Protocol): This maintains the accuracy of the NVR’s clock. Check the box to turn on. Language: This is the language the NVR will use. -
Page 43: Troubleshooting
• Connect the camera to a cable that has a working camera attached. If the camera works, the cable will need to be replaced through the RMA process at www.Q-See.com/support. • Connect the cable to a different channel on the NVR. If you see video, then the culprit is a bad channel input and the... - Page 44 You will which is available at www.q-see.com. need to reposition the camera outside the window. Dark video image. Some cameras feature an infrared Camera video is very dark during one time of day, cut filter to improve daytime video images.
- Page 45 Troubleshooting Network Troubleshooting. Check that the network cable is properly connected to the LAN port on the back of your NVR and to a network port on your router. The lights on both ports should blink occasionally to indicate that data is being transmitted. If the cable is properly connected, but no data is transmitting, replace the cable or try another port on the router.
- Page 46 Notes...
- Page 47 Notes...
-
Page 48: Technical Support And Resources
24/7 Online Support Portal and Knowledge Base www.q-see.com/support How–To’s Repairs and Returns Firmware Updates Support Videos Manuals and Guides Software Additional Support Live Phone Support Chat Support Languages Mon-Fri : 6AM–7:00PM PST Mon-Fri: 6AM–7PM PST English, Spanish 1-877-998-3440 Sat-Sun 9AM–5PM PST...
Need help?
Do you have a question about the QT Series and is the answer not in the manual?
Questions and answers