Table of Contents
Advertisement
Available languages
Available languages
Quick Links
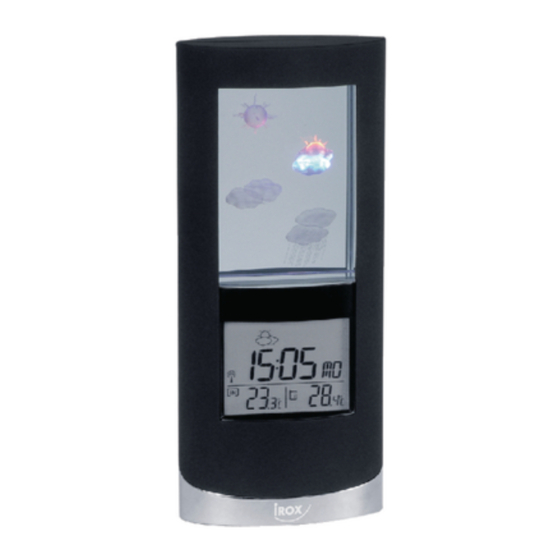
EBR808C
Beschreibung der Anzeige
A. Infrarot (IR) Bewegungsdetektor
Dies ist ein berührungsfreier Kontakt. Mit einer Handbewegung innerhalb des Empfangsbereichs von
bis zu 7cm werden das Hintergrundlicht und/oder die Snooze Funktion aktiviert
B. Wetterprognose Anzeige
Zeigt die Wetterprognose an
C. Alarm Anzeige
Zeigt den aktivierten Alarm an
D. Batterie „leer" Indikator Hauptgerät
Zeigt an, dass die Batterien des Hauptgerätes leer sind und sofort mit neuen ersetzt werden sollten
E. Funkuhr Empfang Anzeige
Zeigt den Empfangs-Status der Funkuhr an
F. Uhr Anzeige
Zeigt die aktuelle Zeit und Sekunde, aktuelle Zeit und Wochentag, Datum oder Alarm Zeit an
G. Innen Thermo Anzeige
Zeigt die aktuelle Innen Temperatur an
H. Innen Min. / Max. Indikator
Zeigt an, dass aktuell die min. oder Max. Innen Temperatur in der Anzeige erscheint
I. Aussen Thermo Anzeige
BEDIENUNGSANLEITUNG
~P.1~
(DE)
Advertisement
Table of Contents

Related Manuals for IROX EBR808C


Summary of Contents for IROX EBR808C
- Page 1 EBR808C BEDIENUNGSANLEITUNG Beschreibung der Anzeige A. Infrarot (IR) Bewegungsdetektor Dies ist ein berührungsfreier Kontakt. Mit einer Handbewegung innerhalb des Empfangsbereichs von bis zu 7cm werden das Hintergrundlicht und/oder die Snooze Funktion aktiviert B. Wetterprognose Anzeige Zeigt die Wetterprognose an C. Alarm Anzeige Zeigt den aktivierten Alarm an D.
-
Page 2: Beschreibung Der Tasten
Zeigt den ausgewählten Kanal (1-3) und die dazugehörende Aussen Temperatur an J. Autoscroll Indikator Zeigt an, dass aktuell die Werte aller Aussensensoren abwechselnd in der Anzeige gezeigt werden (Channelscan) K. Aussen Min. / Max. Indikator Zeigt an, dass aktuell die Min. oder Max. Aussen Temperatur für einen ausgewählten Kanal in der Anzeige erscheint L. -
Page 3: Bitte Beachten
2. Installation der Batterien am Funk-Sensor und Registrierung des Funk-Sensors oder eines Zusatz-Funksensors 1. Entfernen Sie die durchsichtige Schutzhülle des Funk-Sensors durch eindrücken der Arretierungen links und rechts unten mit einem spitzen Gegenstand. 2. Öffnen Sie das Batteriefach durch Aufschieben der Batteriefach-Abdeckung 3. - Page 4 Sonneneinstrahlung, Regen oder Schnee ausgesetzt sind. Bitte beachten Nach dem Sie den Funk-Sensor am gewünschten Ort platziert haben, beobachten Sie beim Hauptgerät die empfangenen Temperatur-Daten für den Sensor während ca. 11 Minuten. Falls in dieser Zeit die Temperatur- Anzeige des Funk-Sensors in der Anzeige verschwindet und die --.- Anzeige blinkt, ist das Signal verloren gegangen.
-
Page 5: Einstellen Des Alarms
Drücken und halten Sie die [ ] Taste für 3 Sekunden, danach drücken Sie sofort erneut (ohne halten) die [ ] Taste, der Funkempfang stoppt und das Funkturm-Symbol bleibt ohne Funkwellen stehen. Der Funkempfang kann dann manuell wie oben beschrieben wieder gestartet werden. Bitte beachten: Die Funkuhr schaltet sich in jedem Fall (ausser die Wetterstation befindet sich ausserhalb des Empfangsbereichs des Senders) während den frühen Morgenstunden automatisch wieder ein. - Page 6 Die Wetterprognose wird mit folgenden Symbolen dargestellt: Hintergrundbeleuchtung (LCD und 3D Wettersymbole) Auswahl der Betriebsart mit dem Schiebeschalter [ BACKLIGHT ] Betrieb mit Netzadapter oder Netzadapter + Batterien: “AUTO” = Die Hintergrundbeleuchtung wird je nach eingestelltem lntervall automatisch eingeschaltet. Um das Intervall einzustellen, nehmen Sie folgende Einstellungen Vor: - Schiebeschalter auf Position “AUTO”...
-
Page 7: Description De L'affichage
EBR808C MODE D’EMPLOI DESCRIPTION DE L’AFFICHAGE A. Détecteur de mouvement infrarouge (IR) Cette interface ne nécessite aucun toucher. Le rétroéclairage et / ou la fonction snooze sont activés par un mouvement de la main dans la portée de détection de 7 cm. -
Page 8: Description Des Touches
I. Affichage du thermomètre extérieur Affiche le canal sélectionné (1-3) J. Indicateur autoscroll Indique qu’actuellement les valeurs de tous les capteurs externes (par ex canal 1-3) sont affichées à l’écran alternativement (channelscan) K. Indicateur extérieur Min / Max Indique qu’actuellement la température extérieures min- / max. du canal sélectioné se trouvent à l’écran L. - Page 9 1. Otez la douille transparente du capteur en appuyant sur le verrouillage en bas à gauche et droite au moyen d’un objet pointu. 2. Ouvrez le compartiment à piles en faisant glisser le couvercle 3. Insérez 2 piles de type AAA 1,5V en respectant les polarités. L’indicateur LED à l’avant du capteur commence à...
- Page 10 Observation Une fois que vous avez placé le détecteur à l’endroit désiré, prenez le temps d’observer les données de températures sur l’unité principale durant environ 11 minutes. Si, durant ce laps de temps, l’affichage de la température du détecteur disparaît et que --.- se met à clignoter, cela indique que le signal a été perdu. Essayer de faire pivoter le détecteur de 45°...
-
Page 11: Réglage De L'alarme
Remarque L’horologe radiocontrôlée s’enclenche, dans tous les cas (sauf si la station météo se trouve hors de portée de l’émetteur) automatiquement dans les premières heures du matin. Réglage de l’heure et du calendrier, format d’affichage et langue 1. Pressez la touche [ CLOCK ] durant 3 secondes, 12 ou 24 heures clignote. 2. - Page 12 Rétroéclairage (LED et symboles meteo 3D) Choix du mode de fonctionnement avec le commutateur [ BACKLIGHT ] Fonctionnement avec l’adaptateur secteur ou adaptateur + piles : “AUTO” = Le rétroéclairage s’active durant quelques secondes selon un intervalle prédéfini. Pour sélectionner l’intervalle désiré, veuillez suivre les instructions suivantes: le commutateur doit se trouver en position “AUTO”...
- Page 13 EBR808C MODO DI USO A. Rivelatore infrarosso di movimento IR Non è necessario tocarlo: la luce posteriore e/o la funzione snooze sono attivate con un movimento della mano nella portata di rivelazione di 7cm B. Affissione delle previsioni meteorologiche Indica le previsioni meteorologiche C.
-
Page 14: Descrizione Dei Tasti
Affige il canale selezionato (1-3) J. Indicatore autoscroll Indica che attualmente I valori di tutti sensori esterni (per es. Canale 1-3) sono affissi alternativamente allo schermo K. Indicatore esterno min. / max. Indica che attualmente, la temperatura esterne min. / max. del canale selezionato (1-3) si trovano allo schermo L. - Page 15 1. Togliere la busta trasparente del sensore premendo sulla chiusura sotto a sinistra e destra con un ogetto aguzzo. 2. Aprire lo scompartimento a pile facciando scivolare il coperchio 3. Inserire 2 pile di tipo AAA 1,5V portando attenzione alle polarità. L’indicatore LED alla parte anteriore del sensore comincia a lampeggiare e indica che il canale 1 è...
- Page 16 principale e ripetere le tappe fino a che le date di temperatura siano di nuovo costante. Per iniziare una sincronizzazione forzata trà l’apparecchio e il sensore, premere sul tasto [ CHANNEL ] durante 2 secondi. Cosultazione della temperatura La temperatura interna e esterna sono affisse in modo permanente. Per la temperatura esterna, si può usare fino a 3 canali secondo il numero di sensori in servizio.
-
Page 17: Previsioni Meteorologiche
3. Le ore lampeggiano. Premere [ ] o [ ] per regolare l’ora (ogni pressione del tasto aumenta o diminuisce il valore di 1 ora; mantenere per accedere allo sfilamento rapido). Confermare con il tasto [ CLOCK ]. 4. I minuti lampeggiano. Ripetere le tappe precedenti per i minuti, l’anno, il formatto mese /giorno o giorno/mese, il mese, il giorno (giorno della settimana automatico) e la lingua per l’affissione del giorno della settimana (G=tedesco, E = inglese, I = italiano, S = Spagnolo, F = francese). - Page 18 per confermare, premere il tasto [UNIT] e procedere alla regolazione seguente con diverse opzioni: ON= ogni simbolo si attiva durante 1 secondo, poi tutti i simboli durante 2 secondi. Dopo, il simbolo della previsione si attiva durante c. 10 secondi (c. 18 secondi con un’alimentazione settore). OFF= nessun’illuminazione successiva dei simboli, ma un’illuminazione diretta del simbolo della previsione durante c.12 secondi.
-
Page 19: Functions Of The Weather Station
EBR808C INSTRUCTION MANUAL Congratulations on your purchasing of this new Crystal Weather Station with 3D projection icons. This unique product is designed for everyday use for the home or office and is a definite asset of great use. To fully benefit from all the features and understand the correct operation of this product, please read this instruction manual thoroughly. -
Page 20: Description Of Buttons
reliable. The user needs to change the batteries at once E. Radio reception signal Indicates the condition of DCF radio controlled time reception F. Clock window Display current time, calendar or alarm time G. Indoor indicator Indicates the indoor temperature is displayed H. -
Page 21: Getting Started
The light will be activated automatically based on an interval which you can define in the following setting -Place the slide switch in the position AUTO -Press and hold the key UNIT for 3 seconds -With the UP or DOWN key you may set the activation interval in steps ( 5,10,20,30 or 60 minutes) -To confirm the setting, press the UNIT key again -Now you can define the sequence of light in the crystal by using the UP/DOWN key: ON=: each icon will be lit for 1 sec, followed by a full illumination of all icons for 2 secs and then the icon... - Page 22 1. To retrieve manually the specific sensor temperature reading, press CHANNEL key until desired channel number is displayed. 2. To enable auto-scroll function, use CHANNEL button to select channel 1, 2, ... until auto scroll icon appears on the left hand corner of the 3rd line display. DCF 77 RADIO CONTROLLED CLOCK The built-in radio controlled clock is designed to synchronize the time automatically once the unit is brought within the range of the Frankfurt DCF 77 radio signal.
-
Page 23: Weather Forecast
3. Press [UNIT] button to confirm and finish the setting. Longer illumination cycle will save more battery power and have a longer battery lifetime. WEATHER FORECAST NOTE: 1. It is not necessary and not possible to adjust the altitude of the weather ststion. After the initial start- up of the weather station, a first forecast will be made within the first 24 hours of operation. - Page 24 ~P.24~...
Need help?
Do you have a question about the EBR808C and is the answer not in the manual?
Questions and answers