
Related Manuals for IROX CBR606


Summary of Contents for IROX CBR606
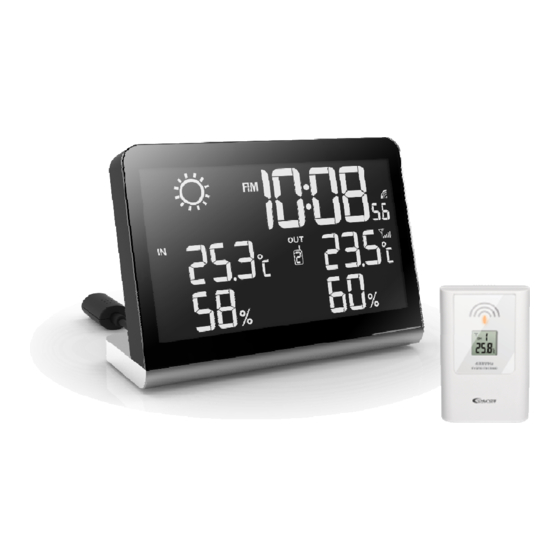
- Page 1 CBR606 RADIO CONTROLLED WEATHER STATION WITH TEMPERATURE AND HUMIDITY USER MANUAL...
-
Page 2: Table Of Contents
CONTENTS INTRODUCTION MAIN FUTURES INSTALLATION RECEPTION OF RC SIGNAL STRENGTH INDICATOR MANUAL TIME SETTING ALARM AND SNOOZE SETTING WEATHER FORECAST FUNCTION COLOUR CHANGE DISPLAY CHECKING AND DELETING MAX/MIN RECORDS VIEWING THE CHANNEL LOW BATTERY INDICATOR ICE ALERT INDICATOR PRECAUTIONS SPECIFICATION EU-DECLARATION OF CONFORMITY... -
Page 3: Introductionx
INTRODUCTION Thank you for purchasing this delicate radio controlled clock with temperature and humidity. Utmost care has gone into the design and manufacture of the clock. Please read the instructions carefully and keep the manual well for Future reference. MAIN FUTURES LCD DISPLAY 1. - Page 4 5. OUTDOOR TEMPERATURE 6. OUTDOOR HUMIDITY 7. CHANNEL 8. TRANSMITTER SIGNAL QUALITY 9. SIGNAL DCF77 QUALITY DESCRIPTION OF BUTTONS...
- Page 5 1. ALARM/SNOOZE key - Press it to stop the current alarm and enter into snooze mode. - Hold it for 2 seconds to turn off the alarm function. 2. LCD display 3. ALARM key - In normal time display, press to enter the alarm mode. - In alarm time mode, press it to turn on/off the alarm function.
- Page 6 green ˃ cyan ˃ blue ˃purple. 10. TUNE key - Turn off the LOOP function and press TUNE key, the backlight will display 256 colours. 10. SENSOR key - Press it to receive the data from the transmitter. 11. RCC key - Press it to receive the RC signal for reception testing.
- Page 7 TRANSMITTER 1. LED indicator - Flashes when the remote unit transmits a reading. 2. LCD display - Display of the channel, temperature and humidity. 3. RESET key - Press it to restart the transmitter. 4. Wall Mounting Holder - Use it to support the transmitter on the wall. 5.
- Page 8 marked on the battery compartment. 3. Replace the battery door. 4. Once batteries are placed in the transmitter, it will start transmitting at 12 second intervals within 5 minute to allow the main unit more easily to search the transmitter. After 5 minute the transmitter will back to normal transmitting mode with 60 second intervals the LED and antenna icon will flash during signal transmission.
-
Page 9: Signal Strength Indicator
RECEPTION OF RADIO CONTROLLED TIME SIGNAL RCC The time and date are radio-controlled. The current time and date are automatically synchronized with the time signal transmitted from DCF77. When used for the first time (after inserting the batteries or pressing RESET and RCC key), the clock will start to receive the RC signal in 5 minutes with the signal strength indicator flashing. -
Page 10: Manual Time Setting
MANUAL TIME SETTING If you are out of the reach of the Radio Controlled Transmitter or if the reception is not reachable, the time can be set manually. As soon as the transmitter is received again, the clock will automatically synchronize with received time: 1. -
Page 11: Weather Forecast Function
in 5 minutes. Snooze can be operated continuously in 24 hours. 3. Press ALARM key for about 2 seconds to turn off the alarm. The alarm stays turned on for the next day. 4. To turn off the alarm press ALARM key 2X. WEATHER FORECAST FUNCTION The indoor console contains a built-in sensitive pressure sensor to predict the weather forecast for the next 12-24 hours. - Page 12 will change its colour in this sequence: white > red > orange > yellow > green > cyan > blue > purple. 3. Turn off the loop function and press TUNE key, the backlight will display 256 colours. 4. Press OUTDOOR TEMP key and the backlight colour changes his colour according to the changes of outdoor temperature transmitted from the transmitter.
-
Page 13: Viewing The Channel
CHECKING AND DELETING MAX/MIN TEMPERATURE AND HUMIDITY RECORDS 1. Press MAX/MIN key once to check the maximum temperature and humidity records. Press it twice to check the minimum records. Press it again to exit. 2. Press and hold MAX/MIN key for 3 seconds to delete the maximum and minimum temperature and humidity records, with beep tone. -
Page 14: Low Battery Indicator
LOW BATTERY INDICATOR If the low battery indicator displays in the outdoor temperature window, it indicates that the battery power of the transmitter is not enough, and you should replace with 2 x AA size batteries at once. NOTE: If the battery power of the transmitter is not enough, insert 2x AA size batteries and press RESET key of transmitter and SENSOR key of the main unit, so that it can receive the time and temperature automatically. -
Page 15: Precautions
PRECAUTIONS - Read and keep these instructions. - Heed all warnings. - Follow all instructions. - Do not subject the unit to excessive force, shock, dust, temperature or humidity. - Do not cover the ventilation holes with any items such as newspapers, curtains etc. -
Page 16: Specification
SPECIFICATION MAIN UNIT Operating temperature range: -5°C-50°C 23°F-122°F Resolution: 0.1°C/°F (above -10°C/14°F) 1°C/°F (below -10°C/14°F) Operating humidity range: 10% ∼ 99% Radio controlled signal: DCF77 version TRANSMITTER Operating temperature range: -20°C-60°C -4°F-140°F Resolution: 0.1°C/°F (above -10°C/14°F) 1°C/°F (below -10°C/14°F) RF transmission frequency: 433MHz No. -
Page 17: Eu-Declaration Of Conformity
This product contains the approved transmitter and complies with the essential requirements of Article 3 of the R&TTE Directives 1999/5/EC, if used for its intended use and that the following standard(s) has/ have been applied. IMPORTANT: In all iROX devices all disposal fees in Switzerland (ARF).
Need help?
Do you have a question about the CBR606 and is the answer not in the manual?
Questions and answers