iOptron iPolar Replacing Instructions
Replacing a ipolar with a optical polar scope
Hide thumbs
Also See for iPolar:
- Operation manual (9 pages) ,
- Installation (3 pages) ,
- Operation manual (14 pages)
Advertisement
Quick Links
Tool needed: a set of metric hex key wrench and a small
Phillips screwdriver
1. Loosen two screws at the front of the mount and
two others on the top of a SkyGuider Pro main
board cover and remove the black cover.
2. Unplug the 6-wire motor driver cable and DC power
cable. Remember how wires wrapped.
Wire wrapping
3. Remove two mounting screws.
4. Gently pull the circuit board with sockets end up
and slide the circuit board out. If the board is stuck
by the motor, loosen two Phillips screws hold the
motor.
5. Remove polar scope base plate.
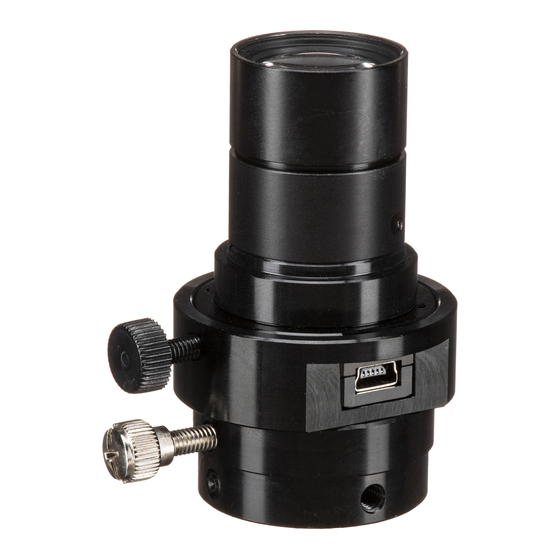
Replacing a iPolar with a Optical Polar Scope
6. Rotate the RA axis to find TWO set screws which are
used to secure the iPolar in place. Use a 1.5mm hex
key to release the set screws. Pull the iPolar out of
the RA axle.
7. Insert optical polar scope into the RA axis. Rotate
the front camera mounting adapter to desired
orientation and adjust the polar scope so that the
LED illuminating hole is facing upward.
8. Lock polar scope via these 2 set screws.
Advertisement

Related Manuals for iOptron iPolar


Summary of Contents for iOptron iPolar
- Page 1 6. Rotate the RA axis to find TWO set screws which are 2. Unplug the 6-wire motor driver cable and DC power used to secure the iPolar in place. Use a 1.5mm hex cable. Remember how wires wrapped. key to release the set screws. Pull the iPolar out of the RA axle.
- Page 2 9. Install the polar scope LED abr. Make sure the cable plug is placed on the left side as shown. 14. When securing the board with two screws, make 10. Connect the polar scope LED cable between the LED sure that the battery and wires underneath are bar and the control board.
Need help?
Do you have a question about the iPolar and is the answer not in the manual?
Questions and answers