Table of Contents
Advertisement
Available languages
Available languages
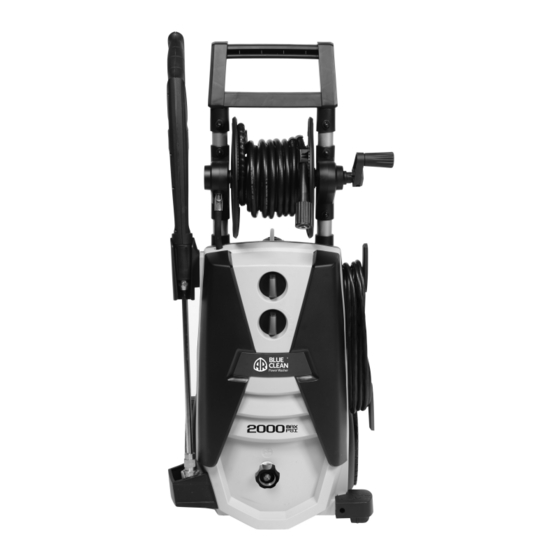
2000 PSI
Electric Pressure Washer
92733-BM
92733_15ANR014 AR390SS_2000PSI ENG-FR-SP.indd 1
ASSEMBLY, CARE AND
USE INSTRUCTIONS
Model AR 390 SS
READ CAREFULLY
IMPORTANT:
RETAIN THESE INSTRUCTIONS
AND
ATTACH RECEIPT TO MANUAL FOR FUTURE
REFERENCE.
Questions, problems, missing parts?
Before returning to your retailer, call (1-866-235-5112)
or email (info@arnorthamerica.com) our customer
service department. They are available from 8:00 a.m. -
5:00 p.m., CST, Monday - Friday. www.arblueclean.com
2018/2/9 上午11:13
Advertisement
Chapters
Table of Contents

Related Manuals for AR Blue Clean AR 390 SS


Summary of Contents for AR Blue Clean AR 390 SS
- Page 1 2000 PSI Electric Pressure Washer ASSEMBLY, CARE AND USE INSTRUCTIONS Model AR 390 SS READ CAREFULLY IMPORTANT: RETAIN THESE INSTRUCTIONS ATTACH RECEIPT TO MANUAL FOR FUTURE REFERENCE. Questions, problems, missing parts? Before returning to your retailer, call (1-866-235-5112) or email (info@arnorthamerica.com) our customer service department.
-
Page 2: Table Of Contents
California to cause cancer and birth defects or other reproductive harm. For more information, go to www.P65Warnings.ca.gov. Wash hands after handling. PRODUCT SPECIFICATIONS PRODUCT SPECIFICATIONS SPECIFICATIONS Max PSI Max GPM Weight (lbs.) Model (lbs/sq. in.) (Gal/per min) Cold Water Volts Amps AR 390 SS 2000 ✔ 92733_15ANR014 AR390SS_2000PSI ENG-FR-SP.indd 2 2018/2/9 上午11:13... -
Page 3: Package Contents
PACKAGE CONTENTS PACKAGE CONTENTS PACKAGE CONTENTS PW909390SS 0°– Red 25° – Green Soap – Black 2000 PART DESCRIPTION QUANTITY PART DESCRIPTION QUANTITY Power Washer Unit Spray Gun Soft PVC High Pressure Spray Gun Trigger Lock Hose Button Nozzle Cleaning Wire Nozzle Tray Rotary Nozzle Spray Gun Holster... -
Page 4: Safety Information
SAFETY INFORMATION SAFETY INFORMATION SAFETY INFORMATION Please read and understand this entire manual before 9. DO NOT use your power washer when you are under attempting to assemble and operate the product. the influence of alcohol or drugs. Use this power tool carefully and only when you are alert. - Page 5 35. NEVER use lances or other parts that are not to protect pumps. compatible for this specific AR Blue Clean unit. 36. NEVER use an extension power cord since it defeats 27. NEVER use hot water with your power washer. It will the effectiveness of the GFCI and increases the overheat and damage the high pressure pump.
-
Page 6: Assembly Instructions
PREPARATION PREPARATION PREPARATION Before beginning assembly of product, make sure Tools Required for Assembly (not included): Phillips all parts are present. Compare parts with package screwdriver and 5/16" (8 mm) allen wrench. contents list and hardware contents list. If any part is missing or damaged, DO NOT attempt to assemble the product.Please call customer service at 1-866-235- 5112. - Page 7 Slip tab of stabilizer foot (E) into slot on bottom Soft PVC High Pressure Hose Assembly righ, when facing the power washer unit (A). Secure with Connect the other end of Soft PVC high pressure hose screw (AA). (B) to spray gun (H) by screwing collar over gun inlet. Hand tighten (turning clockwise) until tight.
- Page 8 PREPARATION ASSEMBLY INSTRUCTIONS Lance Installation Attach nozzles (F) and rotary nozzle (D) into end of lance While spray gun (H) is in the locked position, insert (G) by pressing selected nozzle into place. It will make a lance (G) into the end of spray gun by inserting and “click”...
-
Page 9: Operating Instructions
OPERATING INSTRUCTIONS OPERATING INSTRUCTIONS OFF/0 OFF/0 ON/I ON/I • Turn the power switch to the “ON” (|) position. The unit will turn on for 1 - 2 seconds and shut off. This is a normal function of the auto start feature. Squeeze the spray gun trigger to begin pressure washing. - Page 10 OPERATING INSTRUCTIONS OPERATING INSTRUCTIONS • When using the detergent, fill it with a properly The power washer will pull a ratio of water to detergent formulated detergent or cleaner with water ratio of 10:1 or 10 parts water to 1 part detergent. The according to instructions on the container.
- Page 11 OPERATING INSTRUCTIONS OPERATING INSTRUCTIONS OPERATING INSTRUCTIONS Operation Tips • If you hear the motor run intermittently when the trigger is not being squeezed, that is normal. The pump is priming itself so it is ready to operate when the trigger is squeezed. Turn off the power washer if not being used after five minutes.
-
Page 12: Care And Maintenance
OPERATING INSTRUCTIONS OPERATING INSTRUCTIONS CARE AND MAINTENANCE Cleaning Garden Hose Adapter Storage • The screen inside the adapter should be cleaned • When your pressure washer session has been periodically. Remove it by dragging a thumb over the completed, turn off the power switch located on the screen with enough pressure to pull the screen and front of the power washer. -
Page 13: Pump Saver
OPERATING INSTRUCTIONS OPERATING INSTRUCTIONS PUMP SAVER Pump Saver is a product that protects and prolongs the 4) Squeeze bottle to help it into the pump. life of the pump. This will keep the internal parts of the pump lubricated and protected from freezing while being 5) Turn power off when pump saver exits the machine’s stored in ALL climates. -
Page 14: Troubleshooting
CARE AND MAINTENANCE TROUBLESHOOTING If you have any questions regarding the product, please call customer service at 1-866-235-5112 PROBLEM CORRECTIVE ACTION Unit will not turn on. 1. Make sure the power washer is in the “OFF” position. Plug in the electrical cord to a grounded 120 volt outlet (no electrical extension cord should be used). -
Page 15: Limited Warranty
LIMITED WARRANTY LIMITED WARRANTY This product is under warranty to the original retail consumer against defects in material and workmanship for a period of 1 (one) year and is a complete “bumper to bumper” warranty including the spray gun, the high pressure hose and all accessories from the date of purchase. -
Page 16: Replacement Parts List
LIMITED WARRANTY REPLACEMENT PARTS LIST For replacement parts, call our customer service department at 1-866-235-5112, 8 a.m. - 5:00 p.m., CST, Monday - Friday or order online at www.arblueclean.com PW909390SS 0° – Red 25° – Green Soap – Black PART DESCRIPTION PART # PART... - Page 17 2000 PSI LAVEUSE À PRESSION ÉLECTRIQUE GUIDE D'ASSEMBLAGE, D'ENTRETIEN ET D'UTILISATION Modèle AR 390 SS LIRE ATTENTIVEMENT IMPORTANT : CONSERVER CE GUIDE ET INSÉRER LA FACTURE DANS LE GUIDE POUR RÉFÉRENCE ULTÉRIEURE. Questions, problèmes, pièces manquantes? Avant de retourner l’appareil chez le marchand, Appe- lez (1-866-235-5112) ou par courriel (info@arnortha- merica.com) notre département customerService.
-
Page 18: Spécifications Du Produit
Liste des pièces de rechange ..................32 PRODUCT SPECIFICATIONS SPÉCIFICATIONS DU PRODUIT SPÉCIFICATIONS Modèle Débit Eau froide Volts Poids maximum maximum (kg) (k/cm2) (Litre/min) (lb) (lb/po2) (Gal./min) AR 390 SS 5 853 14.51 ✔ (2 000) (1.4) (32) 92733_15ANR014 AR390SS_2000PSI ENG-FR-SP.indd 18 2018/2/9 上午11:13... -
Page 19: Contenu De L'emballage
PACKAGE CONTENTS CONTENU DE L'EMBALLAGE CONTENU DE L'EMBALLAGE PW909390SS 0° — Rouge 0°– Red 25° — Vert 25° – Green Soap – Black Savon — Noir 2000 PIÈCE DESCRIPTION QUANTITÉ PIÈCE DESCRIPTION QUANTITÉ Laveuse à pression Pistolet pulvérisateur PVC Souple tuyau à haute Verrou de la gâchette de pression pistolet pulvérisateur... -
Page 20: Consignes De Sécurité
SAFETY INFORMATION CONSIGNES DE SÉCURITÉ CONSIGNES DE SÉCURITÉ Veuillez lire et comprendre tout ce manuel avant 10. Toujours garder une position stable et sûre pendant d’essayer de monter et de faire fonctionner le produit. l'utilisation de la laveuse à pression. Les surfaces mouillées sont glissantes et l'utilisation de détergent les rend encore plus dangereuses. - Page 21 (non compris) pour protéger composant qui n'est pas compatible avec ce modèle la pompe. d'appareil AR Blue Clean. 36. NE JAMAIS brancher une rallonge au cordon 27. NE JAMAIS utiliser d'eau chaude dans la laveuse d'alimentation de l'appareil. Cela compromettrait à...
-
Page 22: Instructions D'assemblage
PRÉPARATION PRÉPARATION PREPARATION Avant de commencer l'assemblage de l'appareil, assurez- Outil nécessaire pour l'assemblage (non compris) : vous que toutes les pièces sont dans l'emballage. Tournevis cruciforme et clé hexagonale 8 mm (5/16 po). Comparez les pièces à la liste des pièces et du matériel. Dans le cas où... - Page 23 INSTRUCTIONS D'ASSEMBLAGE Assemblage du PVC souple tuyau à haute pression Placez l’appareil face contre vous (A). À la base de l’ap- Branchez l’autre extrémité du PVC souple tuyau à haute pareil, côté droit, insérez le pied se stabilité (E) dans la pression (B) au pistolet pulvérisateur (H) et vissez la bague rainure.
- Page 24 PREPARATION INSTRUCTIONS D'ASSEMBLAGE Enfoncez la buse sélectionnée (F) et buse rotative (D) en place à l’extrémité de la lance (G). Un clic se fait entendre Montage de la lance indiquant qu’elle est en place. Alors que le pistolet pulvérisateur (H) est verrouillé, insérez la lance (G) dans le pistolet, puis poussez et tournez dans Remarque : Avant de changer la lance ou la buse, le sens horaire.
-
Page 25: Mode D'emploi
OPERATING INSTRUCTIONS MODE D'EMPLOI OFF/0 OFF/0 OFF/0 OFF/0 ON/I ON/I ON/I ON/I • Placez l’interrupteur à la position « ON » (|). L'appareil se met en marche pendant une à deux secondes et s'arrête. Il s'agit du fonctionnement normal du mode de mise en marche automatique. - Page 26 OPERATING INSTRUCTIONS MODE D’EMPLOI • Lorsque vous utilisez le réceptacle à détergent, Le taux eau détergent est de 10:1, soit 10 parties d’eau remplissez-le avec un détergent ou un produit nettoyant pour une partie de détergent. Utilisez le bouton situé sur correctement formulé...
- Page 27 OPERATING INSTRUCTIONS MODE D’EMPLOI MODE D'EMPLOI Utilisation du cordon d'alimentation Conseils d'utilisation • Retirez facilement le cordon d’alimentation du côté • Il est normal d'entendre le moteur tourner par de l’appareil en faisant pivoter le crochet bleu du intermittence, même lorsque la gâchette n'est pas cordon du bas vers la droite jusqu’à...
-
Page 28: Entretien Et Maintenance
OPERATING INSTRUCTIONS MODE D’EMPLOI ENTRETIEN ET MAINTENANCE Entreposage Nettoyage de l’adaptateur de tuyau d’arrosage • Lorsque le Rondelle à pression est terminé, éteignez • L’écran à l’intérieur de l’adaptateur doit être nettoyé l’interrupteur qui se trouve à l’avant de l'appareil. périodiquement. -
Page 29: Protecteur De Pompe
MODE D’EMPLOI PROTECTEUR DE POMPE 3) allumer le moniteur. Le protecteur de pompe est un produit qui protège et prolonge la vie de la pompe. Les pièces internes de la pompe resteront ainsi lubrifiées et protégées du gel lors de 4) Presser la bouteille pour l’aider dans la pompe. -
Page 30: Dépannage
CARE AND MAINTENANCE DÉPANNAGE Pour tout question relative au produit, communiquez avec le service à la clientèle au 1-866-235-5112. PROBLÈME MESURE CORRECTRICE L’appareil ne se met 1. Assurez-vous que l’interrupteur « ON/OFF » (marche/arrêt) est à la position « OFF » pas en marche. -
Page 31: Garantie Limitée
LIMITED WARRANTY GARANTIE LIMITÉE Ce produit est sous garantie pour le consommateur original contre tout défaut de matériau ou de main-d’œuvre pendant une période de 1 (un) an et cette garantie complète comprend le pistolet pulvérisateur, le tuyau à pression et tous les accessoires et ce, depuis la date de l’achat. -
Page 32: Liste Des Pièces De Rechange
LIMITED WARRANTY LISTE DES PIÈCES DE RECHANGE Pour les pièces de rechange, communiquez avec le service à la clientèle au numéro 1-866-235-5112, 8 h à 17 h, HNC, du lundi au vendredi ou commandez en ligne à l’adresse www.arblueclean.com PW909390SS 0°... - Page 33 2000 PSI Lavadora a presión eléctrica INSTRUCCIONES DE MONTAJE, CUIDADO Y USO Modelo AR 390 SS LEA CUIDADOSAMENTE IMPORTANTE: GUARDE ESTAS INSTRUCCIONES Y ADJUNTE EL RECIBO AL MANUAL PARA FUTURAS REFERENCIAS. ¿Preguntas, problemas, piezas faltantes? Antes de regresar a tu minorista, llame al (1-866-235- 5112) o correo electronico (info@arnorthamerica.com)
-
Page 34: Especificaciones Del Producto
Lista de piezas de repuesto ......................48 PRODUCT SPECIFICATIONS ESPECIFICACIONES DEL PRODUCTO ESPECIFICACIONES Modelo Máx. PSI Máx. GPM Agua fría Voltios Amperios Peso (kg) (lb) (kg/cm (Litro/min) (lb/pulgada (gal/por min) AR 390 SS 5,853 (2,000) 5.3 (1.4) 14.51 (32) ✔ 92733_15ANR014 AR390SS_2000PSI ENG-FR-SP.indd 34 2018/2/9 上午11:13... -
Page 35: Contenido Del Paquete
CONTENIDO DEL PAQUETE CONTENIDO DEL PAQUETE PW909390SS 0°: Rojo 0°– Red 25°: Verde 25° – Green Jabón: Negro Soap – Black 2000 PIEZA DESCRIPCIÓN CANTIDAD PIEZA DESCRIPCIÓN CANTIDAD Unidad de la lavadora a presión Pistola rociadora PVC Suave manguera de presión Bloqueo del gatillo de la pistola alta rociadora... -
Page 36: Información De Seguridad
SAFETY INFORMATION INFORMACIÓN DE SEGURIDAD INFORMACIÓN DE SEGURIDAD Por favor lea y entienda todo este manual antes de intentar reconstruya ninguna pieza de la lavadora a presión. ensamblar y operar el producto. 9. NO utilice la lavadora a presión cuando se encuentre bajo la influencia del alcohol o de drogas. - Page 37 35. NUNCA utilice lanzas ni otras piezas que no sean proteger las bombas. compatibles con esta unidad AR Blue Clean específica. 36. NUNCA utilice un cable de alimentación de extensión 27. NUNCA use agua caliente con la lavadora a presión. Esto debido a que este anula la efectividad del GFCI e sobrecalentará...
-
Page 38: Instrucciones De Montaje
PREPARACIÓN PREPARACIÓN PREPARATION Antes de comenzar el montaje del producto, asegúrese Herramientas requeridas para el montaje (no incluidas): de que todas las piezas estén presentes. Compare las Destornillador Phillips y llave Allen de 8 mm (5/16”). piezas con la lista de contenido del paquete y la lista de aditamentos. - Page 39 INSTRUCCIONES DE MONTAJE Montaje de la PVC suave manguera de presión alta Deslice la pestaña de la base del estabilizador (E) en la ranu- Conecte el otro extremo de la PVC suave manguera de pre- ra en la parte inferior derecha, estando frente a la unidad de sión alta (B) a la pistola rociadora (H) atornillando el collarín la lavadora a presión (A).
- Page 40 PREPARATION INSTRUCCIONES DE MONTAJE Acople las boquillas (F) y boquilla rotatoria (D) en el extremo de la lanza (G) presionando la boquilla seleccionada en su Instalación de la lanza lugar. Hará un sonido de “clic” cuando esté firme en su lugar. Mientras la pistola rociadora (H) está...
-
Page 41: Instrucciones De Operación
OPERATING INSTRUCTIONS INSTRUCCIONES DE OPERACIÓN OFF/0 OFF/0 OFF/0 OFF/0 ON/I ON/I ON/I ON/I • Gire el interruptor de alimentación a la posición “ON” (|). La unidad se encenderá durante 1 o 2 segundos y se apagará. Este es un procedimiento normal de la función de arranque automático. - Page 42 OPERATING INSTRUCTIONS INSTRUCCIONES DE OPERACIÓN • Cuando use el detergente, llénela con un detergente La lavadora a presión succionará una relación de agua formulado apropiadamente con una proporción de agua de a detergente de 10:1 o 10 partes de agua a 1 parte de acuerdo a las instrucciones en el envase.
- Page 43 OPERATING INSTRUCTIONS INSTRUCCIONES DE OPERACIÓN INSTRUCCIONES DE OPERACIÓN Consejos para la operación • Si escucha que el motor funciona de forma intermitente cuando no se aprieta el gatillo, eso es normal. La bomba se está purgando para que esté lista para funcionar cuando se apriete el gatillo.
-
Page 44: Cuidado Y Mantenimiento
OPERATING INSTRUCTIONS INSTRUCCIONES DE OPERACIÓN CUIDADO Y MANTENIMIENTO Limpieza del adaptador de manguera de jardín Almacenamiento • La pantalla dentro del adaptador debe limpiarse • Cuando termine la sesión de lavado a presión, apague periódicamente. Quítela arrastrando un pulgar sobre la el interruptor de alimentación ubicado en la parte pantalla con suficiente presión para sacar la pantalla y la delantera de la lavadora a presión. -
Page 45: Protector De La Bomba
CARE AND MAINTENANCE INSTRUCCIONES DE OPERACIÓN PROTECTOR DE LA BOMBA Protector de la bomba es un producto que protege y prolonga la vida de la bomba. Este mantendrá las partes internas de 4) Squeeze Bottle para ayudar en la bomba. la bomba lubricadas y protegidas de la congelación mientras se almacena en TODOS los climas. -
Page 46: Solución De Problemas
CARE AND MAINTENANCE SOLUCIÓN DE PROBLEMAS Si tiene alguna pregunta sobre el producto, llame a Servicio al cliente al 1-866-235-5112 PROBLEMA ACCIÓN CORRECTIVA La unidad no enciende. 1. Asegúrese de que la lavadora a presión esté en la posición “OFF”. Conecte el cable eléctrico a una toma de 120 voltios a tierra (no se debe utilizar un cable extensión eléctrica). -
Page 47: Garantía Limitada
LIMITED WARRANTY GARANTÍA LIMITADA Este producto está en garantía para el consumidor minorista original contra defectos de material y fabricación por un período de 1 (un) año y es una garantía completa “de extremo a extremo” que incluye la pistola rociadora, la manguera de presión alta y todos los aditamentos a partir de la fecha de compra. -
Page 48: Lista De Piezas De Repuesto
LIMITED WARRANTY LISTA DE PIEZAS DE REPUESTO Para obtener piezas de repuesto, llame a nuestro Departamento de Servicio al Cliente al 1-866-235-5112, 8:00 a. m.–5:00 p. m., hora estándar del centro, de lunes a viernes o realice el pedido en línea en www.arblueclean.com PW909390SS 0°: Rojo 0°...
Need help?
Do you have a question about the AR 390 SS and is the answer not in the manual?
Questions and answers