Table of Contents
Advertisement
Advertisement
Table of Contents

Related Manuals for JVC TH-D329B


Summary of Contents for JVC TH-D329B
- Page 1 Instruction Manual Compact Soundbar TH-D329B...
-
Page 3: Table Of Contents
Contents Safety Warnings ........................4 Unpacking ..........................6 Product Overview ........................7 Main Unit .................................7 Remote Control ............................9 Preparation .........................10 Battery Replacement for the Remote Control ................10 Remote Control Operation Range ...................... 10 Wall Mounting .............................11 Speaker Placement ............................13 Connections ........................14 Method 1: HDMI Hub Connection .......................14 Method 2: Optical / Coaxial Connection .................. -
Page 4: Safety Warnings
Safety Warnings • Read all the instructions carefully before Ventilation using the unit and keep them for future • To prevent the risk of electric shock or reference. fire hazard due to overheating, ensure • Retain the manual. If you pass the unit that curtains and other materials do not onto a third party make sure to include this obstruct the ventilation vents. - Page 5 Seek medical advice if you believe a cell To prevent the has been swallowed. • Please dispose of batteries correctly by spread of fire, following the guidance in this manual. keep candles • Do not expose the battery to direct sunlight or sources of excessive heat.
-
Page 6: Unpacking
Thank you for purchasing your new product. We recommend that you spend some time reading this instruction manual in order that you fully understand all the operational features it offers. You will also find some hints and tips to help you resolve any issues. Read all the safety instructions carefully before use and keep this instruction manual for future reference. -
Page 7: Product Overview
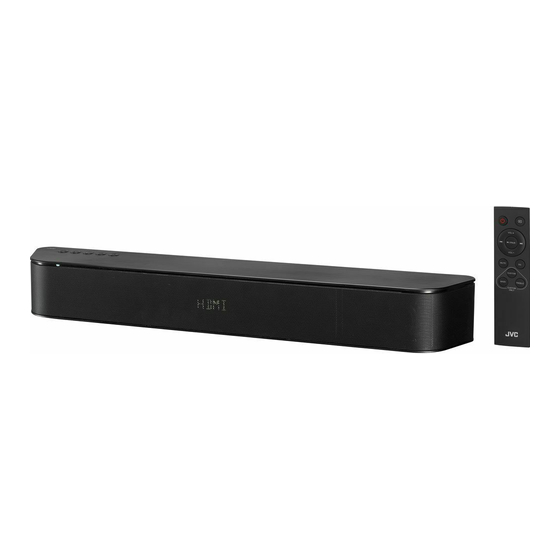
Product Overview Main Unit Front View 1. POWER Indicator In Standby mode: Light up Red. 2. Display Top View 4. VOL–/VOL+ Button Button Adjust the volume. Switch the unit between On and Standby mode. SOURCE Button Select the input source. 3. - Page 8 Rear View 3 4 5 1. Wall Mounting hole 2. 100-240V~50/60Hz AC IN~ Socket 3. COAXIAL Socket 4. OPTICAL Socket 5. HDMI ARC Socket...
-
Page 9: Remote Control
Remote Control Button Switch the unit between On and Standby mode. 2. VOL+/VOL– Button Adjust the volume. 3. MUTE Button Mute the unit or resume the sound. 4. CUSTOM Button Press to select CUSTOM EQ (default) effect. 5. BASS Button Press to enter BASS setup. -
Page 10: Preparation
Preparation Battery Replacement for the Remote Control 1. Press and slide the back cover to open the battery compartment of the remote control. 2. Insert two AAA size batteries (included). Make sure the (+) and (–) ends of the batteries match the (+) and (–) ends indicated in the battery compartment. -
Page 11: Wall Mounting
Wall Mounting • Installation must be carried out by qualified personnel only. Incorrect assembly can result in severe personal injury and property damage (if you intend to install this product yourself, you must check for installations such as electrical wiring and plumbing that may be buried inside the wall). It is the installer’s responsibility to verify that the wall will safely support the total load of the soundbar. - Page 12 2. Firmly fix 1 dowel into each hole in the wall if necessary. Tighten the wall mount brackets on the wall with screws and screwdriver (not included). Make sure that they are securely installed. Wall mounting with dowels and screws ø...
-
Page 13: Speaker Placement
Speaker Placement SOUNDBAR Soundbar Soundbar carries most of the dialogue as well as music and effects. • If your TV is placed on a table, you can place the soundbar on the table directly in front of the TV stand, centred with the TV screen. •... -
Page 14: Connections
Connections This section involves various methods of connecting the product to other external components. Ensure all audio connections of the unit are connected before connecting to the mains power socket. Method 1: HDMI Hub Connection Using Your TV as a hub •... - Page 15 Use this method to connect all your devices into your TV. 1. Connect an HDMI cable from your soundbar’s HDMI ARC socket to the HDMI (ARC) socket on your ARC-compliant TV. 2. After connection, press button on the unit or on the remote control to switch the unit 3.
-
Page 16: Method 2: Optical / Coaxial Connection
Method 2: Optical / Coaxial Connection Use an optical cable (not included) or coaxial cable (included) to connect the soundbar’s OPTICAL / COAXIAL socket to the OPTICAL OUT / COAXIAL OUT socket of the external device. The simplest option is to connect your soundbar directly to your TV. If you connect the soundbar to another external device (e.g. -
Page 17: Connecting To The Mains Supply
• To switch the unit off completely, remove the mains plug from the mains socket. • Please turn the unit off completely to save energy when not in use. • The mains cable is designed for this JVC soundbar only. DO NOT use the mains cable for other purposes. -
Page 18: General Operation
This instruction manual explains the basic instructions for operating this unit. Unless otherwise stated, all operations described are based on remote control use. General Operation Standby / ON When you first connect the unit to the mains socket, the unit will be in Standby mode. •... -
Page 19: Optical / Coaxial / Hdmi Arc In Operation
Adjusting the Bass/Treble Level in CUSTOM EQ mode 1. Press CUSTOM button on the remote control to set the unit into CUSTOM EQ mode. The display will show CUSTOM. 2. Press BASS/TREBLE button on the remote control. BASS/TREBLE will flash in the display. -
Page 20: Bluetooth® Operation
3. Activate your Bluetooth® device and select the search mode. “TH-D329B” will appear on your Bluetooth® device list. 4. Select “TH-D329B” enter “0000” for the password if necessary. The unit will prompt a signal tone, and the display will show “BT”. -
Page 21: Hints And Tips
Hints and Tips If a problem does occur, it may often be due to something very minor. The following table contains various tips. If you require additional assistance • For UK, please call our UK Call Centre on 0344 561 1234. For Ireland, please call our Ireland Call Center on 1 890 818 575. -
Page 22: Product Fiche And Specifications
Product Fiche and Specifications Brand Model TH-D329B Main Unit Input AC 100-240V~ 50/60 Hz Main Unit Power Consumption 30 W Speaker Output Power 25 W rms × 2 Bluetooth® Bluetooth® Version Bluetooth® 4.2 Maximum power 10 dBm transmitted Frequency bands... -
Page 23: Other Information And Licences
Other Information and Licences For general information about this appliance and handy hints and tips, please visit: www.TeamKnowhow.com/discover or call UK: 0344 561 1234 Ireland: 1890 818 575. Visit Partmaster.co.uk today for the easiest way to buy electrical spares and accessories. With over 1 million spares and accessories available we can deliver direct to your door the very next day. - Page 24 3rd Floor Office Suite, Omni Park SC Santry, Dublin 9, Republic of Ireland The product is distributed and warranted exclusive by DSG Retail Ltd. “JVC” is the trademark of JVC KENWOOD Corporation, used by DSG Retail Ltd. under license. (IB-TH-D329B-190625V2)
Need help?
Do you have a question about the TH-D329B and is the answer not in the manual?
Questions and answers