Table of Contents

Subscribe to Our Youtube Channel
Related Manuals for Thrustmaster TMX PRO


Summary of Contents for Thrustmaster TMX PRO
- Page 1 Europe, Middle East North America/ Norteamérica ENGLISH FRANÇAIS ENGLISH DEUTSCH FRANÇAIS NEDERLANDS ESPAÑOL ITALIANO Latin America/ ESPAÑOL América Latina PORTUGUÊS ENGLISH ESPAÑOL ΕΛΛΗΝΙΚΑ TÜRKÇE POLSKI...
- Page 2 FOR XBOX ONE AND PC User Manual WARNING: To ensure that your TMX racing wheel functions correctly with Xbox One and PC games, you may be required to install the game’s automatic updates (available when your console or PC is connected to the Internet). 1/20...
-
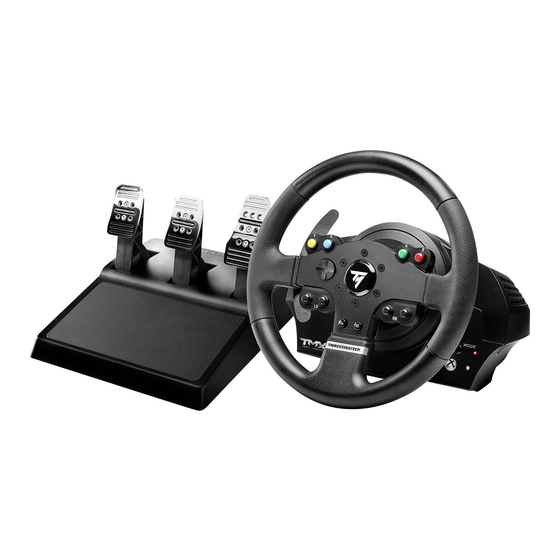
Page 3: Technical Features
TECHNICAL FEATURES 1 TMX base 7 Xbox Guide button + White indicator light 2 Wheel 8 MODE button + Red/Green indicator light 3 2 sequential paddle shifters (up & down) 9 Large threaded hole (for attachment system 4 Directional buttons and fastening screw) 5 Action buttons 10 Attachment system... - Page 4 * Do not let any dust build up on the air vents. For safety reasons, never use the pedal set with bare feet or while wearing only socks on your feet. THRUSTMASTER DISCLAIMS ALL RESPONSIBILITY IN THE EVENT OF ®...
- Page 5 Warning – Injuries due to force feedback and repeated movements (continued) * If the symptoms or pain indicated persist when you start playing again, stop playing and consult your doctor. * Keep out of children’s reach. * During gameplay, always leave both hands correctly positioned on the wheel without completely letting go.
- Page 6 5. Once your console is powered on, your racing wheel will calibrate itself automatically. You are now ready to play! - The list of Xbox One games compatible with the TMX Force Feedback is available at: http://support.thrustmaster.com (in the Racing Wheels/TMX section). This list is updated regularly. XBOX ONE MAPPING...
-
Page 7: Setting Up The Racing Wheel For Pc
USB plug to your computer and complete the installation. 3. Once the installation is complete, click Finish and restart your computer. 4. Select Start / All Programs / Thrustmaster / FFB Racing Wheel / Control Panel to open the Game Controllers window. - Page 8 PC MAPPING 7/20...
- Page 9 ATTACHING THE RACING WHEEL Attaching the racing wheel to a table or a desktop 1. Place the racing wheel on a table or any other horizontal, flat and stable surface. 2. Insert the fastening screw (11) in the attachment system (10), then tighten the device by turning the screw counterclockwise, so that it feeds into the large threaded hole (9) located beneath the racing wheel, until the wheel is perfectly stable.
-
Page 10: Attachment / Removal
ATTACHMENT / DIRECTION REMOVAL To tighten: Turn the screw anticlockwise To release: Turn the screw clockwise 9/20... - Page 11 To display the firmware version that your racing wheel is currently using and update it if required: on PC, visit http://support.thrustmaster.com. Click Racing Wheels / TMX Force Feedback, then select Firmware and follow the instructions describing the download and installation procedure.
- Page 12 TECHNICAL FEATURES 1 Metal support for conical stop 4 2.5 mm Allen key (included) 5 Position adjustment nut for conical stop (not installed by default) 2 Conical stop 3 Attachment screw for metal support 6 Pedal arm 8 Metal pedal head 7 Plastic head support 11/20...
- Page 13 For safety reasons, never use the pedal set with bare feet or while wearing only socks on your feet. THRUSTMASTER® DISCLAIMS ALL RESPONSIBILITY IN THE EVENT OF INJURY RESULTING FROM USE OF THE PEDAL SET WITHOUT SHOES. Warning – Pedal set pinching hazard during gaming sessions * Keep the pedal set out of the reach of children.
- Page 14 Important: The length of the two M6 screws must not exceed the thickness of the cockpit’s pedal support plate plus an additional 10 mm, to avoid damaging the pedal set’s internal components. Layout diagrams for cockpits are available at http://support.thrustmaster.com: click Racing Wheels / TMX Force Feedback, then select Manual or FAQ.
- Page 15 ADJUSTING THE PEDAL SET Each of the three pedals includes: - A metal head (8) with multiple perforations (nine for the accelerator – six for the brake – six for the clutch). - A plastic head support (7) (placed between the head and the arm) with four perforations. - A pedal arm (6) with two perforations.
- Page 16 Adjusting the SPACING of the three pedals - Using the included 2.5 mm Allen key (4), unscrew the two screws holding the metal head (8) and its support (7) in place. - Select your preferred position (to the left, centered, or to the right), then replace and re-tighten the screws so that the metal head (8) and its support (7) are held firmly in place.
- Page 17 Installing the conical stop (“CONICAL RUBBER BRAKE” mod) This modification (or “mod”) is not essential, and is not installed by default. This means that the brake pedal functions perfectly even if the mod is not installed. This mod lets you experience a different feeling and resistance when braking. It’s up to you whether or not to install it, depending on your own preferences.
- Page 18 - Using the included 2.5 mm Allen key (4), attach the unit using the attachment screw (3) and the small central screw thread located on the underside of the pedal set. The “CONICAL RUBBER BRAKE” mod is now installed! Adjusting the brake pedal’s RANGE of travel and STRENGTH of resistance By slightly unscrewing the nut (5), you can further strengthen the resistance of the brake pedal by moving the conical stop (2) closer to the back of the pedal’s arm (if necessary, use a 14 mm wrench or pliers to re-tighten the nut and maintain the selected position).
-
Page 19: Consumer Warranty Information
Thrustmaster product according to applicable laws of the country in which the consumer was domiciled on the date of purchase of the Thrustmaster product (if no such action exists in the corresponding country, then the warranty period shall be one (1) year from the original date of purchase of the Thrustmaster product). - Page 20 During the warranty period, Guillemot shall not provide, in principle, any spare parts, as Technical Support is the only party authorized to open and/or recondition any Thrustmaster product (with the exception of any reconditioning procedures which Technical Support may request that the consumer carry out, by way of written instructions –...
- Page 21 COPYRIGHT © 2017 Guillemot Corporation S.A. All rights reserved. Thrustmaster® is a registered trademark of Guillemot Corporation S.A. All other trademarks are the property of their respective owners. Illustrations not binding. Contents, designs and specifications are subject to change without notice and may vary from one country to another.
- Page 22 POUR XBOX ONE ET PC Manuel de l’utilisateur ATTENTION : Pour que le volant TMX fonctionne correctement avec les jeux Xbox One ou PC il peut être nécessaire d’installer les mises à jour automatiques de ces jeux (disponibles lorsque votre console ou votre PC est connecté(e) à Internet). 1/20...
-
Page 23: Caractéristiques Techniques
CARACTÉRISTIQUES TECHNIQUES 1 Base TMX 7 Bouton Xbox Guide 2 Roue du volant et voyant lumineux blanc 3 2 leviers séquentiels de changement de vitesse 8 Bouton MODE + Voyant lumineux rouge/vert (up & down) 9 Gros pas de vis (pour le système de fixation 4 Croix multidirectionnelle et la vis de serrage) 5 Boutons d’action... - Page 24 * Ne laissez pas la poussière s’accumuler sur les grilles d’aération. Pour des raisons de sécurité, ne jouez pas pieds nus ou en chaussettes lorsque vous utilisez le pédalier. THRUSTMASTER DECLINE TOUTE RESPONSABILITE EN CAS DE ® BLESSURE SUITE A UNE UTILISATION DU PEDALIER SANS CHAUSSURES.
- Page 25 Avertissement – Blessures dues au retour de force et aux mouvements répétitifs (suite) * Si les symptômes ou les douleurs indiqués ci-dessus persistent lorsque vous reprenez le jeu, arrêtez de jouer et consultez votre médecin. * Laissez hors de portée des enfants. * Lors des phases de jeu, laissez toujours vos deux mains correctement positionnées sur le volant sans jamais le lâcher complètement.
- Page 26 Vous êtes maintenant prêt à jouer ! - La liste des jeux Xbox One compatibles avec le TMX Force Feedback est disponible ici : http://support.thrustmaster.com (dans la rubrique Volants / TMX Force Feedback). Cette liste est régulièrement mise à jour.
-
Page 27: Installation Sur Pc
Contrôleurs de jeu. La fenêtre Contrôleurs de jeu affiche le nom du volant Thrustmaster TMX Racing Wheel avec l'état OK. 5. Cliquez sur Propriétés pour configurer votre volant dans le panneau de configuration du TMX : •... - Page 28 MAPPING PC 7/20...
- Page 29 FIXATION DU VOLANT Fixer le volant sur une table ou un bureau 1. Placez le volant sur une table ou autre surface plane. 2. Placez la vis de serrage (11) dans le système de fixation (10), puis vissez l’ensemble (dans le sens inverse des aiguilles d’une montre) dans le gros pas de vis (9) situé...
-
Page 30: Montage / Demontage
MONTAGE / SENS DEMONTAGE Pour serrer : Vissez dans le sens inverse des aiguilles d’une montre Pour desserrer : Dévissez dans le sens des aiguilles d’une montre 9/20... - Page 31 Autres astuces pour le bouton MODE Pour profiter d’autres astuces concernant le bouton MODE et son voyant lumineux, allez sur http://support.thrustmaster.com. Cliquez sur Volants / TMX Force Feedback, puis Manuel utilisateur ou FAQ. METTRE A JOUR LE FIRMWARE DU VOLANT Le firmware inclus dans la base du volant peut être mis à...
-
Page 32: Caracteristiques Techniques
CARACTERISTIQUES TECHNIQUES 1 Support métallique pour la butée conique Clé Allen 2,5 mm fournie Ecrou de réglage de position de la butée (non installée par défaut) 2 Butée conique conique 3 Vis de fixation du support métallique Bras de pédale Tête métallique de pédale Support de tête plastique 11/20... - Page 33 Avant d’utiliser ce produit, lisez attentivement cette documentation et conservez-la pour pouvoir la consulter ultérieurement. Pour des raisons de sécurité, ne jouez pas pieds nus ou en chaussettes lorsque vous utilisez le pédalier. THRUSTMASTER DECLINE TOUTE RESPONSABILITE EN CAS DE ® BLESSURE SUITE A UNE UTILISATION DU PEDALIER SANS CHAUSSURES.
- Page 34 Important : La longueur de ces 2 vis M6 ne doit pas dépasser l’épaisseur de votre support +10 mm pour ne pas endommager les composants internes du pédalier. Plan d’implantation pour les cockpits disponible sur http://support.thrustmaster.com, (dans la rubrique Volants / TMX Force Feedback / Manuel utilisateur ou FAQ)
- Page 35 REGLAGES DU PEDALIER Chacune des 3 pédales comprend : - Une tête métallique (8) avec plusieurs perforations (9 pour l’accélérateur – 6 pour le frein – 6 pour l’embrayage). - Un support de tête plastique (7) (placé entre la tête et le bras) avec 4 perforations. - Un bras de pédale (6) avec 2 perforations.
- Page 36 Ajuster l’ECARTEMEMENT des 3 pédales - A l’aide de la clé Allen 2,5 mm fournie (4), dévissez les 2 vis maintenant la tête métallique (8) et son support (7). - Choisissez ensuite votre position (à gauche, au centre ou à droite), puis revissez le tout. Exemples ici avec la pédale de frein : Position à...
- Page 37 Installer la butée conique (MOD « CONICAL RUBBER BRAKE ») Ce MOD n’est pas obligatoire et n’est pas installé par défaut. Cela signifie que la pédale de frein fonctionne parfaitement même si le MOD n’est pas installé. Ce MOD permet d’apporter un feeling et une résistance différents lors des freinages. Il appartiendra à...
- Page 38 - A l’aide de la clé Allen 2,5 mm fournie (4), fixez l’ensemble en utilisant la vis de fixation (3) et le petit pas de vis central situé sous le pédalier. Le MOD « CONICAL RUBBER BRAKE » est désormais installé ! Ajuster la COURSE de débattement et la FORCE de résistance de la pédale de frein En dévissant légèrement l’écrou (5), vous pouvez également durcir davantage la résistance de la...
-
Page 39: Informations Relatives A La Garantie Aux Consommateurs
Dans les pays de l’Union Européenne, ce délai est de deux (2) ans à compter de la délivrance du produit Thrustmaster. Dans les autres pays, la durée de la période de garantie correspond au délai pour intenter une action en conformité... - Page 40 Pendant la période de garantie, Guillemot ne fournira, en principe, pas de pièce détachée car le Support Technique est seul habilité tant à ouvrir qu'à remettre en état tout produit Thrustmaster (à l'exception des remises en état que le Support Technique demanderait, par instructions écrites, au consommateur d'effectuer -par exemple en raison de la simplicité...
- Page 41 COPYRIGHT © 2017 Guillemot Corporation S.A. Tous droits réservés. Thrustmaster est une marque déposée de ® Guillemot Corporation S.A. Toutes les autres marques sont la propriété de leurs propriétaires respectifs. Illustrations non contractuelles. Le contenu, la conception et les spécifications sont susceptibles de changer sans préavis et de varier selon les pays.
- Page 42 FÜR XBOX ONE UND PC Benutzerhandbuch ACHTUNG! Um sicher zu stellen, daß Ihr TMX Rennlenkrad mit Spielen für Xbox One oder PC korrekt funktioniert, ist es eventuell erforderlich die automatischen Aktualisierungen für das Spiel zu installieren. (verfügbar, wenn Ihre Konsole oder Ihr PC mit dem Internet verbunden ist.) 1/20...
-
Page 43: Technische Spezifikationen
TECHNISCHE SPEZIFIKATIONEN 1 TMX Basis 7 Xbox Guide Button + Weiße Leuchtanzeige 2 Lenkkranz 8 MODE Button + Rot/Grün Leuchtanzeige 3 2 sequenzielle Schaltwippen (Hoch & Runter) 9 Großes Schraubgewinde (für Befestigungs- 4 Multidirektionales D-Pad System und Feststellschraube) 5 Actionbuttons 10 Befestigungssystem 6 Actionbuttons 11 Metallene Feststellschraube... - Page 44 * Vermeiden Sie auf jeden Fall Staubbildung an den Lüftungsschlitzen. Benutzen Sie aus Sicherheitsgründen das Pedalset niemals barfuß oder in Socken. THRUSTMASTER ® ÜBERNIMMT KEINERLEI HAFTUNG BEI VERLETZUNGEN DURCH EINSATZ DES PEDALSETS OHNE SCHUHE. Warnung - Verletzungen durch Force Feedback und wiederholte Bewegungen Spielen mit einem Force-Feedback-Lenkrad kann Muskel- oder Gelenkschmerzen verursachen.
- Page 45 Achtung – Verletzungen durch Force Feedback und wiederholte Bewegungen (Fortsetzung) * Wenn Sie wieder zu spielen beginnen und die oben beschriebenen Symptome oder Schmerzen weiterbestehen, unterbrechen Sie das Spiel und konsultieren Sie Ihren Arzt. * Außerhalb der Reichweite von Kindern aufbewahren. * Lassen Sie immer beide Hände während des Spielens am Lenkrad positioniert, ohne dieses völlig loszulassen.
- Page 46 Sie können nun an den Start gehen und Ihr Rennen bestreiten! - Eine Liste der mit dem TMX Force Feedback kompatiblen Spiele für Xbox One ist verfügbar auf: http://support.thrustmaster.com (in der Sektion Lenkräder / TMX Force Feedback). Diese Liste wird regelmäßig aktualisiert.
-
Page 47: Einrichten Des Rennlenkrads Für Den Pc
Installation zu komplettieren. 3. Nach Beenden der Installation klicken Sie auf Beenden und starten Ihren Computer neu. 4. Wählen Sie Start / Alle Programme / Thrustmaster / FFB Racing Wheel / Control Panel, um das Fenster für den Game-Controller zu öffnen. - Page 48 MAPPING AUF DEM PC 7/20...
- Page 49 BEFESTIGEN DES RENNLENKRADS Befestigen Sie das Rennlenkrad auf einem Tisch oder einen Schreibtisch 1. Plazieren Sie das Lenkrad auf einem Tisch oder einer anderen waagerechten, ebenen und stabilen Oberfläche. 2. Stecken Sie die Befestigungsschraube (11) in das Befestigungssystem (10). Ziehen Sie dann die Schraube entgegen dem Uhrzeigersinn im Schraubgewinde (9) unterhalb des Geräts, bis das Lenkrad sicher und perfekt stabil auf der Oberfläche montiert ist.
- Page 50 MONTAGE / RICHTUNG ABMONTIEREN Montieren: Drehen der Schraube entgegen dem Uhrzeigersinn Abmontieren: Drehen der Schraube im Uhrzeigersinn 9/20...
-
Page 51: Automatische Rennlenkrad-Kalibrierung
HILFE UND HÄUFIG GESTELLTE FRAGEN (in diesem Handbuch nicht enthalten) Gehen Sie bitte auf http://support.thrustmaster.com. Dann klicken Sie auf Lenkräder / TMX Force Feedback und wählen dann Benutzerhandbuch oder FAQ aus. Falls Ihr Rennlenkrad und/oder das Pedalset nicht ordnungsgemäß funktionieren oder die Kalibrierung nicht korrekt zu sein scheint: Schalten Sie Ihr System aus. -
Page 52: Technische Merkmale
TECHNISCHE MERKMALE 1 Metallhalterung für den konischen Stop 4 2.5 mm Inbusschlüssel (inklusive) 5 Positions-Stellmutter für konischen Stop (standardmäßig nicht montiert) 2 Konischer Stop 3 Befestigungsschraube für Metallträger 6 Pedalstange 8 Pedalkopf aus Metall 7 Plastik-Halterung 11/20... - Page 53 Sie später etwas nachlesen müssen. Benutzen Sie das Pedalset aus Sicherheitsgründen niemals barfuß oder wenn Sie nur Socken tragen. THRUSTMASTER® LEHNT JEDWEDE HAFTUNG IM FALLE EINER VERLETZUNG DURCH DAS PEDALSET DURCH NUTZUNG DESSELBEN OHNE SCHUHWERK AB.
- Page 54 überschreiten. Längere Schrauben könnten die internen Komponenten des Pedalsets beschädigen. Layout-Diagramme für Cockpits (zur Positionierung der Rennlenkradbasis und/oder des Pedalsets) stehen auf http://support.thrustmaster.com zur Verfügung: Dann klicken Sie auf Lenkräder / TMX Force Feedback und wählen dann Benutzerhandbuch oder FAQ aus. 13/20...
- Page 55 ANPASSEN DES PEDALSETS Jedes der drei Pedale umfaßt: - Einen Metallkopf (8) mit mehreren Bohrungen (neun für das Gas – sechs für die Bremse – sechs für die Kupplung). - Eine Plastik-Halterung (7) mit vier Bohrungen, die zwischen dem Kopf und der Stange plaziert wird.
- Page 56 Anpassen des ZWISCHENRAUMES der drei Pedale - Benutzen Sie den beigelegten 2,5 mm Inbusschlüssel (4), um die beiden Schrauben, die den Pedalkopf aus Metall (8) und dessen Plastik-Halterung (7) halten, loszuschrauben. - Wählen Sie Ihre bevorzugte Position (mehr links, in der Mitte oder mehr nach rechts) und setzen dann die Schrauben wieder ein.
- Page 57 Montage des konischen Stops (“CONICAL RUBBER BRAKE” Mod) Die Modifizierung (oder “Mod”) ist nicht unbedingt erforderlich und ist standardmäßig nicht montiert. Das bedeutet, daß die Bremse auch ohne diese Mod bestens funktioniert. Diese Mod verschafft Ihnen ein anderes Gefühl und einen anderen Widerstand beim Bremsen. Es liegt bei Ihnen, diese nach Ihrem Belieben zu montieren.
- Page 58 - Benutzen Sie den beigefügten 2.5 mm Inbusschlüssel (4), um die Einheit mittels der Befestigungsschraube (3) und dem kleinen Schraubgewinde an der Unterseite des Pedalsets zu montieren. Die “CONICAL RUBBER BRAKE” Mod ist nun montiert! Anpassen des HUBS und der STÄRKE des Widerstands der Bremse Durch leichtes Losdrehen der Mutter (5) können Sie den Bremswiderstand verstärken, indem Sie den konischen Stop (2) näher an die Rückseite der Bremspedalstange herausdrehen (falls nötig, verwenden Sie einen 14-mm-Maulschlüssel oder eine Zange, um die Mutter in der gewählten...
- Page 59 Mängeln in Material und Verarbeitung für eine Gewährleistungsfrist ist, die mit der Frist für eine Mängelrüge bezüglich des Produktes übereinstimmt. In den Ländern der Europäischen Union entspricht diese einem Zeitraum von zwei (2) Jahren ab Kaufdatum des Thrustmaster Produktes. In anderen Ländern entspricht die Gewährleistungsfrist der zeitlichen Begrenzung für eine Mängelrüge bezüglich des Thrustmaster Produktes in Übereinstimmung mit anwendbarem Recht des Landes, in...
-
Page 60: Technischer Support
Niederlassungen jegliche Haftung für Schäden, die nicht auf einen Material- oder Herstellungsfehler in Bezug auf das Produkt beruhen (einschließlich, aber nicht beschränkt auf, etwaige Schäden, die direkt oder indirekt durch Software oder durch die Kombination der Thrustmaster Produkte mit ungeeigneten Elementen, insbesondere Netzteile, Akkus, Ladegeräte, oder andere Elemente, die von Guillemot für dieses Produkt nicht geliefert wurden), ab. - Page 61 COPYRIGHT © Guillemot Corporation S.A. 2017. Alle Rechte vorbehalten. Thrustmaster ist ein eingetragenes ® Warenzeichen der Guillemot Corporation S.A. Alle anderen Handelsmarken sind im Besitz Ihrer jeweiligen Eigentümer. Illustrationen nicht verbindlich. Inhalte, Design und Spezifikationen können ohne vorherige Ankündigung geändert werden und können von Land zu Land unterschiedlich sein.
- Page 62 VOOR XBOX ONE EN PC Handleiding WAARSCHUWING: Om er zeker van te zijn dat het TMX-racestuur correct werkt met games voor de XboxX One en pc, moet u mogelijk de automatische updates voor de games installeren (beschikbaar wanneer het systeem met internet is verbonden). 1/20...
-
Page 63: Technische Specificaties
TECHNISCHE SPECIFICATIES 1 TMX-voet 7 Xbox Guide-knop + Witte indicator 2 Stuur 8 MODE-knop + rood/groen-indicator 3 2 sequentiële schakelflippers (Up & Down) 9 Groot schroefgat (voor 4 Multidirectionele D-Pad bevestigingssysteem en -schroef) 5 Actieknoppen 10 Bevestigingssysteem 6 Actieknoppen 11 Metalen bevestigingsschroef 12 Stuuras 15 USB-kabel en -connector voor racestuur 13 Xbox Guide-knop + Witte indicator... - Page 64 * Zorg dat de ventilatieopeningen stofvrij blijven. Om veiligheidsredenen mogen de pedalen nooit met blote voeten worden bediend of met alleen sokken aan. THRUSTMASTER WIJST ELKE VERANTWOORDELIJKHEID AF IN GEVAL VAN LETSEL ® ALS GEVOLG VAN HET GEBRUIK VAN DE PEDAALSET ZONDER SCHOENEN AAN.
- Page 65 – Waarschuwing Mogelijk letsel ten gevolge van Force Feedback en repetitieve bewegingen (vervolg) * Stop al het gamen als de hierboven beschreven symptomen van pijn of ongemak blijven aanhouden tijdens het gamen en raadpleeg een huisarts. * Houd het stuur, de voet en de pedaalset buiten het bereik van kinderen. * Houd tijdens het gamen altijd twee handen aan het stuur op de juiste stand en laat het stuur nooit helemaal los.
- Page 66 - De lijst met Xbox One -games die compatibel zijn met de TMX Force Feedback en de daarvoor benodigde stand van de USB-keuzeschakelaar (5) is beschikbaar op: http://support.thrustmaster.com (klik op Raceturen / TMX Force Feedback). Deze lijst wordt regelmatig bijgewerkt.
- Page 67 USB-stekker van het stuur aan te sluiten op uw computer en de installatie te voltooien. 3. Klik nadat de installatieprocedure is afgerond op Voltooien om de computer opnieuw te starten. 4. Kies Start / Alle programma's / Thrustmaster / FFB Racing Wheel / Configuratiescherm om het venster Game Controllers openen.
- Page 68 MAPPING OP PC 7/20...
- Page 69 HET RACESTUUR BEVESTIGEN Het racestuur op een tafel of werkblad bevestigen 1. Plaats het racestuur op een tafel of een ander horizontaal, vlak en stabiel oppervlak. 2. Plaats de bevestigingsschroef (11) in het bevestigingssysteem (10) en draai de schroef aan (tegen de klok in) zodat deze vast komt te zitten in het schroefgat (9) onder het racestuur en het stuur volledig stabiel is.
- Page 70 BEVESTIGEN / RICHTING VERWIJDEREN Vastdraaien: Draai de schroef linksom vast (tegen de wijzers van de klok in). Losdraaien: Draai de schroef rechtsom los (met de wijzers van de klok mee). 9/20...
- Page 71 MODE-KNOP EN INDICATOR (8) MODE-knop voor de pedaalset De TMX Force Feedback is ook compatibel met de Thrustmaster-pedaalsets met drie pedalen. Op deze sets is het mogelijk de functie van het koppelingspedaal en het gaspedaal te verwisselen. Dit doet u door de MODE-knop (6) twee seconden ingedrukt te houden.
-
Page 72: Technische Kenmerken
TECHNISCHE KENMERKEN 1 Metalen steun voor conische begrenzer 4 2,5 mm inbussleutel (meegeleverd) 5 Afstelmoer voor conische begrenzer (niet geïnstalleerd bij levering) 2 Conische begrenzer 3 Bevestigingsbout voor metalen steun 6 Pedaalarm 8 Metalen pedaal 7 Kunststof pedaalsteun 11/20... - Page 73 Voor uw en andermans veiligheid mag de pedaalset nooit worden gebruikt op blote voeten of met alleen sokken aan. THRUSTMASTER® WIJST ELKE VERANTWOORDELIJKHEID AF IN GEVAL VAN LETSEL ALS GEVOLG VAN HET GEBRUIK VAN DE PEDAALSET ZONDER SCHOENEN AAN.
- Page 74 Langere schroeven kunnen de componenten in de pedaalset beschadigen. Schema's voor cockpits (voor het plaatsen van de voet van het racestuur en/of de pedaalset) zijn beschikbaar op http://support.thrustmaster.com. Klik op Racesturen / TMX Force Feedback en selecteer vervolgens Handleiding of FAQ..
- Page 75 DE PEDAALSET VERSTELLEN Elk van de drie pedalen bestaat uit: - Een metalen pedaal (8) met een aantal gaatjes (negen voor het gaspedaal, zes voor het rempedaal en zes voor het koppelingspedaal). - Een kunststof tussenstuk (7) (wordt geplaatst tussen het pedaal en de arm van het pedaal) met vier gaatjes.
- Page 76 De RUIMTE TUSSEN twee pedalen afstellen - Draai met behulp van de meegeleverde 2,5 mm inbussleutel (4) de twee boutjes los waarmee het pedaal (8) en de steun (7) vast zitten. - Kies de gewenste pedaalstand (naar links, in het midden of naar rechts) en zet de twee boutjes weer vast waarmee het pedaal (8) en de steun (7) vast zitten.
- Page 77 De conische begrenzer monteren (“CONICAL RUBBER BRAKE” mod) Deze modificatie (of “mod”) is niet noodzakelijk en is af fabriek niet gemonteerd. Dit betekent dat het rempedaal ook perfect functioneert als deze mod niet is gemonteerd. Als u deze mod wel monteert, krijgt u een ander gevoel in het rempedaal. Het wel of niet monteren van deze begrenzer is dus een kwestie van voorkeur.
- Page 78 - Gebruik de meegeleverde 2,5 mm inbussleutel (4) om de unit te monteren met het bevestigingsboutje (3) en de kleine centrale schroefdraad onderop de pedaalset. De “CONICAL RUBBER BRAKE” mod is nu gemonteerd De SLAG en WEERSTAND van het rempedaal afstellen Als u meer weerstand in het rempedaal wilt, draait u de moer (5) iets los en plaatst u de begrenzer (2) iets dichter bij het rempedaal (gebruik indien nodig een 14 mm steek- of ringsleutel, of een tang om de moer opnieuw vast te draaien en de gewenste stand te fixeren).
- Page 79 Europese Unie komt dit overeen met een periode van twee (2) jaar vanaf het moment van levering van het Thrustmaster-product. In andere landen komt de garantieperiode overeen met de tijd maximaal vereist om een restitutie/vervanging voor dit Thrustmaster-product te claimen zoals wettelijk is vastgelegd in het land waarin de koper woonachtig was op de datum van aankoop van het Thrustmaster-product.
-
Page 80: Technische Ondersteuning
Aanvullende garantiebepalingen Gedurende de garantieperiode zal Guillemot in principe nooit reserveonderdelen leveren omdat Technical Support de enige partij is die bevoegd is een Thrustmaster-product te openen en/of te herstellen (met uitzondering van een herstelprocedure die de klant door Technical Support gevraagd wordt uit te voeren met behulp van schriftelijke instructies –... -
Page 81: Aanbevelingen Voor De Bescherming Van Het Milieu
COPYRIGHT © 2017 Guillemot Corporation S.A. Alle rechten voorbehouden. Thrustmaster is een geregistreerd ® handelsmerk van Guillemot Corporation S.A. Alle andere handelsmerken zijn eigendom van de respectieve eigenaren. Afbeeldingen zijn niet bindend. Inhoud, ontwerp en specificaties kunnen zonder kennisgeving vooraf worden gewijzigd en kunnen per land verschillen. Geproduceerd in China. - Page 82 PER XBOX ONE E PC Manuale d'uso ATTENZIONE: Per far sì che il tuo TMX Force Feedback funzioni correttamente con i giochi per Xbox One e PC, potrebbe rendersi necessario installare gli aggiornamenti automatici dei giochi (disponibili nel momento in cui il tuo sistema (Xbox One o PC ) viene collegato a internet).
-
Page 83: Caratteristiche Tecniche
CARATTERISTICHE TECNICHE 1 Base TMX 7 Pulsante Xbox Guide + Led bianco 2 Volante 8 Pulsante MODE + led Rosso/Verde 3 2 leve del cambio sequenziali (Up e Down) 9 Ampio foro filettato (per sistema di 4 D-Pad multidirezionale aggancio e vite di fissaggio) 5 Pulsanti azione 10 Sistema di aggancio 6 Pulsanti azione... - Page 84 * Non lasciare che la polvere penetri nella prese d'aria. Per motivi di sicurezza, non utilizzare mai la pedaliera a piedi nudi o indossando solamente i calzini. THRUSTMASTER DECLINA OGNI RESPONSABILITÀ IN CASO DI INFORTUNI ® DERIVANTI DALL'USO DELLA PEDALIERA SENZA SCARPE.
- Page 85 Attenzione – Infortuni derivanti dal force feedback e dai movimenti ripetuti (seguito) * Qualora i sintomi o il dolore sopradescritti dovessero persistere anche quando ricominci a giocare, smetti di giocare e consulta il tuo medico. * Tenere lontano dalla portata dei bambini. * Nei giochi, mantieni sempre le mani sul volante in posizione corretta, senza mai lasciarlo andare completamente.
- Page 86 5. Una volta acceso il tuo sistema, il tuo volante si calibrerà automaticamente. Ora sei pronto/a per giocare! - L’elenco dei giochi per Xbox One compatibili con il TMX Force Feedback è disponibile sul sito: http://support.thrustmaster.com (clicca su Volanti / TMX Force Feedback). Questo elenco viene aggiornato regolarmente. MAPPATURA SU XBOX ONE...
-
Page 87: Configurazione Del Volante Per Pc
USB del tuo volante e completare l'installazione. 3. Una volta completata l'installazione, clicca su Fine e riavvia il tuo computer. 4. Seleziona Start / Tutti i programmi / Thrustmaster / FFB Racing Wheel / Pannello di Controllo per aprire la finestra Controller di Gioco. - Page 88 MAPPATURA PER PC 7/20...
- Page 89 FISSARE IL VOLANTE Fissare il volante a un tavolo o a una scrivania 1. Colloca il volante su un tavolo o su qualsiasi altra superficie piana, orizzontale e stabile. 2. Inserisci la vite di fissaggio (11) nel sistema di aggancio (10), dopodiché blocca la periferica ruotando la vite in senso antiorario, in modo tale che questa penetri nell'ampio foro filettato (9) presente nella parte inferiore del volante, finché...
- Page 90 AGGANCIO / DIREZIONE RIMOZIONE Per stringere: Gira la vite in senso antiorario Per allentare: Gira la vite in senso orario 9/20...
- Page 91 PULSANTE MODE E SPIA LUMINOSA (8) Pulsante MODE per la pedaliera Il TMX Force Feedback è compatibile anche con pedaliere Thrustmaster a 3 pedali (vendute separatamente); in questo modo potrai scambiare elettronicamente fra loro i pedali di acceleratore e frizione.
- Page 92 CARATTERISTICHE TECNICHE 1 Supporto metallico per blocco conico 4 Chiave Allen da 2,5 mm (inclusa) 5 Dado di regolazione della posizione del (non preventivamente installato) 2 Blocco conico blocco conico 3 Vite di fissaggio per supporto metallico 6 Asta del pedale 8 Copri-pedale in metallo 7 Supporto copri-pedale in plastica 11/20...
- Page 93 Per ragioni di sicurezza, non utilizzare mai la pedaliera a piedi nudi o indossando unicamente dei calzini. THRUSTMASTER® DECLINA OGNI RESPONSABILITÀ IN CASO DI INFORTUNIO DERIVANTE DALL’USO DELLA PEDALIERA SENZA SCARPE. Attenzione – Rischio di schiacciamento durante le sessioni di gioco con la pedaliera * Mantieni la pedaliera fuori dalla portata dei bambini.
- Page 94 M6 non deve superare lo spessore della placca di supporto per la pedaliera del tuo abitacolo aumentato di 10 mm. I diagrammi delle configurazioni per gli abitacoli (per il posizionamento della base del volante e/o della pedaliera) sono disponibili sul sito http://support.thrustmaster.com: clicca su Volanti / TMX Force Feedback, quindi seleziona Manuale o FAQ. 13/20...
- Page 95 REGOLAZIONE DELLA PEDALIERA Ognuno dei tre pedali è dotato di: - Copri-pedale in metallo (8) multi-perforato (nove per l’acceleratore – sei per il freno – sei per la frizione). - Un supporto copri-pedale in plastica (7) (posizionato tra la testa e l’asta del pedale) con quattro perforazioni.
- Page 96 Regolare la DISTANZA fra i tre pedali - Utilizzando l’acclusa chiave Allen da 2,5 mm (4), svita le due viti di fissaggio del copri-pedale in metallo (8) e del relativo supporto (7). - Seleziona la tua posizione preferita (a sinistra, al centro, a destra), dopodiché reinserisci e stringi nuovamente le viti, in modo tale che il copri-pedale in metallo (8) e il relativo supporto (7) siano saldamente fissati.
- Page 97 Installare in blocco conico (“CONICAL RUBBER BRAKE” mod) Questa modifica (o “mod”) non è essenziale e non risulta preventivamente installata. Ciò significa che il pedale del freno funziona perfettamente anche a mod non installato. Questo mod ti permette di sperimentare differenti sensazioni e resistenze durante le frenate. Sta a te scegliere se installarlo o meno, a seconda delle tue preferenze.
- Page 98 - Utilizzando l’acclusa chiave Allen da 2,5 mm (4), aggancia l’unità stringendo la vite di fissaggio (3) nel piccolo foro centrale filettato, presente nella parte inferiore della pedaliera. Il mod “CONICAL RUBBER BRAKE” è ora installato! Regolazione dell’AMPIEZZA della corsa e della FORZA resistente del pedale del freno Svitando leggermente il dado (5), puoi aumentare ulteriormente la resistenza del pedale del freno, avvicinando il blocco conico (2) alla parte posteriore dell’asta del pedale (se necessario, per stringere nuovamente il dado e mantenerlo nella posizione desiderata, usa una chiave del 14 o delle pinze).
- Page 99 35571 Chantepie, Francia (d’ora in avanti “Guillemot”) garantisce al consumatore che il presente prodotto Thrustmaster sarà privo di difetti relativi ai materiali e alla fabbricazione, per un periodo di garanzia corrispondente al limite temporale stabilito per la presentazione di un reclamo riguardante la conformità...
-
Page 100: Assistenza Tecnica
Considerando i propri cicli di innovazione e per proteggere il proprio know-how e i propri segreti commerciali, in linea di principio, Guillemot non fornirà alcuna notifica o parte di ricambio finalizzata alla rimessa in attività di un qualunque prodotto Thrustmaster il cui periodo di garanzia risultasse scaduto. -
Page 101: Raccomandazioni Sulla Tutela Dell'ambiente
COPYRIGHT © 2017 Guillemot Corporation S.A. Tutti i diritti riservati. Thrustmaster è un marchio registrato di ® proprietà di Guillemot Corporation S.A. Tutti gli altri marchi appartengono ai legittimi proprietari. Illustrazioni escluse. I contenuti, i design e le caratteristiche possono essere oggetto di modifiche senza preavviso e possono variare da un Paese all’altro. - Page 102 PARA XBOX ONE Y PC Manual del usuario ADVERTENCIA: Para asegurarte de que tu volante de carreras TMX funcione correctamente con juegos para Xbox One o PC, puede que tengas que instalar las actualizaciones automáticas de los juegos (disponibles cuando tu sistema (Xbox One o PC) está conectado a Internet). 1/20...
-
Page 103: Características Técnicas
CARACTERÍSTICAS TÉCNICAS 1 Base de TMX 7 Botón Xbox Guide + luz indicadora blanca 2 Volante 8 Botón MODE + luz indicadora roja/verde 3 2 levas de cambio secuenciales (Up y Down) 9 Agujero roscado grande (para sistema de 4 D-Pad multidireccional fijación y tornillo de apriete) 5 Botones de acción 10 Sistema de fijación... - Page 104 * No dejes que se acumule polvo en las rejillas de ventilación. Por razones de seguridad, no uses nunca los pedales con los pies descalzos o únicamente con calcetines en los pies. THRUSTMASTER DECLINA TODA RESPONSABILIDAD EN CASO DE ®...
- Page 105 Advertencia – Lesiones debidas a Force Feedback y los movimientos repetitivos (continuación) * Si los síntomas o el dolor indicados anteriormente persisten cuando vuelves a jugar, deja de hacerlo y consulta al médico. * Mantén el volante fuera del alcance de los niños. * Durante el juego, mantén siempre ambas manos colocadas correctamente en el volante sin dejarlas completamente caídas.
- Page 106 ¡Ya estás preparado para jugar! - La lista de juegos de Xbox One compatibles con el TMX Force Feedback está disponible en: http://support.thrustmaster.com (haz clic en Wheels / TMX Force Feedback). Esta lista se actualiza regularmente. ASIGNACIÓN PARA XBOX ONE...
-
Page 107: Configuración Del Volante De Carreras Para Pc
USB del volante al ordenador y terminar la instalación. 3. Una vez completada la instalación, haz clic en Terminar y reinicia el ordenador. 4. Selecciona Inicio / Todos los programas / Thrustmaster / FFB Racing Wheel / Panel de control para abrir la ventana Dispositivos de juego. - Page 108 ASIGNACIÓN EN PC 7/20...
- Page 109 FIJACIÓN DEL VOLANTE DE CARRERAS Fijación del volante de carreras a una mesa o un escritorio 1. Coloca el volante de carreras en una mesa o en otra superficie horizontal, plana y estable. 2. Inserta el tornillo de sujeción (11) en el sistema de fijación (10) y, a continuación, aprieta el dispositivo girando el tornillo a la izquierda, para que entre en el agujero roscado grande (9) situado debajo del volante de carreras, hasta que el volante esté...
- Page 110 COLOCACIÓN / INDICACIÓN RETIRADA Para apretar: Gira el tornillo hacia la izquierda Para aflojar: Gira el tornillo hacia la derecha 9/20...
-
Page 111: Calibración Automática Del Volante
Para mostrar la versión de firmware que está usando actualmente tu volante de carreras y actualizarla si es necesario: en PC, visita http://support.thrustmaster.com. Clic en Volantes de carreras / TMX Force Feedback y, a continuación, selecciona Firmware y sigue las instrucciones que describen el procedimiento de descarga e instalación. - Page 112 CARACTERÍSTICAS TÉCNICAS 1 Soporte metálico para tope cónico 3 Tornillo de sujeción de soporte metálico 4 Llave Allen de 2,5 mm (incluida) (no está instalado de forma 5 Tuerca de ajuste de posición para tope predeterminada) 2 Tope cónico cónico 6 Brazo del pedal 8 Cabeza del pedal metálica 7 Soporte de cabeza de plástico...
- Page 113 Por motivos de seguridad, no utilizar nunca los pedales con los pies desnudos o únicamente con calcetines en los pies. THRUSTMASTER® DECLINA TODA RESPONSABILIDAD EN CASO DE LESIONES PRODUCTO DEL USO DE LOS PEDALES SIN CALZADO. Advertencia – Peligro de pillarse con los pedales durante las sesiones de juego * Mantén los pedales fuera del alcance de los niños.
- Page 114 10 mm adicionales, para evitar dañar los componentes internos de los pedales. Los diagramas de diseño para cabinas (para colocar la base del volante de carreras y/o los pedales) están disponibles en http://support.thrustmaster.com: haz clic en Volantes de carreras / TMX Force Feedback y luego selecciona Manual o PF. 13/20...
- Page 115 AJUSTE DE LOS PEDALES Cada uno de los tres pedales incluye: - Una cabeza metálica (8) con varias perforaciones (nueve para el acelerador, seis para el freno y seis para el embrague). - Un soporte de cabeza de plástico (7) (situado entre la cabeza y el brazo) con cuatro perforaciones.
- Page 116 Ajuste del ESPACIADO de los tres pedales - Con la llave Allen de 2,5 mm incluida (4), desatornilla los dos tornillos que sujetan la cabeza metálica (8) y su soporte (7) en su sitio. - Selecciona la posición que prefieras (a la izquierda, centrada o a la derecha) y, a continuación, vuelve a colocar y apretar los tornillos de forma que la cabeza metálica (8) y su soporte (7) queden sujetos firmemente en su sitio.
- Page 117 Instalación del tope cónico (mod “CONICAL RUBBER BRAKE”) Esta modificación (o “mod”) no es esencial y no se instala de forma predeterminada. Esto significa que el pedal del freno funciona perfectamente aunque no esté instalado el mod. Este mod te permite experimentar una resistencia y sensación diferentes al frenar. Depende de ti instalarlo o no, en función de tus preferencias.
- Page 118 - Con la llave Allen de 2,5 mm incluida (4), fija la unidad con el tornillo de sujeción (3) y la rosca de tornillo central pequeña situada en la cara inferior de los pedales. ¡Ya está instalado el mod “CONICAL RUBBER BRAKE”! Ajuste del RANGO de desplazamiento y la RESISTENCIA del pedal del freno Si desatornillas ligeramente la tuerca (5), puedes reforzar más la resistencia del pedal del freno moviendo el tope cónico (2) más cerca de la parte trasera del brazo del pedal (si es necesario, usa...
-
Page 119: Información De Garantía Al Consumidor
En los países de la Unión Europea, esto corresponde a un período de dos (2) años a partir de la entrega del producto de Thrustmaster. En otros países, el período de garantía corresponde al límite de tiempo para interponer una acción legal referida a la conformidad en relación con este producto de Thrustmaster según las leyes... - Page 120 Thrustmaster con cualquier elemento no adecuado, incluyendo en particular fuentes de alimentación, baterías recargables, cargadores o cualquier otro elemento no suministrado por Guillemot para este producto).
-
Page 121: Recomendación De Protección Ambiental
COPYRIGHT © 2017 Guillemot Corporation S.A. Todos los derechos reservados. Thrustmaster es una marca ® registrada de Guillemot Corporation S.A. Todas las demás marcas son propiedad de sus respectivos dueños. Ilustraciones no definitivas. El contenido, la concepción y las especificaciones son susceptibles de cambiar sin previo aviso y varían según el país. - Page 122 PARA XBOX ONE E PC Manual do Utilizador ATENÇÃO: Para garantir que o seu volante TMX funciona corretamente com jogos para Xbox One ou PC, poderá ser-lhe pedido para instalar as atualizações automáticas dos jogos (disponível quando o sistema (Xbox One ou PC) está ligado à Internet). 1/20...
- Page 123 CARACTERÍSTICAS TÉCNICAS 1 Base do TMX 7 Botão Xbox Guide + Luz indicadora branca 2 Volante 8 Botão MODE + Luz indicadora 3 2 pás de mudança de velocidades sequenciais vermelha/verde (Up e Down) 9 Furo roscado grande (para o sistema de 4 D-Pad multidirecional fixação e parafuso de aperto) 5 Botões de acções...
- Page 124 * Não deixe que pó se acumule nas aberturas de ventilação. Por razões de segurança, nunca utilize o conjunto de pedais com os pés descalços ou apenas com meias calçadas nos pés. A THRUSTMASTER NÃO ASSUME QUALQUER RESPONSABILIDADE NA EVENTUALIDADE DE ®...
- Page 125 Atenção – Ferimentos resultantes dos efeitos Force Feedback e dos movimentos repetidos (continuação) * Se os sintomas ou as dores acima indicados persistirem quando recomeçar a jogar, pare de jogar e consulte o seu médico. * Guarde o volante fora do alcance das crianças. * Durante o jogo, mantenha sempre ambas as mãos posicionadas corretamente no volante sem largá- lo por completo.
- Page 126 Está pronto para começar a jogar! - A lista de jogos para a Xbox One compatíveis com o TMX Force Feedback está disponível em: http://support.thrustmaster.com (clique em Volantes / TMX Force Feedback). Esta lista é atualizada regularmente. MAPEAMENTO PARA XBOX ONE...
- Page 127 USB e completar a instalação. 3. Quando a instalação for concluída, clique em Finalizar e reinicie o computador. 4. Selecione Iniciar / Todos os Programas / Thrustmaster / FFB Racing Wheel / Painel de Controle para abrir a janela Controladores de Jogo A janela Controladores de Jogo exibe o nome Thrustmaster TMX Racing Wheel e o status OK.
- Page 128 MAPEAMENTO PARA PC 7/20...
- Page 129 FIXAR O VOLANTE Fixar o volante a uma mesa ou secretária 1. Coloque o volante sobre uma mesa ou de qualquer outra superfície horizontal, plana e estável. 2. Insira o parafuso de aperto (11) no sistema de fixação (10),em seguida aperte o dispositivo rodando o parafuso no sentido anti-horário, de forma que penetre no furo roscado grande (9) situado por baixo do volante, até...
-
Page 130: Fixação / Remoção
FIXAÇÃO / DIREÇÃO REMOÇÃO Para apertar: Rode o parafuso no sentido anti- horário Para soltar: Rode o parafuso no sentido horário 9/20... -
Page 131: Calibragem Automática Do Volante
BOTÃO MODE E LUZ INDICADORA (8) Botão MODE para o conjunto de pedais O TMX Force Feedback também é compatível com conjuntos de pedais Thrustmaster dotados de 3 pedais; estes permitem trocar eletronicamente os pedais do acelerador e da embraiagem. - Page 132 CARACTERÍSTICAS TÉCNICAS 1 Apoio de metal para batente cónico 4 Chave sextavada de 2,5 mm (incluída) 5 Porca de ajuste da posição para o batente (não instalado por predefinição) 2 Batente cónico cónico 3 Parafuso de fixação para o apoio de metal 6 Braço do pedal 8 Cabeça de metal do pedal 7 Apoio de plástico da cabeça...
- Page 133 Por razões de segurança, nunca utilize o conjunto de pedais com os pés descalços ou quando estiver apenas de meias calçadas. A THRUSTMASTER® NÃO ASSUME QUALQUER RESPONSABILIDADE NA EVENTUALIDADE DE DANOS FÍSICOS RESULTANTES DA UTILIZAÇÃO DO CONJUNTO DE PEDAIS SEM CALÇADO.
- Page 134 10 mm, para evitar danificar os componentes internos do conjunto de pedais. Estão disponíveis esquemas de disposição para cockpits (para posicionar a base do volante e/ou o conjunto de pedais) em http://support.thrustmaster.com: clique em Volantes / TMX Force Feedback e em seguida selecione Manual ou FAQ. 13/20...
- Page 135 AJUSTAR O CONJUNTO DE PEDAIS Cada um dos três pedais inclui: - Uma cabeça de metal (8) com vários furos (nove para o acelerador, seis para o travão e seis para a embraiagem). - Um apoio de plástico da cabeça (7) (colocado entre a cabeça e o braço) com quatro furos. - Um braço do pedal (6) com dois furos.
- Page 136 Ajustar o ESPAÇAMENTO dos três pedais - Com a chave sextavada de 2,5 mm incluída (4), desenrosque os dois parafusos que prendem a cabeça de metal (8) e o respetivo apoio (7) na posição. - Selecione a sua posição preferida (à esquerda, ao centro ou à direita) e em seguida reaperte os parafusos de forma a fixar firmemente nessa posição a cabeça de metal (8) e o respetivo apoio (7).
- Page 137 Instalar o batente cónico (“CONICAL RUBBER BRAKE” mod) Esta modificação (ou “mod”) não é essencial, não sendo instalada por predefinição. Isto significa que o pedal do travão funciona perfeitamente mesmo sem a mod instalada. Esta mod permite-lhe experimentar uma sensação e uma resistência diferentes ao travar. Cabe a si decidir se deve ou não instalá-la, de acordo com as suas próprias preferências.
- Page 138 - Com a chave sextavada de 2,5 mm incluída (4), fixe a unidade utilizando o parafuso de fixação (3) e a pequena rosca de parafuso situada na parte inferior do conjunto de pedais. A “CONICAL RUBBER BRAKE” mod encontra-se agora instalada! Ajustar o CURSO e a FORÇA da resistência do pedal do travão Ao desenroscar ligeiramente a porca (5), pode aumentar a resistência do pedal do travão aproximando o batente cónico (2) da parte posterior do braço do pedal (se necessário, utilize uma...
-
Page 139: Informações Sobre A Garantia Para O Consumidor
Thrustmaster de acordo com a legislação em vigor do país no qual o consumidor residia à data de compra do produto Thrustmaster (se a dita ação não existir no país correspondente, então o período de garantia será... -
Page 140: Suporte Técnico
(incluindo, mas sem limitação, quaisquer danos causados direta ou indiretamente por qualquer software ou por combinar o produto Thrustmaster com qualquer elemento inadequado, incluindo, em particular, fontes de alimentação, baterias recarregáveis, carregadores ou quaisquer outros elementos não fornecidos pela Guillemot para... -
Page 141: Direitos De Autor
DIREITOS DE AUTOR © 2017 Guillemot Corporation S.A. Todos os direitos reservados. Thrustmaster é uma marca ® registada da Guillemot Corporation S.A. Todas as outras marcas comerciais são pertencem aos respectivos proprietários. As ilustrações não são vinculativas. Os conteúdos, desenhos e especificações estão sujeitos a alteração sem aviso prévio e podem variar de país para país. - Page 142 Для XBOX ONE и PC Инструкция по эксплуатации ВНИМАНИЕ! Для обеспечения оптимальной совместимости рулевой системы TMX с играми на Xbox One или ПК, может потребоваться установка автоматических обновлений для игр (их можно загрузить, подключив игровую систему к Интернету). 1/20...
-
Page 143: Технические Характеристики
ТЕХНИЧЕСКИЕ ХАРАКТЕРИСТИКИ 1 База системы TMX 7 Кнопка Xbox Guide + Белый индикатор 2 Руль 8 Кнопка MODE (Режим) + 3 2 лепестковых переключателя (Up и Down) красный/зеленый индикатор 4 Многопозиционная кнопка 9 Резьба под большой винт (для системы 5 Кнопки крепления... - Page 144 * ничем не накрывайте базу; * не допускайте скопления пыли на вентиляционных отверстиях. Из соображений безопасности никогда не нажимайте на педали босой ногой или ногой в носке (без обуви). КОМПАНИЯ THRUSTMASTER ОТКАЗЫВАЕТСЯ ОТ ЛЮБОЙ ® ОТВЕТСТВЕННОСТИ В СЛУЧАЕ ПОЛУЧЕНИЯ ТРАВМЫ В РЕЗУЛЬТАТЕ...
- Page 145 Внимание – риск травмирования в результате повторяющихся движений и действия силовой обратной связи Использование рулевой системы с силовой обратной связью может вызвать боль в мышцах или суставах. Советы по предотвращению проблем со здоровьем: * не проводите за игрой продолжительное время; * после...
-
Page 146: Настройка Рулевой Системы Для Xbox One
5. После включения игровой системы автоматически выполняется калибровка рулевого колеса. Теперь все готово для игры! - Перечень игр для Xbox One, совместимых с рулевой системой TMX Force Feedback можно найти на сайте: http://support.thrustmaster.com (выберите Гоночные рули / TMX). Этот список регулярно обновляется. СООТНЕСЕНИЕ ФУНКЦИЙ ДЛЯ XBOX ONE... -
Page 147: Настройка Рулевой Системы Для Пк
по подключению USB-кабеля к компьютеру и завершению установки. 3. После завершения установки щелкните кнопку «Готово» и перезапустите компьютер. 4. Выберите «Пуск / Все программы / Thrustmaster / FFB Racing Wheel / Control Panel», чтобы открыть окно «Игровые устройства». В окне «Игровые устройства» отображается рулевая система Thrustmaster TMX Racing Wheel с... - Page 148 РАСКЛАДКА ФУНКЦИЙ ДЛЯ ПК 7/20...
-
Page 149: Установка Рулевой Системы
УСТАНОВКА РУЛЕВОЙ СИСТЕМЫ Размещение рулевого колеса на столе. 1. Расположите гоночный руль на столе или иной горизонтальной плоской и устойчивой поверхности. 2. Вставьте крепежный винт (11) в систему крепления (10) и надежно зафиксируйте руль, затягивая винт против часовой стрелки, так чтобы он вошел в большое резьбовое отверстие... - Page 150 УСТАНОВКА / НАПРАВЛЕНИЕ ДЕМОНТАЖ Фиксация Закручивайте винт против часовой стрелки Ослабление Раскручивайте винт по часовой стрелке 9/20...
- Page 151 (В противном случае возможен сбой калибровки и/или телесная травма). КНОПКА И ИНДИКАТОР MODE(8) Кнопка MODE для педального блока Рулевая система TMX Force Feedback совместима также с педальными блоками Thrustmaster с тремя педалями (приобретаются отдельно); на которых можно электронным способом поменять местами педали сцепления и газа.
- Page 152 ТЕХНИЧЕСКИЕ ХАРАКТЕРИСТИКИ 1 Металлическая база для 3 Крепежный винт для металлической базы конусообразного стопора 4 6-гранный ключ 2,5 мм (в комплекте) 5 Регулировочная гайка для (по умолчанию не установлена) 2 Конусообразный стопор конусообразного стопора 6 Рычаг педали 8 Металлическая педаль 7 Пластиковая...
- Page 153 сохраните ее на будущее. Из соображений безопасности никогда не нажимайте на педали босой ногой или ногой в носке (без обуви). КОМПАНИЯ THRUSTMASTER® ОТКАЗЫВАЕТСЯ ОТ ЛЮБОЙ ОТВЕТСТВЕННОСТИ В СЛУЧАЕ ПОЛУЧЕНИЯ ТРАВМЫ В РЕЗУЛЬТАТЕ НАЖИМАНИЯ НА ПЕДАЛИ НЕОБУТЫМИ НОГАМИ. Предупреждение — опасность защемления педальным блоком во время игры...
- Page 154 Важно! Длина винтов M6 не должна превышать толщину площадки больше чем на 10 мм во избежание повреждений внутренних деталей педального блока. Компоновочные схемы для кокпитов (размещение базы рулевого колеса и/или педального блока) можно найти на сайте http://support.thrustmaster.com. Щелкните Гоночные рули / TMX Force Feedback и выберите Инструкция по эксплуатации или Часто задаваемые вопросы.
- Page 155 РЕГУЛИРОВКА ПЕДАЛЬНОГО БЛОКА Конструкция педалей: - металлическая площадка педали (8) с несколькими отверстиями (9 отверстий на педали газа, 6 — на педали тормоза, 6 — на педали сцепления); - пластиковая прокладка для площадки (7) (крепится между площадкой и рычагом) с четырьмя...
- Page 156 Регулировка РАССТОЯНИЯ между тремя педалями - С помощью входящего в комплект шестигранного ключа 2,5 мм (4) открутите 2 винта, удерживающих металлическую площадку (8) и прокладку (7). - Выберите нужное положение педали (слева, по центру или справа) и заново закрутите винты для жесткой фиксации металлической площадки (8) и прокладки (7). Примеры...
- Page 157 Установка конусообразного стопора (конфигурация CONICAL RUBBER BRAKE mod) Данная конфигурация (mod) необязательна, поэтому стопор по умолчанию не установлен. Это означает, что педаль тормоза превосходно работает и без установленного стопора mod. Стопор mod позволяет добиться новых ощущений и сопротивления при торможении. Пользователь...
- Page 158 - Закрепите модуль с помощью шестигранного ключа 2,5 мм (4), вкрутив крепежный винт (3) в небольшое резьбовое отверстие на нижней стороне педального блока. Модуль CONICAL RUBBER BRAKE mod установлен! Регулировка ШАГА педали тормоза и СИЛЫ сопротивления Слегка ослабив гайку (5) и сдвинув конусообразный стопор (2) к задней части рычага педали, можно...
- Page 159 Корпорация Guillemot Corporation S.A., зарегистрированная по адресу Place du Granier, B.P. 97143, 35571 Chantepie, Франция, (далее — «Guillemot») гарантирует своим клиентам во всем мире, что в данном изделии Thrustmaster не будет выявлено никаких дефектов материалов и производства в течение гарантийного периода, который равен сроку предъявления претензии по соответствию для...
- Page 160 Дополнительные условия гарантии В течение гарантийного срока компания Guillemot, в общем и целом, не предоставляет никаких запасных частей, так как вскрытие и/или модификацию любых изделий Thrustmaster вправе осуществлять только служба технической поддержки (за исключением каких-либо процедур по модификации, которые служба технической поддержки может предложить выполнить клиенту путем...
-
Page 161: Авторское Право
АВТОРСКОЕ ПРАВО © 2017 Guillemot Corporation S.A. Все права защищены. Thrustmaster® является зарегистрированной торговой маркой Guillemot Corporation. Все прочие торговые марки являются собственностью соответствующих владельцев. Иллюстрации могут не соответствовать внешнему виду/функциям конкретного изделия. Содержание руководства, конструкция и технические характеристики изделия изменяются без предварительного... - Page 162 ΓΙΑ XBOX ONE Η PC Εγχειρίδιο χρήσης ΠΡΟΕΙΔΟΠΟΙΗΣΗ: Για να βεβαιωθείτε ότι η τιμονιέρα TMX Racing Wheel λειτουργεί σωστά με τα παιχνίδια για την κονσόλα Xbox One ή για PC, ίσως χρειαστεί να εγκαταστήσετε τις αυτόματες ενημερώσεις του κάθε παιχνιδιού (είναι...
-
Page 163: Τεχνικα Χαρακτηριστικα
ΤΕΧΝΙΚΑ ΧΑΡΑΚΤΗΡΙΣΤΙΚΑ 1 Βάση TMX 7 Κουμπί Xbox Guide + λυχνία ένδειξης σε 2 Τιμόνι λευκό 3 2 μοχλοί αλλαγής ταχυτήτων σειριακής 8 Κουμπί MODE + λυχνία ένδειξης με διάταξης (Up & Down) κόκκινο/πράσινο χρώμα 4 Σταυρός κατευθύνσεων πολλών κατευθύνσεων 9 Οπή... - Page 164 * Μην αφήνετε να συσσωρευτεί σκόνη επάνω στους αεραγωγούς. Για λόγους ασφάλειας, ποτέ μην χρησιμοποιείτε το σετ των πεντάλ ξυπόλητοι ή φορώντας μόνο κάλτσες. Η THRUSTMASTER ΑΠΟΠΟΙΕΙΤΑΙ ΟΠΟΙΑΣΔΗΠΟΤΕ ΕΥΘΥΝΗΣ ΣΕ ΠΕΡΙΠΤΩΣΗ ΤΡΑΥΜΑΤΙΣΜΟΥ ® ΠΟΥ ΠΡΟΚΑΛΕΙΤΑΙ ΑΠΟ ΤΗ ΧΡΗΣΗ ΤΟΥ ΣΕΤ ΤΩΝ ΠΕΝΤΑΛ ΧΩΡΙΣ ΠΑΠΟΥΤΣΙΑ.
- Page 165 Προειδοποίηση – Τραυματισμοί λόγω τεχνολογίας Force Feedback και επαναλαμβανόμενων κινήσεων (συνέχεια) * Αν τα συμπτώματα ή ο πόνος που αναφέρθηκαν παραπάνω επιμένουν όταν αρχίσετε ξανά το παιχνίδι, σταματήστε να παίζετε και επισκεφτείτε τον ιατρό σας. * Κρατήστε το προϊόν μακριά από παιδιά. * Κατά...
- Page 166 5. Αφού ενεργοποιήσετε το σύστημά σας, η τιμονιέρα σας θα βαθμονομηθεί αυτόματα. Τώρα είστε έτοιμοι για παιχνίδι! - Η λίστα με συμβατά παιχνίδια του Xbox One με το τιμόνι TMX Force Feedback υπάρχει διαθέσιμη http://support.thrustmaster.com στον ιστότοπο: (κάντε κλικ στις επιλογές Racing Wheels / TMX Force Feedback).
-
Page 167: Ρυθμιση Τησ Τιμονιερασ Για Pc
ΡΥΘΜΙΣΗ ΤΗΣ ΤΙΜΟΝΙΕΡΑΣ ΓΙΑ PC 1. Μεταβείτε στη διεύθυνση http://support.thrustmaster.com για λήψη των οδηγών και του λογισμικού Force Feedback για PC. Κάντε κλικ στις επιλογές Wheels (Τιμόνια)/TMX Force Feedback, έπειτα επιλέξτε Drivers (Οδηγοί). 2. Μετά την ολοκλήρωση της λήψης, εκκινήστε την εγκατάσταση και ακολουθήστε τις οδηγίες στην... - Page 168 ΑΝΤΙΣΤΟΙΧΙΣΗ ΣΕ PC 7/20...
- Page 169 ΠΡΟΣΑΡΤΗΣΗ ΤΙΜΟΝΙΕΡΑΣ Τοποθέτηση τιμονιέρας σε τραπέζι ή γραφείο 1. Τοποθετήστε την τιμονιέρα σε τραπέζι ή οποιαδήποτε άλλη οριζόντια, επίπεδη και σταθερή επιφάνεια. 2. Εισάγετε τη βίδα σύσφιξης (11) στο σύστημα προσάρτησης (10), μετά σφίξτε τη συσκευή στρέφοντας τη βίδα σύσφιξης αριστερόστροφα, ώστε να στερεωθεί στην οπή του μεγάλου σπειρώματος...
- Page 170 ΠΡΟΣΑΡΤΗΣΗ/ΑΦΑΙ ΚΑΤΕΥΘΥΝΣΗ ΡΕΣΗ Για να σφίξετε: Στρέψτε τη βίδα αριστερόστροφα Για ελευθέρωση: Στρέψτε τη βίδα δεξιόστροφα 9/20...
-
Page 171: Αυτοματη Βαθμονομηση Τιμονιου
ΚΟΥΜΠΙ MODE ΚΑΙ ΛΥΧΝΙΑ ΕΝΔΕΙΞΗΣ (8) Κουμπί MODE για το σετ των πεντάλ Η τιμονιέρα TMX Force Feedback είναι επίσης συμβατή με το σετ των πεντάλ της Thrustmaster που διαθέτει 3 πεντάλ (πωλούνται ξεχωριστά). Αυτά σας παρέχουν τη δυνατότητα να πραγματοποιείτε... - Page 172 ΤΕΧΝΙΚΑ ΧΑΡΑΚΤΗΡΙΣΤΙΚΑ 1 Μεταλλικό στήριγμα για κωνικό στοπ 4 Κλειδί άλεν 2,5 χιλ. (περιλαμβάνεται) 5 Παξιμάδι στερέωσης θέσης για κωνικό στοπ (δεν εγκαθίσταται από προεπιλογή) 2 Κωνικό στοπ 3 Βίδα στερέωσης για μεταλλικό στήριγμα 6 Βραχίονας πεντάλ 8 Μεταλλική κεφαλή πεντάλ 7 Στήριγμα...
- Page 173 Πριν χρησιμοποιήσετε αυτό το προϊόν, πρέπει να διαβάσετε προσεκτικά αυτές τις οδηγίες και να τις φυλάξετε για μελλοντική χρήση. Για λόγους ασφαλείας, ποτέ μην χρησιμοποιείτε το σετ των πεντάλ ξυπόλητοι ή ενώ φοράτε μόνο κάλτσες. Η THRUSTMASTER ΑΠΟΠΟΙΕΙΤΑΙ ΟΠΟΙΑΣΔΗΠΟΤΕ ΕΥΘΥΝΗ ΣΕ ® ΠΕΡΙΠΤΩΣΗ ΤΡΑΥΜΑΤΙΣΜΟΥ ΠΟΥ ΠΡΟΚΑΛΕΙΤΑΙ ΑΠΟ ΤΗ ΧΡΗΣΗ ΤΟΥ ΣΕΤ...
- Page 174 τη ζημιά στα εσωτερικά εξαρτήματα του σετ των πεντάλ. Τα διαγράμματα για τις θέσεις του οδηγού (για τοποθέτηση της βάσης της τιμονιέρας και/ή του σετ των πεντάλ) υπάρχουν διαθέσιμα στον ιστότοπο http://support.thrustmaster.com. Κάντε κλικ στις επιλογές Racing Wheels / TMX Force Feedback, και μετά επιλέξτε Manual ή FAQ.
- Page 175 ΡΥΘΜΙΣΗ ΤΟΥ ΣΕΤ ΤΩΝ ΠΕΝΤΑΛ Καθένα από τα τρία πεντάλ διαθέτει: - Μια μεταλλική κεφαλή (8) με πολλές οπές (εννιά για το γκάζι – έξι για το φρένο – έξι για τον συμπλέκτη). - Μια πλαστική κεφαλή στήριξης (7) (ανάμεσα στην κεφαλή και στον βραχίονα) με 4 οπές. - Έναν...
- Page 176 Ρύθμιση της ΑΠΟΣΤΑΣΗΣ των τριών πεντάλ - Χρησιμοποιήστε το κλειδί άλεν των 2,5 χιλ. που παρέχεται (4) ξεβιδώστε τις δύο βίδες κρατώντας τη μεταλλική κεφαλή (8) και το στήριγμά της (7) στη σωστή θέση. - Επιλέξτε τη θέση που προτιμάτε (προς τα αριστερά, στο κέντρο ή προς τα δεξιά), μετά επανατοποθετήστε...
- Page 177 Η εγκατάσταση του κωνικού στοπ (“CONICAL RUBBER BRAKE” mod) Αυτή η τροποποίηση (ή “mod”) δεν είναι ουσιαστικής σημασίας και δεν εγκαθίσταται από προεπιλογή. Αυτό σημαίνει ότι το πεντάλ του φρένου λειτουργεί τέλεια ακόμη κι αν το mod δεν έχει εγκατασταθεί. Αυτό...
- Page 178 - Με ένα κλειδί άλεν 2,5 χιλ. (4), προσαρτήστε τη μονάδα χρησιμοποιώντας μια βίδα στερέωσης (3) και τη μικρή κεντρική βίδα με κεφαλή που βρίσκεται στο σετ των πεντάλ. Τώρα το “CONICAL RUBBER BRAKE” mod έχει εγκατασταθεί! Ρύθμιση του ΕΥΡΟΥΣ της διαδρομής του πεντάλ του φρένου και την ΙΣΧΥ της αντίστασης...
- Page 179 Granier, B.P. 97143, 35571 Chantepie, France (Γαλλία) (εφεξής “Guillemot”) εγγυάται στον καταναλωτή ότι το προϊόν της Thrustmaster δεν παρουσιάζει ελάττωμα στο υλικό ούτε κατασκευαστικές ατέλειες για το χρονικό διάστημα της εγγύησης, το οποίο αντιστοιχεί στο χρονικό όριο για άσκηση αγωγής για...
- Page 180 Δεδομένου των κύκλων καινοτομιών και με σκοπό την προστασία της τεχνογνωσίας και των εμπορικών μυστικών, η Guillemot δεν θα παρέχει, κατά βάση, καμία ειδοποίηση περί μετασκευής ή ανταλλακτικών για κανένα προϊόν της Thrustmaster του οποίου η περίοδος εγγύησης έχει λήξει. Ευθύνη...
- Page 181 πνευματικα δικαιωματα © 2017 Guillemot Corporation S.A. Με την επιφύλαξη παντός δικαιώματος. Η ονομασία Thrustmaster είναι εμπορικό σήμα της Guillemot Corporation S.A. Όλα τα υπόλοιπα εμπορικά ® σήματα αποτελούν ιδιοκτησία των αντίστοιχων κατόχων τους. Οι εικόνες δεν είναι δεσμευτικές. Τα...
- Page 182 XBOX ONE VE PC İÇİN Kullanma Kılavuzu UYARI: TMX Force Feedback yarış direksiyonunuzun Xbox One veya PC oyunlarıyla düzgün çalışmasını sağlamak için, oyunların otomatik güncellemelerini yüklemeniz gerekebilir (sisteminiz İnternete bağlıyken yapılabilir). 1/20...
-
Page 183: Teknik Özellikler
TEKNIK ÖZELLIKLER 1 TMX tabanı 7 Xbox Guide düğmesi + Beyaz gösterge 2 Direksiyon lambası 3 2 direksiyondan kumandalı sıralı vites (Up ve 8 MODE düğmesi + kırmızı/yeşil gösterge Down) lambası 4 Çok yönlü D-Ped 9 Büyük dişli delik (montaj sistemi ve 5 Eylem düğmeleri sabitleme vidası... - Page 184 * Havalandırma deliklerinin üzerinde toz birikmesine izin vermeyin. Güvenlik nedeniyle pedal setini asla çıplak ayaklarla veya ayağınıza sadece çorap giyerek oynamayın. THRUSTMASTER® PEDAL SETİNİN AYAKKABISIZ KULLANILMASINDAN KAYNAKLANAN YARALANMALARDA HİÇBİR SORUMLULUK KABUL ETMEZ. Uyarı - Force Feedback ve tekrarlanan hareketlerden dolayı yaralanma Force Feedback direksiyonla oynamak kas veya eklem ağrısına neden olabilir.
- Page 185 Uyarı - Force Feedback ve tekrarlanan hareketlerden dolayı yaralanma (devamı) * Yeniden oynamaya başladığınızda yukarıda belirtilen semptomlar veya ağrı tekrar ederse oynamayı kesin ve bir doktora başvurun. * Çocukların ulaşabileceği yerlerden uzak tutun. * Oyun oynarken kollarınızı, tamamen gitmesine izin vermeden daima yarış direksiyonunun üzerinde doğru konumlandırılmış...
- Page 186 5. Sisteminiz açıldığında yarış direksiyonunuz otomatik olarak kendini kalibre edecektir. Artık oynamaya hazırsınız! - TMX Force Feedback ile uyumlu Xbox One oyunlarının listesi şu adreste mevcuttur: http://support.thrustmaster.com (Racing Wheels / TMX Force Feedback’ye tıklayın). Bu liste düzenli olarak güncellenir. XBOX ONE DÜĞME YERLEŞİMİ...
-
Page 187: Pc İçi̇n Yariş Di̇reksi̇yonu Kurulumu
3. Kurulum tamamlandığında Finish düğmesine tıklayın ve bilgisayarınızı yeniden başlatın. 4. Başlat / Tüm Programlar / Thrustmaster / FFB Racing Wheel / Control Panel’i seçerek Oyun Kumandaları penceresini açın. Oyun Kumandaları penceresi, yarış direksiyonunun adını (Thrustmaster TMX Racing Wheel) Tamam durumunda gösterir. - Page 188 PC EŞLEŞTİRMESİ 7/20...
- Page 189 YARIŞ DIREKSIYONUNUN MONTE EDİLMESİ Yarış direksiyonunun bir sehpa veya masaya monte edilmesi 1. Yarış direksiyonunu bir masa veya yatay, düz ve sağlam bir yüzeye yerleştirin. 2. Bağlantı vidasını (11) montaj sistemine takın (10) ve direksiyon tamamen sabitlenene dek bağlantı vidasını saatin aksi yönünde sıkarak, yarış direksiyonunu altındaki büyük dişli deliğe (9) geçirin.
- Page 190 MONTE ETME / YÖN SÖKME Sıkmak için: Vidayı saatin aksi yönünde çevirin Gevşetmek için: Vidayı saat yönünde çevirin 9/20...
- Page 191 MOD DÜĞMESİ VE GÖSTERGE LAMBASI (8) Pedal seti MODE düğmesi TMX Force Feedback, Thrustmaster'ın 3 pedal içeren pedal setleriyle (ayrı olarak satılır) de uyumludur; bunlar, gaz ve debriyaj pedallarını elektronik olarak değiştirmenizi sağlar. Bunu yapmak için MOD düğmesine (8) 2 saniye süreyle basın.
- Page 192 TEKNİK ÖZELLİKLER 1 Konik durdurucu için metal destek 4 2,5 mm Allen anahtarı (dahil) 5 Konik durdurucu için pozisyon ayar somunu (varsayılan olarak takılı değildir) 2 Konik durdurucu 3 Metal durdurucu montaj vidası 6 Pedal kolu 8 Metal pedal başlığı 7 Plastik başlık desteği 11/20...
- Page 193 üzere saklayın. Güvenlik nedeniyle pedal setini asla çıplak ayaklarla veya ayağınıza sadece çorap giyerek oynamayın. THRUSTMASTER® PEDAL SETİNİN AYAKKABISIZ KULLANILMASINDAN KAYNAKLANAN YARALANMALARDA HİÇBİR SORUMLULUK KABUL ETMEZ. Uyarı - Oyun oturumları sırasında pedal seti sıkıştırma tehlikesi * Pedal setini çocukların ulaşabileceği yerlerden uzak tutun.
- Page 194 Önemli: Pedal setinin iç parçalarının hasar görmesini engellemek için iki M6 vidanın boyu kokpitin pedal destek plakasının kalınlığı artı ilave 10 mm'yi aşmamalıdır. Kokpitler için yerleşim diyagramları (yarış direksiyonunun tabanını ve/veya pedal setini konumlandırmak için) http://support.thrustmaster.com adresinde, Racing Wheels / T150’ye tıklayın, ardından Manual veya FAQ'yu seçin. 13/20...
- Page 195 PEDAL SETİNİN AYARLANMASI Üç pedal setinin her biri şunları içerir: - Çok delikli (gaz pedalında dokuz - fren pedalında altı - debriyajda altı) metal başlık (8). - Dört delikli plastik başlık desteği (7) (başlık ile kol arasına yerleştirilir). - İki delikli pedal kolu (6). DİKKAT: Kalibrasyon sorunlarını...
- Page 196 Üç pedal arasındaki BOŞLUĞUN ayarlanması - Ürünle verilen 2,5 mm Allen anahtarını (4) kullanarak metal başlık (8) ile desteğini (7) sabitleyen iki vidayı sökün. - İstediğiniz pozisyonu (sola, ortaya veya sağa) seçerek metal başlık (8) ile desteğini (7) yerleştirerek sıkıca sabitleyecek şekilde vidaları sıkın. Fren pedalını...
- Page 197 Konik durdurucunun monte edilmesi (“CONICAL RUBBER BRAKE” mod) Bu modifikasyon (veya "mod") zorunlu değildir ve varsayılan olarak monte edilmez. Yani mod monteli olmasa bile fren pedalı mükemmel çalışır. Bu mod frenleme sırasında farklı bir his ve direnç yaşamanızı sağlar. Tercihinize göre monte etmek veya etmemek size kalmıştır. - Konik durdurucuyu (2) metal desteğine (1) vidalayın.
- Page 198 - Ürünle verilen 2,5 mm Allen anahtarını (4) kullanarak üniteyi montaj vidası (3) ve pedal setinin alt kısmında bulunan küçük merkezi vida deliğini kullanarak monte edin. “CONICAL RUBBER BRAKE” mod şimdi monteli! Fren pedalının hareket ARALIĞININ ve direnç KUVVETİNİN ayarlanması Somunu (5) hafif gevşetip konik durdurucuyu (2) pedal kolunun arka kısmına yaklaştırarak fren pedalının direncini daha da kuvvetlendirebilirsiniz (gerekirse somunu yeniden sıkmak ve seçili pozisyonu korumak için 14 mm anahtar veya pense kullanın).
-
Page 199: Tüketi̇ci̇ Garanti̇ Bi̇lgi̇si̇
ürününün satın alındığı tarihte müşterinin ikamet ettiği ülkede geçerli yasalara uygun şekilde, müşterinin kusurlu ürünün ücretinin iade edilmesi veya değiştirilmesi talebinde bulunabileceği süreye karşılık gelir (İlgili ülkede bu tür bir düzenleme mevcut değilse garanti süresi Thrustmaster ürününün satın alındığı asıl tarihten itibaren bir (1) yıl olacaktır). -
Page 200: Teknik Destek
– örneğin onarım işleminin basit olmasından ve gizlilik içermemesinden dolayı). İnovasyon döngülerini dikkate almak ve bilgi birikimi ile ticari sırlarını korumak için Guillemot, prensip olarak garanti süresi dolmuş hiç bir Thrustmaster ürünü için onarım bilgisi veya yedek parça sağlamayacaktır. Sorumluluk Yürürlükte olan yasaların izin vermesi halinde, Guillemot Corporation S.A. - Page 201 TELİF HAKKI © 2017 Guillemot Corporation S.A. Tüm hakları saklıdır. Thrustmaster Guillemot Corporation ® S.A’nın tescilli markasıdır. Diğer tüm ticari markalar kendi sahiplerinin. Resimler bağlayıcı değildir. İçerik, tasarım ve özellikler önceden haber verilmeksizin değiştirilebilir ve bir ülkeden başka bir ülkeye değişiklik gösterebilir. Çin’de yapılmıştır.
- Page 202 NA XBOX ONE I PC Instrukcja obsługi OSTRZEŻENIE: W celu zapewnienia prawidłowego działania kierownicy TMX w grach na konsolę Xbox One lub na PC może być wymagane zainstalowanie automatycznych aktualizacji gier (dostępnych, gdy system (Xbox One lub PC) ma połączenie z Internetem). 1/20...
- Page 203 ELEMENTY 1 Podstawa TMX 7 Przycisk Xbox Guide + Biała kontrolka 2 Kierownica 8 Przycisk MODE + czerwona/zielona kontrolka 3 2 łopatki sekwencyjnej zmiany biegów (Up i 9 Duży gwintowany otwór (na element Down) montażowy i śrubę mocująca) 4 Wielokierunkowy d-pad 10 Element montażowy 5 Przyciski czynności 11 Metalowa śruba mocująca...
- Page 204 * Nie przykrywaj podstawy. * Nie dopuszczaj do gromadzenia się kurzu w odpowietrznikach. Ze względów bezpieczeństwa zestawu pedałów nie wolno używać w bosych stopach ani w samych skarpetach. FIRMA THRUSTMASTER NIE PONOSI ŻADNEJ ODPOWIEDZIALNOŚCI ® ZA EWENTUALNE OBRAŻENIA CIAŁA WYNIKŁE Z UŻYWANIA ZESTAWU PEDAŁÓW BEZ OBUWIA.
- Page 205 — Ostrzeżenie ryzyko obrażeń ciała spowodowanych siłowym sprzężeniem zwrotnym i powtarzającymi się ruchami (ciąg dalszy) * Jeśli po ponownym rozpoczęciu gry opisane powyżej objawy lub ból powrócą, przerwij grę i skonsultuj się z lekarzem. * Trzymaj kierownicę z dala od dzieci. * Podczas gry zawsze trzymaj obie dłonie we właściwym położeniu na kierownicy bez jej całkowitego puszczania.
- Page 206 5. Po włączeniu zasilania systemu nastąpi automatyczna kalibracja kierownicy. Teraz możesz zacząć grać! — Lista gier do systemów Xbox One zgodnych z kierownicą TMX Force Feedback jest dostępna na stronie: http://support.thrustmaster.com (kliknij Wheels / TMX Force Feedback). Lista jest regularnie aktualizowana. MAPOWANIE W XBOX ONE 5/20...
-
Page 207: Konfigurowanie Kierownicy Pod Kątem Komputera Pc
3. Po zakończeniu instalacji kliknij Finish (Zakończ) i uruchom ponownie komputer. 4. Wybierz Start / All Programs / Thrustmaster / FFB Racing Wheel / Control Panel (Start / Wszystkie programy / Thrustmaster / FFB Racing Wheel / Panel sterowania), aby otworzyć okno Game Controllers (Kontrolery gier). - Page 208 MAPOWANIE NA KOMPUTERZE PC 7/20...
- Page 209 MOCOWANIE KIEROWNICY Mocowanie kierownicy do stołu lub biurka 1. Połóż kierownicę na stole lub innej poziomej, płaskiej i stabilnej powierzchni. 2. Włóż śrubę mocującą (11) w element montażowy (10), a następnie zamocuj urządzenie, wkręcając śrubę przeciwnie do ruchu wskazówek zegara w duży gwintowany otwór (9) znajdujący się...
- Page 210 MOCOWANIE/ZDEJ KIERUNEK MOWANIE Dokręcanie: Obróć śrubę przeciwnie do ruchu wskazówek zegara Odkręcanie: Obróć śrubę zgodnie z ruchem wskazówek zegara 9/20...
-
Page 211: Automatyczna Kalibracja Kierownicy
PRZYCISK I KONTROLKA MODE (8) Przycisk MODE do zestawu pedałów Kierownica TMX Force Feedback jest również zgodna z zestawami pedałów Thrustmaster zawierającymi 3 pedały. Zestawy te umożliwiają elektroniczną zamianę pedałów przyspieszenia i sprzęgła. W tym celu należy nacisnąć przycisk MODE (8) i przytrzymać go przez 2 sekundy. - Page 212 ELEMENTY 1 Metalowa podpórka ogranicznika 4 Klucz imbusowy 2,5 mm (w komplecie) stożkowego 5 Nakrętka do regulacji położenia ogranicznika stożkowego (domyślnie niezainstalowana) 2 Ogranicznik stożkowy 3 Śrubka mocująca do metalowej podpórki 6 Ramię pedału 8 Metalowa stopka pedału 7 Plastikowa podpórka stopki 11/20...
- Page 213 Ze względów bezpieczeństwa zestawu pedałów nie wolno używać w bosych stopach ani samych skarpetach. FIRMA THRUSTMASTER® NIE PONOSI ŻADNEJ ODPOWIEDZIALNOŚCI ZA EWENTUALNE OBRAŻENIA CIAŁA WYNIKŁE Z UŻYWANIA ZESTAWU PEDAŁÓW BEZ OBUWIA. Ostrzeżenie — ryzyko przytrzaśnięcia przez pedały podczas gry * Trzymaj zestaw pedałów z dala od dzieci.
- Page 214 Ważne: długość śrub M6 nie może przekraczać grubości płyty podporowej w kokpicie powiększonej o 10 mm. Dłuższe śruby mogą uszkodzić elementy wewnętrzne zestawu pedałów. Na stronie http://support.thrustmaster.com są dostępne schematy kokpitów (ułatwiające prawidłowe ustawienie podstawy kierownicy i zestawu pedałów). Kliknij Racing Wheels / TMX Force Feedback, a następnie wybierz Manual lub FAQ.
- Page 215 REGULACJA ZESTAWU PEDAŁÓW Każdy z trzech pedałów zawiera: – metalową stopkę (8) z kilkoma otworami (dziewięcioma w pedale przyspieszenia, sześcioma w pedale hamulca i sześcioma w pedale sprzęgła), – plastikową podpórkę stopki (7) (umieszczaną między stopką a ramieniem) z czterema otworami, –...
- Page 216 Regulacja ODLEGŁOŚCI między trzema pedałami – Za pomocą dostarczonego klucza imbusowego 2,5 mm (4) wykręć dwie śruby przytrzymujące metalową stopkę (8) i jej podpórkę (7). – Wybierz preferowane położenie (lewe, środkowe lub prawe), a następnie włóż i wkręć śruby w celu solidnego zamocowania metalowej stopki (8) i jej podpórki (7).
- Page 217 Instalowanie ogranicznika stożkowego (modu „CONICAL RUBBER BRAKE”) Ten element (tzw. „mod”) nie jest niezbędny i nie jest instalowany fabrycznie. Oznacza to, że pedał hamulca działa znakomicie nawet bez instalowania modu. Dodatkowy mod powoduje inne odczucia i inny opór podczas hamowania. Ewentualną...
- Page 218 – Za pomocą dostarczonego klucza imbusowego 2,5 mm (4) zamocuj element, wkręcając śrubkę mocującą (3) w niewielki gwintowany otwór znajdujący się w środkowej części spodniej powierzchni zestawu pedałów. Mod „CONICAL RUBBER BRAKE” został zainstalowany! Regulacja ZAKRESU ruchu i SIŁY oporu pedału hamulca Przez nieznaczne odkręcenie nakrętki (5) można dodatkowo zwiększyć...
-
Page 219: Informacje Dotyczące Gwarancji Dla Klienta
W krajach Unii Europejskiej jest to okres dwóch (2) lat od dostarczenia produktu Thrustmaster. W innych krajach okres gwarancji jest równy limitowi czasu, w którym klient może występować z roszczeniami z tytułu wad produktu Thrustmaster zgodnie z przepisami obowiązującymi w kraju, w którym klient mieszkał... - Page 220 (w tym między innymi za szkody spowodowane bezpośrednio lub pośrednio przez jakiekolwiek oprogramowanie lub na skutek połączenia produktu Thrustmaster z nieodpowiednim elementem, w tym w szczególności z zasilaczem, akumulatorem, ładowarką lub jakimkolwiek innym elementem niedostarczonym przez firmę...
-
Page 221: Prawa Autorskie
PRAWA AUTORSKIE © 2017 Guillemot Corporation S.A. Wszelkie prawa zastrzeżone. Thrustmaster® jest zastrzeżonym znakiem towarowym firmy Guillemot Corporation S.A. Wszystkie inne znaki towarowe stanowią własność odpowiednich podmiotów. Ilustracje nie są wiążące prawnie. Treść, wzory i dane techniczne przedstawione w instrukcji mogą ulec zmianie bez powiadomienia i mogą różnić się w zależności od kraju. - Page 222 ﺍﻟﻛﻣﺑﻳﻭﺗﺭ ﻭ XBOX ONE ﺧﺎﺻﺔ ﺑـ ﺩﻟﻳﻝ ﺍﻟﻣﺳﺗﺧﺩﻡ :ﺗﺣﺫﻳﺭ ﺗﻌﻣﻝ ﺑﺷﻛﻝ ﺻﺣﻳﺢ ﻟﻠﺗﺄﻛﺩ ﻣﻥ ﺃﻥ ﻋﺟﻠﺔ ﺍﻟﺳﺑﺎﻕ ، ﻗﺩ ﻳ ُ ﻁﻠﺏ ﻣﻧﻙ ﺗﺛﺑﻳﺕ ﺍﻟﺗﺣﺩﻳﺛﺎﺕ ﺍﻟﺗﻠﻘﺎﺋﻳﺔ ﻟﻸﻟﻌﺎﺏ ﻭ ﺍﻟﻛﻣﺑﻳﻭﺗﺭ ﻣﻊ ﺃﻟﻌﺎﺏ Xbox One) (ﻓﻲ ﺍﻷﻟﻌﺎﺏ ﺑﺎﻹﻧﺗﺭﻧﺕ ﺍﻟﻧﻅﺎﻡ )ﺗﺗﻭﻓﺭ ﻋﻧﺩ ﺗﻭﺻﻳﻝ...
- Page 223 ﺍﻟﻣﻳﺯﺍﺕ ﺍﻟﺗﻘﻧﻳﺔ + Xbox Guide ﺯﺭ ﻣﺻﺑﺎﺡ ﻣﺅﺷﺭ ﺃﺑﻳﺽ ﺎﻋﺩﺓ ﻗ )ﺍﻟﻭﺿﻊ( + ﺿﻭء ﻣﺅﺷﺭ MODE ﺯﺭ ﻋﺟﻠﺔ ﺃﺣﻣﺭ/ﺃﺧﺿﺭ Up & Down ) ﺑﺷﻛﻝ ﻣﺗﺑﺎﺩﻝ ﻧﻘﻝ ﺍﻟﺳﺭﻋﺔ ﺩﻭﺍﺳﺗﺎ (ﺛﻘﺏ ﻣﻠﻭﻟﺏ ﻛﺑﻳﺭ )ﻷﺩﺍﺓ ﺍﻟﺗﺭﻛﻳﺏ ﻭﺑﺭﻏﻲ ﺍﻟﺭﺑﻁ ﺩﺩﺓ ﺍﻻﺗﺟﺎﻫﺎﺕ ﻣﺗﻌ ﻟﻭﺣﺔ ﺃﺩﺍﺓ ﺍﻟﺭﺑﻁ ﺃﺯﺭﺍﺭ...
- Page 224 .ﻻ ﺗﻐﻁﻲ ﺍﻟﻘﺎﻋﺩﺓ .ﻻ ﺗﺳﻣﺢ ﺑﺗﺭﺍﻛﻡ ﺍﻷﺗﺭﺑﺔ ﻋﻠﻰ ﻓﺗﺣﺎﺕ ﺍﻟﺗﻬﻭﻳﺔ ﻷﺳﺑﺎﺏ ﺗﺗﻌﻠﻖ ﺑﺎﻟﺳﻼﻣﺔ، ﻻ ﺗﺳﺗﺧﺩﻡ ﻣﺟﻣﻭﻋﺔ ﺍﻟﺩﻭﺍﺳﺔ ﺑﻘﺩﻡ ﻋﺎﺭﻳﺔ .ﺃﻭ ﺃﺛﻧﺎء ﺍﺭﺗﺩﺍء ﺟﻭﺍﺭﺏ ﻓﻘﻁ ﺃﻱ ﻣﺳﺋﻭﻟﻳﺔ ﻓﻲ ﺣﺎﻟﺔ ﻭﻗﻭﻉ ﺇﺻﺎﺑﺎﺕ ﻧﺎﺗﺟﺔ ﻋﻥ ﺍﺳﺗﺧﺩﺍﻡ THRUSTMASTER ® ﻻ ﺗﺗﺣﻣﻝ .ﺳﺔ ﺑﺩﻭﻥ ﺣﺫﺍء ﻣﺟﻣﻭﻋﺔ ﺍﻟﺩﻭﺍ...
- Page 225 (ﺍﻹﺻﺎﺑﺎﺕ ﺍﻟﻧﺎﺗﺟﺔ ﻋﻥ ﻗﻭﺓ ﺭﺩ ﺍﻟﻔﻌﻝ ﻭﺍﻟﺣﺭﻛﺎﺕ ﺍﻟﻣﺗﻛﺭﺭﺓ )ﻣﺗﺎﺑﻌﺔ – ﺗﺣﺫﻳﺭ .ﻪ ﺃﻋﻼﻩ ﻋﻧﺩ ﺑﺩء ﺍﻟﻠﻌﺏ ﻣﺭﺓ ﺃﺧﺭﻯ، ﻓﺗﻭﻗﻑ ﻋﻥ ﺍﻟﻠﻌﺏ ﻭﺍﺳﺗﺷﺭ ﻁﺑﻳﺑﻙ ﺇﺫ ﺍﺳﺗﻣﺭﺕ ﺍﻷﻋﺭﺍﺽ ﺃﻭ ﺍﻷﻟﻡ ﺍﻟﻣﺷﺎﺭ ﺇﻟﻳ .ﺗﺣﻔﻅ ﺑﻌﻳ ﺩ ًﺍ ﻋﻥ ﻣﺗﻧﺎﻭﻝ ﺃﻳﺩﻱ ﺍﻷﻁﻔﺎﻝ .ﺃﺛﻧﺎء ﺍﻟﻠﻌﺏ، ﺍﺗﺭﻙ ﻛﻠﺗﺎ ﻳﺩﻳﻙ ﺩﺍﺋﻣ ً ﺎ ﻓﻲ ﻣﻭﺿﻊ ﺻﺣﻳﺢ ﻋﻠﻰ ﻋﺟﻠﺔ ﺍﻟﻘﻳﺎﺩﺓ ﺩﻭﻥ ﺗﻣﺭﻳﺭﻫﺎ ﻣﻧﻬﺎ ﺑﺷﻛﻝ ﻛﺎﻣﻝ .ﺎﻥ...
- Page 226 ، ﺳﻭﻑ ﺗﻘﻭﻡ ﻋﺟﻠﺔ ﺍﻟﻧﻅﺎﻡ ﺑﻣﺟﺭﺩ ﺗﺷﻐﻳﻝ !ﺃﻧﺕ ﺍﻵﻥ ﻣﺳﺗﻌﺩ ﻟﻠﻌﺏ :ﻋﻠﻰ ﺍﻟﻣﺗﻭﺍﻓﻘﺔ ﻣﻊ ﺗﺗﻭﻓﺭ ﻗﺎﺋﻣﺔ ﺑﺄﻟﻌﺎﺏ TMX Force Feedback Xbox One http:// support .thrustmaster.com ﺍﻧﻘﺭ Racing Wheels / TMX Force Feedback ﻳﺗﻡ ﺗﺣﺩﻳﺙ ﻫﺫﻩ ﺍﻟﻘﺎﺋﻣﺔ ﺑﺎﻧﺗﻅﺎﻡ XBOX ONE ﺗﺧﻁﻳﻁ...
- Page 227 .ﺍﻟﻛﻣﺑﻳﻭﺗﺭ ﻭﺇﺗﻣﺎﻡ ﺍﻟﺗﺛﺑﻳﺕ .)ﺇﻧﻬﺎء( ﻭﻗﻡ ﺑﺈﻋﺎﺩﺓ ﺗﺷﻐﻳﻝ ﺍﻟﻛﻣﺑﻳﻭﺗﺭ ﺍﻟﺧﺎﺹ ﺑﻙ Finish ﺑﻣﺟﺭﺩ ﺍﻛﺗﻣﺎﻝ ﺍﻟﺗﺛﺑﻳﺕ، ﺍﻧﻘﺭ ﻓﻭﻕ )ﺍﻟﺑﺩء / ﻛﺎﻓﺔ Start / All Programs / Thrustmaster / FFB Racing Wheel / Control Panel ﺣﺩﺩ )ﻭﺣﺩﺍﺕ Game Controllers / ﻟﻭﺣﺔ ﺍﻟﺗﺣﻛﻡ( ﻟﻔﺗﺢ ﻧﺎﻓﺫﺓ...
- Page 228 ﺗﺧﻁﻳﻁ ﺍﻟﻛﻣﺑﻳﻭﺗﺭ...
- Page 229 ﺗﺭﻛﻳﺏ ﻋﺟﻠﺔ ﺍﻟﺳﺑﺎﻕ ﻋﻠﻰ ﻁﺎﻭﻟﺔ ﺃﻭ ﺳﻁﺢ ﻣﻛﺗﺏ .ﻠﻰ ﻁﺎﻭﻟﺔ ﺃﻭ ﺃﻱ ﺳﻁﺢ ﺁﺧﺭ ﺃﻓﻘﻲ ﻭﻣﺳﺗﻭﻱ ﻭﻣﺗﺯﻥ ﺿﻊ ﻋﺟﻠﺔ ﺍﻟﺳﺑﺎﻕ ﻋ ﺛﻡ ﻗﻡ ﺑﺈﺣﻛﺎﻡ ﺍﻟﺟﻬﺎﺯ ﻋﻥ ﻁﺭﻳﻖ ﺗﺩﻭﻳﺭ ﺍﻟﺑﺭﻏﻲ ﻓﻲ ﻋﻛﺱ ﺍﺗﺟﺎﻩ ﻓﻲ ﺃﺩﺍﺓ ﺍﻟﺭﺑﻁ ﺃﺩﺧﻝ ﺑﺭﻏﻲ ﺍﻟﺗﺛﺑﻳﺕ .ﺍﻟﻣﻭﺟﻭﺩ ﺃﺳﻔﻝ ﻋﺟﻠﺔ ﺍﻟﺳﺑﺎﻕ، ﺣﺗﻰ ﺗﺳﺗﻘﺭ ﺍﻟﻌﺟﻠﺔ ﺗﻣﺎﻣ ً ﺎ ﻋﻘﺎﺭﺏ...
- Page 230 ﺍﻻﺗﺟﺎﻩ ﺍﻟﺗﺭﻛﻳﺏ/ ﺍﻹﺯﺍﻟﺔ ﻟﻠﺭﺑﻁ ﺗﺩﻭﻳﺭ ﺍﻟﺑﺭﻏﻲ ﻋﻛﺱ ﺍﺗﺟﺎﻩ ﻋﻘﺎﺭﺏ ﺍﻟﺳﺎﻋﺔ ﻟﻠﻔﻙ ﺗﺩﻭﻳﺭ ﺍﻟﺑﺭﻏﻲ ﻓﻲ ﺍﺗﺟﺎﻩ ﻋﻘﺎﺭﺏ ﺍﻟﺳﺎﻋﺔ...
- Page 231 ﻭﻣﺻﺑﺎﺡ ﺍﻟﻣﺅﺷﺭ MODE ﺯﺭ ﻟﻣﺟﻣﻭﻋﺔ ﺍﻟﺩﻭﺍﺳﺔ MODE ﺯﺭ ﺩﻭﺍﺳﺎﺕ ؛ ﺣﻳﺙ ﺍﻟﺗﻲ ﺗﻭﻓﺭ Thrustmaster ﻣﺗﻭﺍﻓﻘﺔ ﻣﻊ ﻣﺟﻣﻭﻋﺔ ﺩﻭﺍﺳﺔ TMX Force Feedback ﻛﻣﺎ ﺃﻥ ﻳﻣ ﻛ ّ ﻧ .ﻙ ﺫﻟﻙ ﻣﻥ ﺍﻟﺗﺑﺩﻳﻝ ﺍﻹﻟﻛﺗﺭﻭﻧﻲ ﻟﺩﻭﺍﺳﺔ ﺍﻟﺳﺭﻋﺔ ﻭﺍﻟﻘﺎﺑﺽ .ﻟﻣﺩﺓ ﺛﺎﻧﻳﺗﻳﻥ MODE (8) ﻟﻠﻘﻳﺎﻡ ﺑﺫﻟﻙ، ﻣﺎ ﻋﻠﻳﻙ ﺇﻻ ﺍﻟﺿﻐﻁ ﻋﻠﻰ ﺍﻟﺯﺭ...
- Page 232 ﺍﻟﻣﻳﺯﺍﺕ ﺍﻟﺗﻘﻧﻳﺔ ()ﻣﺿﻣﻥ ﻣﻠﻡ ﻣﻔﺗﺎﺡ ﺃﻟﻥ ﺩﺍﻋﻣﺔ ﻣﻌﺩﻧﻳﺔ ﻟﻠﻣﺳﻣﺎﺭ ﺫﻭ ﺍﻟﺭﺃﺱ ﺻﻣﻭﻟﺔ ﺿﺑﻁ ﺍﻟﻣﻛﺎﻥ ﻟﻠﻣﺳﻣﺎﺭ ﺫﻭ ﺍﻟﺭﺃﺱ ﺍﻟﻣﺧﺭﻭﻁﻳﺔ ()ﻏﻳﺭ ﻣﺛﺑﺕ ﻓﻲ ﺍﻟﻭﺿﻊ ﺍﻻﻓﺗﺭﺍﺿﻲ ﺍﻟﻣﺧﺭﻭﻁﻳﺔ ﻣﺳﻣﺎﺭ ﺫﻭ ﺭﺃﺱ ﻣﺧﺭﻭﻁﻳﺔ ﻣﺳﻣﺎﺭ ﻗﻼﻭﻭﻅ ﻟﺭﺑﻁ ﺍﻟﺩﺍﻋﻣﺔ ﺍﻟﻣﻌﺩﻧﻳﺔ ﺭﺃﺱ ﺍﻟﺩﻭﺍﺳﺔ ﺍﻟﻣﻌﺩﻧﻳﺔ ﺫﺭﺍﻉ ﺍﻟﺩﻭﺍﺳﺔ ﺭﺃﺱ ﺩﺍﻋﻣﺔ ﺑﻼﺳﺗﻳﻛﻳﺔ...
- Page 233 ﻫﺫﺍ ﺍﺳﺗﺧﺩﺍﻡ ﻗﺑﻝ ﻓﻘﻁ ﺍﻟﺟﻭﺍﺭﺏ ﺍﺭﺗﺩﺍء ﺃﺛﻧﺎء ﺃﻭ ﺍﻟﻘﺩﻣﻳﻥ ﺣﺎﻓﻲ ﻟﺩﻭﺍﺳﺎﺕ ﺍ ﻣﺟﻣﻭﻋﺔ ﺗﺳﺗﺧﺩﻡ ﻻ ﺑﺎﻟﺳﻼﻣﺔ ﺗﺗﻌﻠﻖ ﻷﺳﺑﺎﺏ ﻗﺩﻣﻳﻙ ﻓﻲ THRUSTMASTER® ﻣﺟﻣﻭﻋﺔ ﺍﺳﺗﺧﺩﺍﻡ ﻋﻥ ﻧﺎﺟﻣﺔ ﺇﺻﺎﺑﺔ ﺣﺩﻭﺙ ﺣﺎﻝ ﻓﻲ ﻣﺳﺅﻭﻟﻳﺗﻬﺎ ﺗﺧﻠﻲ ﺍﻷﺣﺫﻳﺔ ﺍﺭﺗﺩﺍء ﺩﻭﻥ ﺍﻟﺩﻭﺍﺳﺎﺕ – ﺍﻷﻟﻌﺎﺏ ﺟﻠﺳﺎﺕ ﺃﺛﻧﺎء ﺍﻟﺩﻭﺍﺳﺎﺕ...
- Page 234 :ﻫﺎﻡ ﻳﺟﺏ ﺃﻻ ﺗﻛﻭﻥ ﺍﻟﻣﺳﺎﻣﻳﺭ ﺍﻟﻘﻼﻭﻭﻅ .ﺎﺕ ﺍﻟﺩﺍﺧﻠﻳﺔ ﻟﻣﺟﻣﻭﻋﺔ ﺍﻟﺩﻭﺍﺳﺎﺕ ﻣﻠﻡ، ﻟﺗﺟﻧﺏ ﺍﻹﺿﺭﺍﺭ ﺑﺎﻟﻣﻛﻭﻧ ﺗﺗﻭﻓﺭ ﻣﺧﻁﻁﺎﺕ ﺗﺧﻁﻳﻁ ﺍﻟﻣﻘﺻﻭﺭﺍﺕ )ﻟﻭﺿﻊ ﻗﺎﻋﺩﺓ ﻋﺟﻠﺔ ﺍﻟﺳﺑﺎﻕ ﻭ/ﺃﻭ ﻣﺟﻣﻭﻋﺔ ﺍﻟﺩﻭﺍﺳﺔ( ﻋﻠﻰ TMX Force Feedback < Racing Wheels ﺍﻧﻘﺭ ﻓﻭﻕ http://support.thrustmaster.com Manual ﺃﻭ ، ﺛﻡ ﺣﺩﺩ...
- Page 235 ﺿﺑﻁ ﻣﺟﻣﻭﻋﺔ ﺍﻟﺩﻭﺍﺳﺎﺕ :ﺩﻭﺍﺳﺎﺕ ﻋﻠﻰ ﺗﺣﺗﻭﻱ ﻛﻝ ﻭﺍﺣﺩﺓ ﻣﻥ ﺍﻟﺛﻼﺙ .(ﻟﻠﻘﺎﺑﺽ – ﻟﻠﻣﻛﺑﺢ – ﻟﻠﻣﺳﺭﻉ ) ﺫﺍﺕ ﺛﻘﻭﺏ ﻣﺗﻌﺩﺩﺓ ﺭﺃﺱ ﻣﻌﺩﻧﻳﺔ .ﺛﻘﻭﺏ ( )ﺗﻭﺿﻊ ﻣﺎ ﺑﻳﻥ ﺍﻟﺭﺃﺱ ﻭﺍﻟﺫﺭﺍﻉ( ﺫﺍﺕ ) ﺭﺃﺱ ﺑﻼﺳﺗﻳﻛﻳﺔ ﺩﺍﻋﻣﺔ .( ﺫﻭ ﺛﻘﺑﻳﻥ ) ﺫﺭﺍﻉ ﺩﻭﺍﺳﺔ ﺃﻱ ﺗﻌﺩﻳﻼﺕ ﻋﻠﻰ ﺍﻟﺧﺎﺹ...
- Page 236 ﺗﻌﺩﻳﻝ ﺍﻟﻣﺳﺎﻓﺎﺕ ﺑﻳﻥ ﺍﻟﺩﻭﺍﺳﺎﺕ ﺍﻟﺛﻼﺛﺔ .( ﻓﻲ ﻣﻛﺎﻧﻬﺎ ) ( ﻭﺩﻋﺎﻣﺗﻬﺎ (، ﻓﻙ ﺍﻟﺑﺭﻏﻳﻳﻥ ﺍﻟﻣﺛﺑﺗﻳﻥ ﻟﻠﺭﺃﺱ ﺍﻟﻣﻌﺩﻧﻳﺔ ) ﻣﻡ ﺍﻟﻣﺿﻣﻥ ﺑﺎﺳﺗﺧﺩﺍﻡ ﻣﻔﺗﺎﺡ ﺃﻟﻥ ﺃﻭ ﺍﻟﻣﻧﺗﺻﻑ ﺃﻭ ﺍﻟﻳﻣﻳﻥ(، ﺛﻡ ﺍﺳﺗﺑﺩﻝ ﺍﻟﺑﺭﺍﻏﻲ ﻭﺃﻋﺩ ﺇﺣﻛﺎﻡ ﺭﺑﻁﻬﺎ ﺑﺣﻳﺙ ﺗﻛﻭﻥ ﺣﺩﺩ ﺍﻻﺭﺗﻔﺎﻉ ﺍﻟﻣﻔﺿﻝ ﻟﻙ )ﺇﻟﻰ ﺍﻟﻳﺳﺎﺭ .( ﻣﺛﺑﺗﺔ...
- Page 237 ("ﺗﺭﻛﻳﺏ ﺍﻟﻣﺳﻣﺎﺭ ﺫﻭ ﺍﻟﺭﺃﺱ ﺍﻟﻣﺧﺭﻭﻁﻳﺔ )ﺗﻌﺩﻳﻝ "ﺍﻟﻣﻛﺑﺢ ﺍﻟﻣﻁﺎﻁﻲ ﺍﻟﻣﺧﺭﻭﻁﻲ ﻣﻣﺎ ﻳﻌﻧﻲ ﺃﻥ ﻭﻅﺎﺋﻑ ﺩﻭﺍﺳﺔ ﺍﻟﻣﻛﺑﺢ ﺗﻌﻣﻝ ﺑﺷﻛﻝ .ﻻ ﻳﻌﺗﺑﺭ ﻫﺫﺍ ﺍﻟﺗﻌﺩﻳﻝ ﺿﺭﻭﺭ ﻳ ً ﺎ ﻭﻻ ﻳﺗﻡ ﺗﺭﻛﻳﺑﻪ ﻓﻲ ﺑﺷﻛﻝ ﺍﻓﺗﺭﺍﺿﻲ .ﻣﺛﺎﻟﻲ ﺣﺗﻰ ﻓﻲ ﺣﺎﻝ ﻋﺩﻡ ﺗﺭﻛﻳﺏ ﺍﻟﺗﻌﺩﻳﻝ .ﺑﺔ ﺇﺣﺳﺎﺱ ﻣﺧﺗﻠﻑ ﻭﻣﻘﺎﻭﻣﺔ ﻋﻧﺩ ﺍﻟﻛﺑﺢ ﻳﺗﻳﺢ...
- Page 238 ( ﻭﺍﻟﺳﻥ ﺍﻟﻠﻭﻟﺑﻲ ﺍﻟﺻﻐﻳﺭ ﺍﻟﻣﺭﻛﺯﻱ ) (، ﺍﺭﺑﻁ ﺍﻟﻭﺣﺩﺓ ﺑﺎﺳﺗﺧﺩﺍﻡ ﺑﺭﻏﻲ ﺍﻟﺭﺑﻁ ) ﻣﻠﻡ ﺑﺎﺳﺗﺧﺩﺍﻡ ﻣﻔﺗﺎﺡ ﺃﻟﻥ .ﺍﻟﻣﻭﺟﻭﺩ ﻋﻠﻰ ﺍﻟﺟﺎﻧﺏ ﺍﻟﺳﻔﻠﻲ ﻣﻥ ﻣﺟﻣﻭﻋﺔ ﺍﻟﺩﻭﺍﺳﺎﺕ " ﺗﻡ ﺍﻵﻥ ﺗﺭﻛﻳﺏ ﺗﻌﺩﻳﻝ "ﺍﻟﻣﻛﺑﺢ ﺍﻟﻣﻁﺎﻁﻲ ﺍﻟﻣﺧﺭﻭﻁﻲ ﺗﻌﺩﻳﻝ ﻧﻁﺎﻕ ﺍﻟﺳﻔﺭ ﻟﺩﻭﺍﺳﺔ ﺍﻟﻣﻛﺑﺢ ﻭﻗﻭﺓ ﺍﻟﻣﻘﺎﻭﻣﺔ (، ﻳﻣﻛﻧﻙ ﺯﻳﺎﺩﺓ ﺗﻌﺯﻳﺯ ﻣﻘﺎﻭﻣﺔ ﺩﻭﺍﺳﺔ ﺍﻟﻔﺭﺍﻣﻝ ﻋﻥ ﻁﺭﻳﻖ ﺗﺣﺭﻳﻙ ﺍﻟﻣﺳﻣﺎﺭ ﺫﻭ ) ﻋﻥ...
- Page 239 Place du Granier, B.P. 97143, 35571 Chantepie, France ﻭﻣﻘﺮﻫﺎ ﺍﻟﺮﺋﻴﺴﻲ ﻓﻲ ﺍﻟﻤﻮﺍﺩ ﻭﻋﻴﻮﺏ ﺍﻟﺘﺼﻨﻴﻊ، ﻁﻮﺍﻝ ﻣﺪﺓ ﻓﺘﺮﺓ ﺍﻟﻀﻤﺎﻥ ﺍﻟﺘﻲ ﻫﺬﺍ ﺧﺎﻟ ﻴ ً ﺎ ﻣﻦ ﻋﻴﻮﺏ Thrustmaster ﻳﻜﻮﻥ ﻣﻨﺘﺞ ﻓﻲ ﺩﻭﻝ .ﺗﺘﻮﺍﻓﻖ ﻣﻊ ﺍﻟﻔﺘﺮﺓ ﺍﻟﻤﺤﺪﺩﺓ ﺍﻟﺘﻲ ﻳﻤﻜﻦ ﺧﻼﻟﻬﺎ ﺍﻟﻤﻄﺎﻟﺒﺔ ﺑﺎﻟﻤﻄﺎﺑﻘﺔ ﻻﺳﺘﺮﺩﺍﺩ ﻗﻴﻤﺔ ﻫﺬﺍ ﺍﻟﻤﻨﺘﺞ ﺃﻭ ﺍﺳﺘﺒﺪﺍﻟﻪ...
- Page 240 ﻛﺎﻓﺔ ﻣﺴﺆﻭﻟﻴﺘﻬﺎ ﻋﻦ ﺃﻱ ﺃﺿﺮﺍﺭ ﻻ ﺗﺮﺗﺒﻂ ﺑﻌﻴﺐ ﻓﻲ ﺍﻟﻤﻮﺍ ﺍﻟﻤﺜﺎﻝ ﻻ ﺍﻟﺤﺼﺮ، ﺃﻱ ﺃﺿﺮﺍﺭ ﺗﺤﺪﺙ ﺑﺸﻜﻞ ﻣﺒﺎﺷﺮ ﺃﻭ ﻏﻴﺮ ﻣﺒﺎﺷﺮ ﺑﺴﺒﺐ ﺃﻱ ﺑﺮﻧﺎﻣﺞ ﺃﻭ ﻋﻦ ﻁﺮﻳﻖ ﺩﻣﺞ ﻣﻨﺘﺞ ﻣﻊ ﺃﻱ ﻋﻨﺼﺮ ﻏﻴﺮ ﻣﻨﺎﺳﺐ، ﺑﻤﺎ ﻓﻲ ﺫﻟﻚ ﻋﻠﻰ ﻭﺟﻪ ﺍﻟﺨﺼﻮﺹ ﻭﺣﺪﺍﺕ ﺍﻹﻣﺪﺍﺩ ﺑﺎﻟﻄﺎﻗﺔ ﺃﻭ Thrustmaster ﻟﻬﺬﺍ Guillemot ﺍﻟﺸﻮﺍﺣﻦ...
- Page 241 ﺣﻘﻭﻕ ﺍﻟﻧﺷﺭ ﻫﻲ Thrustmaster® ﺍﻟﻌﻼﻣﺔ .ﻛﺎﻓﺔ ﺍﻟﺣﻘﻭﻕ ﻣﺣﻔﻭﻅﺔ - © 2017 Guillemot Corporation S.A. Guillemot Corporation S.A. ﻋﻼﻣﺔ ﺗﺟﺎﺭﻳﺔ ﻣﺳﺟﻠﺔ ﻟﺷﺭﻛﺔ ﻭﺗﺧﺿﻊ ﺍﻟﻣﺣﺗﻭﻳﺎﺕ .ﺍﻟﺭﺳﻭﻡ ﺍﻟﺗﻭﺿﻳﺣﻳﺔ ﻏﻳﺭ ﻣﻠﺯﻣﺔ ﻛﺎﻓﺔ ﺍﻟﻌﻼﻣﺎﺕ ﺍﻟﺗﺟﺎﺭﻳﺔ ﺍﻷﺧﺭﻯ ﻣﻣﻠﻭﻛﺔ ﻷﺻﺣﺎﺑﻬﺎ ﺍﻟﻣﻌﻧﻳﻳﻥ .ﺻﻧﻊ ﻓﻲ ﺍﻟﺻﻳﻥ .ﻭﺍﻟﺗﺻﻣﻳﻣﺎﺕ ﻭﺍﻟﻣﻭﺍﺻﻔﺎﺕ ﻟﻠﺗﻐﻳﻳﺭ ﺩﻭﻥ ﺇﺷﻌﺎﺭ ﻭﻗﺩ ﺗﺧﺗﻠﻑ ﻣﻥ ﺑﻠﺩ ﺇﻟﻰ ﺁﺧﺭ...
- Page 242 FOR XBOX ONE AND PC User Manual WARNING: To ensure that your TMX racing wheel functions correctly with Xbox One and PC games, you may be required to install the game’s automatic updates (available when your console or PC is connected to the Internet). 1/20...
-
Page 243: Technical Features
TECHNICAL FEATURES 1 TMX base 7 Xbox Guide button + White indicator light 2 Wheel 8 MODE button + Red/Green indicator light 3 2 sequential paddle shifters (up & down) 9 Large threaded hole (for attachment system 4 Directional buttons and fastening screw) 5 Action buttons 10 Attachment system... - Page 244 * Do not let any dust build up on the air vents. For safety reasons, never use the pedal set with bare feet or while wearing only socks on your feet. THRUSTMASTER DISCLAIMS ALL RESPONSIBILITY IN THE EVENT OF ®...
- Page 245 Warning – Injuries due to force feedback and repeated movements (continued) * If the symptoms or pain indicated persist when you start playing again, stop playing and consult your doctor. * Keep out of children’s reach. * During gameplay, always leave both hands correctly positioned on the wheel without completely letting go.
- Page 246 5. Once your console is powered on, your racing wheel will calibrate itself automatically. You are now ready to play! - The list of Xbox One games compatible with the TMX Force Feedback is available at: http://support.thrustmaster.com (in the Racing Wheels/TMX section). This list is updated regularly. XBOX ONE MAPPING...
- Page 247 USB plug to your computer and complete the installation. 3. Once the installation is complete, click Finish and restart your computer. 4. Select Start / All Programs / Thrustmaster / FFB Racing Wheel / Control Panel to open the Game Controllers window.
- Page 248 PC MAPPING 7/20...
- Page 249 ATTACHING THE RACING WHEEL Attaching the racing wheel to a table or a desktop 1. Place the racing wheel on a table or any other horizontal, flat and stable surface. 2. Insert the fastening screw (11) in the attachment system (10), then tighten the device by turning the screw counterclockwise, so that it feeds into the large threaded hole (9) located beneath the racing wheel, until the wheel is perfectly stable.
- Page 250 ATTACHMENT / DIRECTION REMOVAL To tighten: Turn the screw anticlockwise To release: Turn the screw clockwise 9/20...
- Page 251 To display the firmware version that your racing wheel is currently using and update it if required: on PC, visit http://support.thrustmaster.com. Click Racing Wheels / TMX Force Feedback, then select Firmware and follow the instructions describing the download and installation procedure.
- Page 252 TECHNICAL FEATURES 1 Metal support for conical stop 4 2.5 mm Allen key (included) 5 Position adjustment nut for conical stop (not installed by default) 2 Conical stop 3 Attachment screw for metal support 6 Pedal arm 8 Metal pedal head 7 Plastic head support 11/20...
- Page 253 For safety reasons, never use the pedal set with bare feet or while wearing only socks on your feet. THRUSTMASTER® DISCLAIMS ALL RESPONSIBILITY IN THE EVENT OF INJURY RESULTING FROM USE OF THE PEDAL SET WITHOUT SHOES. Warning – Pedal set pinching hazard during gaming sessions * Keep the pedal set out of the reach of children.
- Page 254 Important: The length of the two M6 screws must not exceed the thickness of the cockpit’s pedal support plate plus an additional 10 mm, to avoid damaging the pedal set’s internal components. Layout diagrams for cockpits are available at http://support.thrustmaster.com: click Racing Wheels / TMX Force Feedback, then select Manual or FAQ.
- Page 255 ADJUSTING THE PEDAL SET Each of the three pedals includes: - A metal head (8) with multiple perforations (nine for the accelerator – six for the brake – six for the clutch). - A plastic head support (7) (placed between the head and the arm) with four perforations. - A pedal arm (6) with two perforations.
- Page 256 Adjusting the SPACING of the three pedals - Using the included 2.5 mm Allen key (4), unscrew the two screws holding the metal head (8) and its support (7) in place. - Select your preferred position (to the left, centered, or to the right), then replace and re-tighten the screws so that the metal head (8) and its support (7) are held firmly in place.
- Page 257 Installing the conical stop (“CONICAL RUBBER BRAKE” mod) This modification (or “mod”) is not essential, and is not installed by default. This means that the brake pedal functions perfectly even if the mod is not installed. This mod lets you experience a different feeling and resistance when braking. It’s up to you whether or not to install it, depending on your own preferences.
- Page 258 - Using the included 2.5 mm Allen key (4), attach the unit using the attachment screw (3) and the small central screw thread located on the underside of the pedal set. The “CONICAL RUBBER BRAKE” mod is now installed! Adjusting the brake pedal’s RANGE of travel and STRENGTH of resistance By slightly unscrewing the nut (5), you can further strengthen the resistance of the brake pedal by moving the conical stop (2) closer to the back of the pedal’s arm (if necessary, use a 14 mm wrench or pliers to re-tighten the nut and maintain the selected position).
- Page 259 In the countries of the European Union, this corresponds to a period of two (2) years from delivery of the Thrustmaster product. In other countries, the warranty period corresponds to the time limit to bring an action for conformity with respect to...
-
Page 260: Fcc Statement
COPYRIGHT © 2017 Guillemot Corporation S.A. All rights reserved. Thrustmaster® is a registered trademark of Guillemot Corporation S.A. All other trademarks are the property of their respective owners. Illustrations not binding. Contents, designs and specifications are subject to change without notice and may vary from one country to another. -
Page 261: Technical Support
TECHNICAL SUPPORT http://support.thrustmaster.com 20/20... - Page 262 POUR XBOX ONE ET PC Manuel de l’utilisateur ATTENTION : Pour que le volant TMX fonctionne correctement avec les jeux Xbox One ou PC il peut être nécessaire d’installer les mises à jour automatiques de ces jeux (disponibles lorsque votre console ou votre PC est connectée à Internet). 1/20...
- Page 263 CARACTÉRISTIQUES TECHNIQUES 1 Base TMX 7 Bouton Xbox Guide 2 Roue du volant et voyant lumineux blanc 3 2 leviers séquentiels de changement de vitesse 8 Bouton MODE + Voyant lumineux rouge/vert (up & down) 9 Gros pas de vis (pour le système de fixation 4 Croix multidirectionnelle et la vis de serrage) 5 Boutons d’action...
- Page 264 * Ne laissez pas la poussière s’accumuler sur les grilles d’aération. Pour des raisons de sécurité, ne jouez pas pieds nus ou en chaussettes lorsque vous utilisez le pédalier. THRUSTMASTER DECLINE TOUTE RESPONSABILITE EN CAS DE ® BLESSURE SUITE A UNE UTILISATION DU PEDALIER SANS CHAUSSURES.
- Page 265 Avertissement – Blessures dues au retour de force et aux mouvements répétitifs (suite) * Si les symptômes ou les douleurs indiqués ci-dessus persistent lorsque vous reprenez le jeu, arrêtez de jouer et consultez votre médecin. * Laissez hors de portée des enfants. * Lors des phases de jeu, laissez toujours vos deux mains correctement positionnées sur le volant sans jamais le lâcher complètement.
- Page 266 Vous êtes maintenant prêt à jouer ! - La liste des jeux Xbox One compatibles avec le TMX Force Feedback est disponible ici : http://support.thrustmaster.com (dans la rubrique Volants / TMX Force Feedback). Cette liste est régulièrement mise à jour.
- Page 267 Contrôleurs de jeu. La fenêtre Contrôleurs de jeu affiche le nom du volant Thrustmaster TMX Racing Wheel avec l'état OK. 5. Cliquez sur Propriétés pour configurer votre volant dans le panneau de configuration du TMX : •...
- Page 268 MAPPING PC 7/20...
- Page 269 FIXATION DU VOLANT Fixer le volant sur une table ou un bureau 1. Placez le volant sur une table ou autre surface plane. 2. Placez la vis de serrage (11) dans le système de fixation (10), puis vissez l’ensemble (dans le sens inverse des aiguilles d’une montre) dans le gros pas de vis (9) situé...
- Page 270 MONTAGE / SENS DEMONTAGE Pour serrer : Vissez dans le sens inverse des aiguilles d’une montre Pour desserrer : Dévissez dans le sens des aiguilles d’une montre 9/20...
- Page 271 Autres astuces pour le bouton MODE Pour profiter d’autres astuces concernant le bouton MODE et son voyant lumineux, allez sur http://support.thrustmaster.com. Cliquez sur Volants / TMX Force Feedback, puis Manuel utilisateur ou FAQ. METTRE A JOUR LE FIRMWARE DU VOLANT Le firmware inclus dans la base du volant peut être mis à...
- Page 272 CARACTERISTIQUES TECHNIQUES 1 Support métallique pour la butée conique Clé Allen 2,5 mm fournie Ecrou de réglage de position de la butée (non installée par défaut) 2 Butée conique conique 3 Vis de fixation du support métallique Bras de pédale Tête métallique de pédale Support de tête plastique 11/20...
- Page 273 AVERTISSEMENT Pour des raisons de sécurité, ne jouez pas pieds nus ou en chaussettes lorsque vous utilisez le pédalier. THRUSTMASTER DECLINE TOUTE RESPONSABILITE EN CAS DE ® BLESSURE SUITE A UNE UTILISATION DU PEDALIER SANS CHAUSSURES. Avertissement – Risque de pincement au niveau du pédalier lors des phases de jeu * Laissez le pédalier hors de portée des enfants.
- Page 274 Important : La longueur de ces 2 vis M6 ne doit pas dépasser l’épaisseur de votre support +10 mm pour ne pas endommager les composants internes du pédalier. Plan d’implantation pour les cockpits disponible sur http://support.thrustmaster.com, (dans la rubrique Volants / TMX Force Feedback / Manuel utilisateur ou FAQ)
- Page 275 REGLAGES DU PEDALIER Chacune des 3 pédales comprend : - Une tête métallique (8) avec plusieurs perforations (9 pour l’accélérateur – 6 pour le frein – 6 pour l’embrayage). - Un support de tête plastique (7) (placé entre la tête et le bras) avec 4 perforations. - Un bras de pédale (6) avec 2 perforations.
- Page 276 Ajuster l’ECARTEMEMENT des 3 pédales - A l’aide de la clé Allen 2,5 mm fournie (4), dévissez les 2 vis maintenant la tête métallique (8) et son support (7). - Choisissez ensuite votre position (à gauche, au centre ou à droite), puis revissez le tout. Exemples ici avec la pédale de frein : Position à...
- Page 277 Installer la butée conique (MOD « CONICAL RUBBER BRAKE ») Ce MOD n’est pas obligatoire et n’est pas installé par défaut. Cela signifie que la pédale de frein fonctionne parfaitement même si le MOD n’est pas installé. Ce MOD permet d’apporter un feeling et une résistance différents lors des freinages. Il appartiendra à...
- Page 278 - A l’aide de la clé Allen 2,5 mm fournie (4), fixez l’ensemble en utilisant la vis de fixation (3) et le petit pas de vis central situé sous le pédalier. Le MOD « CONICAL RUBBER BRAKE » est désormais installé ! Ajuster la COURSE de débattement et la FORCE de résistance de la pédale de frein En dévissant légèrement l’écrou (5), vous pouvez également durcir davantage la résistance de la...
- Page 279 Thrustmaster selon la législation en vigueur dans le pays où le consommateur avait son domicile lors de l’achat du produit Thrustmaster (si une telle action en conformité n’existe pas dans ce pays alors la période de garantie est de un (1) an à compter de la date d’achat d’origine du produit Thrustmaster).
- Page 280 à un défaut matériel ou à un vice de fabrication du produit (y compris, mais non limitativement, tout dommage causé directement ou indirectement par tout logiciel, ou par une combinaison du produit Thrustmaster avec tout élément inadapté, notamment alimentations électriques, batteries, chargeurs, ou tous autres éléments non-fournis par Guillemot pour ce produit).
-
Page 281: Support Technique
SUPPORT TECHNIQUE http://support.thrustmaster.com 20/20... - Page 282 PARA XBOX ONE Y PC Manual del usuario ADVERTENCIA: Para asegurarte de que tu volante de carreras TMX funcione correctamente con juegos para Xbox One o PC, puede que tengas que instalar las actualizaciones automáticas de los juegos (disponibles cuando tu sistema (Xbox One o PC) está conectado a Internet). 1/20...
-
Page 283: Características Técnicas
CARACTERÍSTICAS TÉCNICAS 1 Base de TMX 7 Botón Xbox Guide + luz indicadora blanca 2 Volante 8 Botón MODE + luz indicadora roja/verde 3 2 levas de cambio secuenciales (Up y Down) 9 Agujero roscado grande (para sistema de 4 D-Pad multidireccional fijación y tornillo de apriete) 5 Botones de acción 10 Sistema de fijación... - Page 284 * No dejes que se acumule polvo en las rejillas de ventilación. Por razones de seguridad, no uses nunca los pedales con los pies descalzos o únicamente con calcetines en los pies. THRUSTMASTER DECLINA TODA RESPONSABILIDAD EN CASO DE ®...
- Page 285 Advertencia – Lesiones debidas a Force Feedback y los movimientos repetitivos (continuación) * Si los síntomas o el dolor indicados anteriormente persisten cuando vuelves a jugar, deja de hacerlo y consulta al médico. * Mantén el volante fuera del alcance de los niños. * Durante el juego, mantén siempre ambas manos colocadas correctamente en el volante sin dejarlas completamente caídas.
- Page 286 ¡Ya estás preparado para jugar! - La lista de juegos de Xbox One compatibles con el TMX Force Feedback está disponible en: http://support.thrustmaster.com (haz clic en Wheels / TMX Force Feedback). Esta lista se actualiza regularmente. ASIGNACIÓN PARA XBOX ONE...
- Page 287 USB del volante al ordenador y terminar la instalación. 3. Una vez completada la instalación, haz clic en Terminar y reinicia el ordenador. 4. Selecciona Inicio / Todos los programas / Thrustmaster / FFB Racing Wheel / Panel de control para abrir la ventana Dispositivos de juego.
- Page 288 ASIGNACIÓN EN PC 7/20...
- Page 289 FIJACIÓN DEL VOLANTE DE CARRERAS Fijación del volante de carreras a una mesa o un escritorio 1. Coloca el volante de carreras en una mesa o en otra superficie horizontal, plana y estable. 2. Inserta el tornillo de sujeción (11) en el sistema de fijación (10) y, a continuación, aprieta el dispositivo girando el tornillo a la izquierda, para que entre en el agujero roscado grande (9) situado debajo del volante de carreras, hasta que el volante esté...
- Page 290 COLOCACIÓN / INDICACIÓN RETIRADA Para apretar: Gira el tornillo hacia la izquierda Para aflojar: Gira el tornillo hacia la derecha 9/20...
- Page 291 Para mostrar la versión de firmware que está usando actualmente tu volante de carreras y actualizarla si es necesario: en PC, visita http://support.thrustmaster.com. Clic en Volantes de carreras / TMX Force Feedback y, a continuación, selecciona Firmware y sigue las instrucciones que describen el procedimiento de descarga e instalación.
- Page 292 CARACTERÍSTICAS TÉCNICAS 1 Soporte metálico para tope cónico 3 Tornillo de sujeción de soporte metálico 4 Llave Allen de 2,5 mm (incluida) (no está instalado de forma 5 Tuerca de ajuste de posición para tope predeterminada) 2 Tope cónico cónico 6 Brazo del pedal 8 Cabeza del pedal metálica 7 Soporte de cabeza de plástico...
- Page 293 Por motivos de seguridad, no utilizar nunca los pedales con los pies desnudos o únicamente con calcetines en los pies. THRUSTMASTER® DECLINA TODA RESPONSABILIDAD EN CASO DE LESIONES PRODUCTO DEL USO DE LOS PEDALES SIN CALZADO. Advertencia – Peligro de pillarse con los pedales durante las sesiones de juego * Mantén los pedales fuera del alcance de los niños.
- Page 294 10 mm adicionales, para evitar dañar los componentes internos de los pedales. Los diagramas de diseño para cabinas (para colocar la base del volante de carreras y/o los pedales) están disponibles en http://support.thrustmaster.com: haz clic en Volantes de carreras / TMX Force Feedback y luego selecciona Manual o PF. 13/20...
- Page 295 AJUSTE DE LOS PEDALES Cada uno de los tres pedales incluye: - Una cabeza metálica (8) con varias perforaciones (nueve para el acelerador, seis para el freno y seis para el embrague). - Un soporte de cabeza de plástico (7) (situado entre la cabeza y el brazo) con cuatro perforaciones.
- Page 296 Ajuste del ESPACIADO de los tres pedales - Con la llave Allen de 2,5 mm incluida (4), desatornilla los dos tornillos que sujetan la cabeza metálica (8) y su soporte (7) en su sitio. - Selecciona la posición que prefieras (a la izquierda, centrada o a la derecha) y, a continuación, vuelve a colocar y apretar los tornillos de forma que la cabeza metálica (8) y su soporte (7) queden sujetos firmemente en su sitio.
- Page 297 Instalación del tope cónico (mod “CONICAL RUBBER BRAKE”) Esta modificación (o “mod”) no es esencial y no se instala de forma predeterminada. Esto significa que el pedal del freno funciona perfectamente aunque no esté instalado el mod. Este mod te permite experimentar una resistencia y sensación diferentes al frenar. Depende de ti instalarlo o no, en función de tus preferencias.
- Page 298 - Con la llave Allen de 2,5 mm incluida (4), fija la unidad con el tornillo de sujeción (3) y la rosca de tornillo central pequeña situada en la cara inferior de los pedales. ¡Ya está instalado el mod “CONICAL RUBBER BRAKE”! Ajuste del RANGO de desplazamiento y la RESISTENCIA del pedal del freno Si desatornillas ligeramente la tuerca (5), puedes reforzar más la resistencia del pedal del freno moviendo el tope cónico (2) más cerca de la parte trasera del brazo del pedal (si es necesario, usa...
- Page 299 97143, 35571 Chantepie, Francia (en lo sucesivo “Guillemot”) garantiza al consumidor que este producto de Thrustmaster estará libre de defectos de materiales y mano de obra, durante un período de garantía que corresponde al límite de tiempo para interponer una acción legal referida a la conformidad en relación con este producto.
- Page 300 (incluyendo, pero no de forma exclusiva, los daños causados de forma directa o indirecta por cualquier software, o por combinar el producto de Thrustmaster con cualquier elemento no adecuado, incluyendo en particular fuentes de alimentación, baterías recargables, cargadores o cualquier otro elemento no suministrado por Guillemot para este producto).
-
Page 301: Soporte Técnico
SOPORTE TÉCNICO http://support.thrustmaster.com 20/20...
Need help?
Do you have a question about the TMX PRO and is the answer not in the manual?
Questions and answers