Table of Contents
Advertisement
Quick Links
The Bio-6000 is a professional gel scanner specially designed and optimized for image
capture of biological samples from gels or transparent film. It features an A3-sized
scan bed, 48-bit color depth, 3200 x 6400-dpi optical resolution, and one Smart-Touch
button on the front panel for an easy access to the scan function. With a Dmin of
0.05D and a Dmax of 3.77D, the Bio-6000 can deliver a wide dynamic range to
enhance the image quality in both bright and dark areas of the image. Additionally,
the Bio-6000 also lets you scan reflectives and prints up to 11.6" x 16.9" in size,
convenient for any biological laboratory use.
Contents
Getting to Know Your Bio-6000 ....................................................................... 1
Features of the Bio-6000 .................................................................................. 2
Taking a Closer Look ........................................................................................ 3
Initial Setup ...................................................................................................... 4
Step 1: Unpacking Package Contents ................................................... 4
Step 2: Installing the Software .............................................................. 5
Step 3: Unlocking the Scanner .............................................................. 6
Step 4: Installing the TMA ...................................................................... 7
Step 5: Connecting the Scanner ............................................................ 8
Using the U-Shaped Ruler (Calibration Ruler) ............................................... 9
Copyright © 2014
Microtek International, Inc.
I49-004826 E, January 2014
Getting to Know Your Bio-6000
http://www.microtek.com
Positioning Electrophoresis Gels/Film or Transparent Film ....................... 10
Positioning Reflective Materials ................................................................... 10
The Black Plate ................................................................................... 1 1
Your First Scan ............................................................................................... 12
Scanning Scenarios ....................................................................................... 14
Scanning Electrophoresis Gels or Film ................................................ 15
Scanning Reflective Materials ............................................................... 17
Specifications / System Requirements ........................................................ 19
FCC Compliance Statement .......................................................................... 20
Advertisement
Table of Contents

Related Manuals for Microtek Bio-6000


Summary of Contents for Microtek Bio-6000
-
Page 1: Table Of Contents
0.05D and a Dmax of 3.77D, the Bio-6000 can deliver a wide dynamic range to enhance the image quality in both bright and dark areas of the image. Additionally, the Bio-6000 also lets you scan reflectives and prints up to 11.6" x 16.9" in size, convenient for any biological laboratory use. -
Page 2: Features Of The Bio-6000
The Bio-6000 comes with several important features, including the following: • Large A3 scan bed — The A3-sized scan bed of the Bio-6000 lets you easily scan biological samples from a gel or film up to 11.6" x 16" and oversized reflective originals up to 11.6"... -
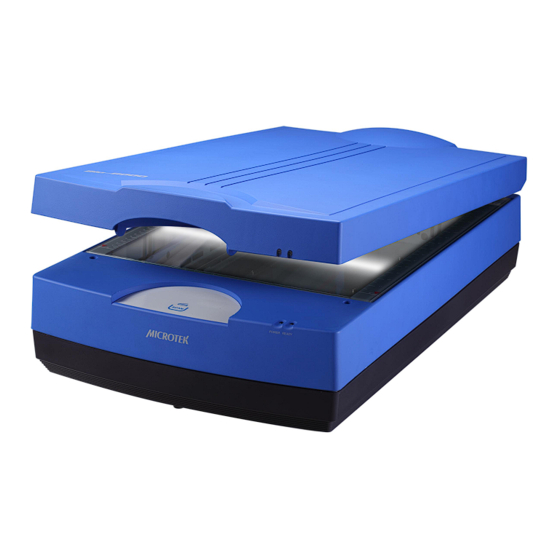
Page 3: Taking A Closer Look
Taking a Closer Look Scanner Glass surface (Scan bed) Vertical ruler READY indicator (Green) POWER indicator (Orange) Smart-Touch button (Scan) Accessory port (or with TMA's connector securely connected) Power connector Hi-Speed USB port (1) Power switch Bio-6000 User Guide... -
Page 4: Initial Setup
Initial Setup Step 1: Unpacking Package Contents After unpacking your scanner package, please check for the major components listed below. 1. Bio-6000 (lower base) 2. USB Cable 3. Power Cord 4. Software CDs 5. TMA (Transparent Media Adapter) 6. Black Plate - for scanning reflective media 7. -
Page 5: Step 2: Installing The Software
After you finish the installation of software, if you found that the installed drivers and software cannot run your product or your computer system properly later, please go to the Microtek Download Service site at ww7.microtek.com.tw/service.php to download and install any updates you may require. -
Page 6: Step 3: Unlocking The Scanner
When the screw has been tightened, this indicates that your scanner is locked. Locked 3. Turn off your scanner. Bio-6000 User Guide... -
Page 7: Step 4: Installing The Tma
3. When the indicators on the front of your TMA and scanner stop blinking, turn the locking knob clockwise to the lock position “ ”. 4. Turn off your scanner and disconnect the TMA connector from the scanner. The TMA is ready for transport. Bio-6000 User Guide... -
Page 8: Step 5: Connecting The Scanner
4. Connect the other end of the cable to the scanner. 5. Press the power switch at the back of your scanner, and wait for the indicator light on the front panel to stop blinking and stay on steady. The system will detect your scanner automatically. Bio-6000 User Guide... -
Page 9: Using The U-Shaped Ruler (Calibration Ruler)
2. Then, put the ruler facing up on the scanner glass surface and hook the ruler onto the raised Silicone Rings located on the both sides of the scanner surface, making sure that they have been oriented correctly. U-shaped Ruler Silicone Rings 3. Finally, turn on the scanner power. Bio-6000 User Guide... -
Page 10: Positioning Electrophoresis Gels/Film Or Transparent Film
2. Peel the protective film from the Black Plate*. 3. Put the Black Plate on the top of the reflective to cover it, with the side of the Black Plate that reads “This side U-shaped Ruler up” facing up. Bio-6000 User Guide... -
Page 11: The Black Plate
Black Plate is in optimal condition at all times. 2. A protective film covers the Black Plate during shipping and prevents it from being scratched. When peeling the film from the plate, be careful not to tear or bend the Black Plate. Bio-6000 User Guide... -
Page 12: Your First Scan
9. Click the Scan to (or “Scan”) button in the Preview window or on the scanner unit to start scanning. • If ScanWizard Bio was launched from an application program, the image is then delivered to your application, where the image can be saved, printed, or edited. Bio-6000 User Guide... - Page 13 When you have completed the settings, press the Done/Save button, and the scanner will automatically scan and save your image based on your settings. Settings window Preview window Scan Job window Bio-6000 User Guide...
-
Page 14: Scanning Scenarios
Scanning Scenarios The following pages provide various scenarios for scanning with the Bio-6000, including the following: • Scanning electrophoresis gels or film: This scenario details the steps for scanning electrophoresis gels or film. • Scanning reflective originals: This scenario details the steps for scanning reflective materials, such as photos or prints. -
Page 15: Scanning Electrophoresis Gels Or Film
When you have completed the settings, press the Done/Save button, and the scanner will automatically scan and save your image based on your settings. Bio-6000 User Guide... - Page 16 Settings window Preview window Scan Job window Bio-6000 User Guide...
-
Page 17: Scanning Reflective Materials
When you have completed the settings, press the Done/Save button, and the scanner will automatically scan and save your image based on your settings. Bio-6000 User Guide... - Page 18 Settings window Preview window Scan Job window Bio-6000 User Guide...
-
Page 19: Specifications / System Requirements
• Pentium IV PC or higher with Hi-Speed USB (USB 2.0) port • Microsoft Windows 7 and 8; compatible with Windows XP and Vista Important Specifications, software bundles, and accessories are subject to change without notice. Not responsible for typographic errors. Bio-6000 User Guide... -
Page 20: Fcc Compliance Statement
This device complies with Part 15 of the FCC Rules. Operation is subject to the following two conditions: (1) This device may not cause harmful interference, and (2) this device must accept any interference received, including interference that may cause undesired operation. Bio-6000 User Guide...
Need help?
Do you have a question about the Bio-6000 and is the answer not in the manual?
Questions and answers