Microtek ScanMaker 6000 Supplementary Manual
Microtek scanmaker 6000: supplementary guide
Hide thumbs
Also See for ScanMaker 6000:
- Quick start (2 pages) ,
- User manual (160 pages) ,
- Tutorial (16 pages)
Table of Contents
Advertisement
Supplement
The ScanMaker 6000 is a high-resolution, high-performance scanner that offers the
exclusive ColoRescue
an 8.5" x 11.7" scan bed, and seven Smart-Touch buttons plus a convenient Power
button on the front panel to automate scanner functions. For added versatility, the
scanner includes the LightLid
and filmstrips.
Contents
Getting to Know Your ScanMaker 6000 .......................................................... 1
Features of the ScanMaker 6000 ..................................................................... 2
Taking a Closer Look ........................................................................................ 3
How the Smart-Touch Scanner Buttons Work .............................................. 4
Scanning Scenarios ......................................................................................... 5
Scanning Photos (1) ....................................................................................... 6
Copyright © 2005
Microtek International, Inc.
January 2005
ScanMaker 6000 features, scenarios, and information
Getting to Know Your ScanMaker 6000
TM
for color restoration. It features 6400 x 3200 dpi, 48-bit color,
http://www.microtek.com
TM
35 transparency adapter for scanning 35mm slides
Scanning Photos (2) ....................................................................................... 8
Scanning Film with the LightLid 35 .............................................................. 10
A. Installing the LightLid 35 .............................................................. 10
B. Installing the LightLid 35 Calibrator ............................................. 10
Scanning 35mm Filmstrips .............................................................. 12
Scanning 35mm Slides ..................................................................... 16
Specifications / System Requirements ........................................................ 17
FCC Compliance Statement .......................................................................... 18
Advertisement
Table of Contents

Subscribe to Our Youtube Channel
Related Manuals for Microtek ScanMaker 6000


Summary of Contents for Microtek ScanMaker 6000
-
Page 1: Table Of Contents
Supplement ScanMaker 6000 features, scenarios, and information Getting to Know Your ScanMaker 6000 The ScanMaker 6000 is a high-resolution, high-performance scanner that offers the exclusive ColoRescue an 8.5" x 11.7" scan bed, and seven Smart-Touch buttons plus a convenient Power button on the front panel to automate scanner functions. -
Page 2: Features Of The Scanmaker 6000
All it takes is one touch of a button — and you can scan to a file, send an image to your printer, attach it to an email, etc. The seven Smart- Touch buttons include Cancel/Setup, Scan, Copy, E-mail, OCR, Scan-to-Web, and Custom. -
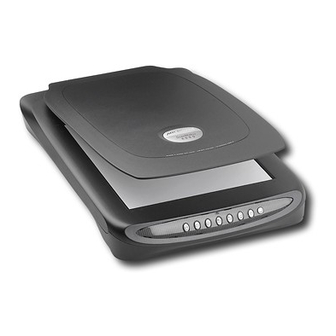
Page 3: Taking A Closer Look
Taking a Closer Look Glass surface Scanner lid Scan Copy E-mail Cancel/ Setup Horizontal ruler Power button Scan- Custom to-Web Power connector Accessory port (15-pin) Hi-Speed USB port (1) ScanMaker 6000 Supplement... -
Page 4: How The Smart-Touch Scanner Buttons Work
To launch the MSC, double-click the MSC icon on your desktop. Please note that you need to exit ScanWizard 5 before accessing the MSC utility. The ScanMaker 6000 is equipped with seven Smart-Touch buttons for easy access to frequently used scanner functions. To carry out a specific task, simply press the corresponding button on the scanner. -
Page 5: Scanning Scenarios
• Scanning photos (2): This scenario is similar to above but uses the Advanced Control Panel in ScanWizard 5. It also includes information on how to use the Microtek ColoRescue color restoration feature. • Scanning film: This scenario utilizes the LightLid 35 transparency adapter to scan 35mm slides and filmstrips. -
Page 6: Scanning Photos (1)
Scanning Photos (1) 1. Raise the scanner lid, and place the photo to be scanned face down on the scanner glass surface. Position the top end of the photo towards the front of the scanner, then lower the scanner lid on the scanner glass surface. - Page 7 • Contains the built-in ScanWizard 5 help feature • Exits ScanWizard 5 • Minimizes ScanWizard 5 (Windows only) Selections and options for image settings Resize the scan frame to adjust the actual size of your scan ScanMaker 6000 Supplement...
-
Page 8: Scanning Photos (2)
Scanning Photos (2) 1. Raise the scanner lid, and place the photo to be scanned face down on the scanner glass surface. Position the top end of the photo towards the front of the scanner, then lower the scanner lid on the scanner glass surface. - Page 9 ScanMaker 6000 Supplement...
-
Page 10: Scanning Film With The Lightlid 35
To scan film, use the LightLid 35 transparency adapter included with your ScanMaker 6000. The LightLid 35 is specially designed to scan 35mm slides and filmstrips. Microtek recommends the use of this accessory to scan slides for on-screen display purposes or where high resolution is not critical. For high-quality print reproduction, we recommend purchasing a dedicated slide scanner or a Microtek scanner with built- in film-scanning features. - Page 11 For Macs: 1. Place the Microtek CD-ROM into the CD-ROM drive. When the Microtek CD- ROM icon appears on the desktop, double-click this icon to open it. Then, double-click “For OS 9.x” or “For OS X”, depending on the Mac OS you are using.
-
Page 12: Scanning 35Mm Filmstrips
Mylar sheets 2. Place the LightLid 35 with the loaded film on the scan bed. The LightLid 35 can be placed horizontally at the front edge of the scanner glass bed, or vertically anywhere on the glass surface, as shown below. - Page 13 To obtain best results when scanning with the LightLid 35, set the scan Resolution to a minimum 600 dpi and the Scaling to 100%. ScanMaker 6000 Supplement...
-
Page 14: For Advanced Users
After the scan, the scanned and processed image can be saved as a file, opened in an image-editing program, sent to a printer, attached in an e-mail, or uploaded to a website. ScanMaker 6000 Supplement output type. image output resolution. - Page 15 ScanMaker 6000 Supplement...
-
Page 16: Scanning 35Mm Slides
2. Place the LightLid 35 with the loaded film on the scan bed. The LightLid 35 can be placed horizontally at the front edge of the scanner glass bed, or vertically anywhere on the glass surface, as shown on page 12. -
Page 17: Specifications
Mac OS 9, OS X 10.2 - 10.3 Important Specifications, bundles, and accessories are subject to change without notice. Manufacturer Model No. 1. DVE DSA-0151A-12 2. GAREAR GAD-SLU-121A3 3. HARD HDAD15W101-123 1. DVE DSA-0151A-12 2. GAREAR GAD-SHE-121A3 3. HARD HDAD15W101-124 ScanMaker 6000 Supplement... -
Page 18: Fcc Compliance Statement
• Consult the dealer or an experienced radio/TV technician for help. Note: A shielded Hi-Speed USB interface cable with ferrite core installed on the scanner connector end must be used with this equipment. Caution: Changes or modifications not expressly approved by the manufacturer responsible for compliance could void the user's authority to operate the equipment.
Need help?
Do you have a question about the ScanMaker 6000 and is the answer not in the manual?
Questions and answers