
Subscribe to Our Youtube Channel
Related Manuals for ozQRP MDT


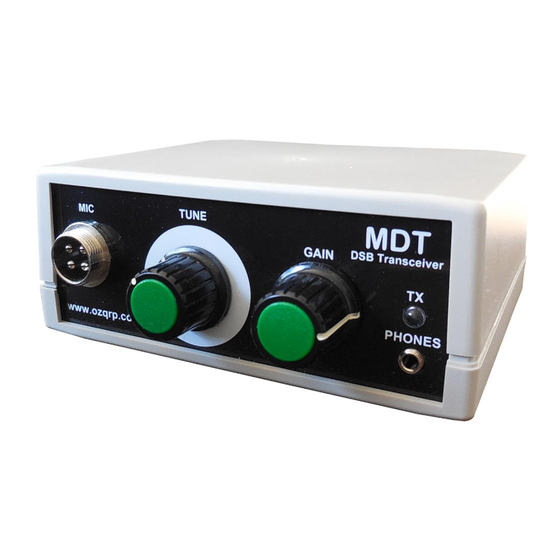
Summary of Contents for ozQRP MDT
- Page 1 TRANSCEIVER ONSTRUCTION ANUAL MDT Construction Manual – Issue 2 Page 1...
-
Page 2: Table Of Contents
Crystal operation ................................40 12.4 Using a loudspeaker ..............................40 13 Operation................................. 41 13.1 Setting up ................................... 41 13.2 Receiving .................................... 41 13.2.1 SSB ................................41 13.2.2 CW ................................41 13.3 Transmitting ..................................42 MDT Construction Manual – Issue 2 Page 2... - Page 3 List of Figures Figure 1 DSB generation ..............................6 Figure 2 Direct Conversion receiver ......................... 7 Figure 3 MDT Block diagram ............................8 Figure 4 Carrier oscillator ............................12 Figure 5 Mixer ................................. 13 Figure 6 Microphone Amplifier ..........................14 Figure 7 Transmit ................................
-
Page 4: Introduction
A kit of parts for the MDT including everything you need, such as enclosure and front and rear panels is available from www.ozQRP.com. -
Page 5: Dsb Vs Ssb
Lower Sideband (LSB) without having to change controls or move frequency. Secondly, being able to hear both sidebands means that you can check for other stations on both sides of your frequency before transmitting and avoid interfering with them. MDT Construction Manual – Issue 2 Page 5... -
Page 6: Dsb Transmitter
However, it would then be necessary to add another mixer to move the SSB signal onto the wanted transmit frequency. Figure 1 DSB generation MDT Construction Manual – Issue 2 Page 6... -
Page 7: Direct Conversion Receiver
Both Figure 1 and Figure 2 show a single 1KHz tone for the audio signal. This is done to make it easier to understand the process involved. In practice there would be a range of voice band frequencies present, but the same mixing conversion principle applies. Figure 2 Direct Conversion receiver MDT Construction Manual – Issue 2 Page 7... -
Page 8: Mdt Block Diagram
5 MDT B LOCK IAGRAM Figure 3 MDT Block diagram MDT Construction Manual – Issue 2 Page 8... -
Page 9: Circuit Description
VR2 is used to balance the diode currents in each side. They are adjusted together to bring the modulator into balance. In practice up to 50dB of carrier suppression can be achieved. MDT Construction Manual – Issue 2 Page 9... -
Page 10: Microphone Amplifier
As a visual indication of power output and modulation, the transmit signal is sampled by capacitor C28 and ground referenced by R21. The signal is rectified by D9 and filtered by C29. This drives the front panel LED via current limiting resistor R22. MDT Construction Manual – Issue 2 Page 10... -
Page 11: Power Supply And Rx/Tx Switching
A MOSFET (Q9) is turned on in TX mode and shorts the audio signal to ground. Even though the audio amplifiers are switched off during transmit, this is still necessary because microphone signals can make their way through to the headphones while the audio amplifiers are turning off. MDT Construction Manual – Issue 2 Page 11... -
Page 12: Figure 4 Carrier Oscillator
Figure 4 Carrier oscillator MDT Construction Manual – Issue 2 Page 12... -
Page 13: Figure 5 Mixer
Figure 5 Mixer MDT Construction Manual – Issue 2 Page 13... -
Page 14: Figure 6 Microphone Amplifier
Figure 6 Microphone Amplifier MDT Construction Manual – Issue 2 Page 14... -
Page 15: Figure 7 Transmit
Figure 7 Transmit MDT Construction Manual – Issue 2 Page 15... -
Page 16: Figure 8 Receive Audio
Figure 8 Receive Audio MDT Construction Manual – Issue 2 Page 16... -
Page 17: Kit Supplied Parts
56K 1/4W 5% 100K 1/4W 5% R3, R4 220K 1/4W 5% R29, R40 470K 1/4W 5% R26, R36 500Ω vertical multi-turn trimpot 5K horizontal trimpot 10K LOG 16mm pot 50K LIN 16mm pot MDT Construction Manual – Issue 2 Page 17... - Page 18 2 pin 2.54mm pitch plug with pins MIC, PTT 2M 0.4mm enamelled wire 0.4M hookup wire Plastic instrument case including screws MDT Front panel MDT Rear panel Knobs 4 pin mic socket MDT Construction Manual – Issue 2 Page 18...
-
Page 19: Individual Parts List
MKT BD139 NPN transistor 100uF 25V RB electrolytic 2N3904 NPN transistor 100uF 25V RB electrolytic 2N3904 NPN transistor 220pF ceramic disc 2N7000 N ch MOSFET 10nF polyester MKT 4.7nF polyester MKT MDT Construction Manual – Issue 2 Page 19... - Page 20 1/4W 5% resistor 1/4W 5% resistor 1/4W 5% resistor 4.7K 1/4W 5% resistor 220K 1/4W 5% resistor 10Ω 1/4W 5% resistor 470Ω 1/4W 5% resistor 22Ω 1/4W 5% resistor 10Ω 1/4W 5% resistor MDT Construction Manual – Issue 2 Page 20...
-
Page 21: Construction
9.1 G ENERAL The MDT is built on a high quality fiberglass PCB. The PCB is doubled sided with the majority of the tracks on the bottom side with the top side forming a ground plane. To assist construction the component overlay is screen printed on the top side and a solder mask is included to help guard against solder bridges. -
Page 22: Building The Pcb
Zener diode looks like a signal diode so make sure you don’t get it mixed up. You may need a magnifier to identify them correctly. Form the leads before inserting to reduce stress on the body when pulling through the PCB. Figure 9 Diode identification MDT Construction Manual – Issue 2 Page 22... -
Page 23: Figure 10 Dip Ics
The relay is inserted with pin 1 towards D7 as shown in Figure 11. This end of the relay has a line printed on top of the case for identification. Once inserted hold against the PCB and solder the pins. Figure 11 Relay install MDT Construction Manual – Issue 2 Page 23... -
Page 24: Figure 12 Non-Polarised Capacitors
These look like 0.1uF MLCC types, so don’t get them mixed up. Figure 13 shows how to identify the LPF capacitor markings. Capacitor Marking Value 150pF 220pF C25, C26, C27 470pF Figure 13 LPF capacitor marking MDT Construction Manual – Issue 2 Page 24... -
Page 25: Figure 14 Trimcap Install
The 2N3904 transistors are orientated to match the screen silk component overlay. The BD139 transistors are mounted so that their Bases face the left hand side of the PCB when viewed from the front as shown in Figure 15. Figure 15 BD139 location MDT Construction Manual – Issue 2 Page 25... -
Page 26: Figure 16 Bd139 Lead Identification
Step 13: Connectors The MDT board utilizes polarized pin headers for the microphone and PTT. If preferred the wires may be soldered directly to the PCB, but the connectors make for a professional looking build, plus allow easy disconnection and testing if required. The connectors have a vertical polarizing piece and the connectors are installed with this piece towards the centre of the PCB. -
Page 27: Figure 17 Led Lead Bending
Once bent insert the LED leads into the PCB just far enough to allow them to be soldered. Ensure the anode(A) and cathode(K) leads go in the correct holes as shown in Figure 18. Figure 17 LED lead bending Figure 18 LED install MDT Construction Manual – Issue 2 Page 27... - Page 28 2 turn secondary. Scrape the enamel off the ends of the wires and tin with solder before installing in the PCB. The winding direction is not important. MDT Construction Manual – Issue 2 Page 28...
- Page 29 80% of the circumference. Note the direction of winding as this makes for a neater alignment on the PCB. Scrape the enamel off the ends of the wires and tin with solder before installing. MDT Construction Manual – Issue 2 Page 29...
- Page 30 80% of the circumference. Note the direction of winding as this makes for a neater alignment on the PCB. Scrape the enamel off the ends of the wires and tin with solder before installing. MDT Construction Manual – Issue 2 Page 30...
-
Page 31: Figure 19 Pot With Tab Removed
Push the pot pins through the board as far as they will go and solder in place. Double check when mounted that the pot shafts are parallel to the PCB. Figure 19 Pot with tab removed MDT Construction Manual – Issue 2 Page 31... -
Page 32: Figure 20 Component Overlay
Figure 20 Component overlay MDT Construction Manual – Issue 2 Page 32... -
Page 33: Final Assembly
Insert the microphone socket into the front panel and secure with the supplied washer and nut. Colour Function Yellow Microphone signal Green Microphone ground Blue PTT signal Blue PTT ground Figure 21 Mic connector wiring MDT Construction Manual – Issue 2 Page 33... -
Page 34: Terminating Plugs
Slide the pin into the housing ensuring the small locking piece on top of the pin locates within the rectangular cutout on the housing. MDT Construction Manual – Issue 2 Page 34... -
Page 35: Front Panel
The PCB should then fit flat on the base plastic pillars. Screw the PCB to the mounting pillars using the supplied self-tapping screws. MDT Construction Manual – Issue 2 Page 35... -
Page 36: Testing And Alignment
11 T ESTING AND ALIGNMENT 11.1 G ENERAL The minimum tools and accessories needed to get the MDT tested and aligned are listed below: Digital multimeter. 50 ohm dummy load capable of dissipating at least 2 Watts. ... -
Page 37: Transmit
Plug in a microphone and check the relay operates when the PTT is pressed. When you speak there should be RF output, and the LED should flash. You will now be able to monitor yourself with a receiver placed nearby and determine an appropriate Mic gain setting. MDT Construction Manual – Issue 2 Page 37... -
Page 38: Marking The Vfo Scale
Ensure the MDT has been powered on for at least 10 minutes to allow the VFO section to warm up and stabilize. This is especially important if any of the VFO components have been recently soldered. -
Page 39: Figure 22 Typical Circuit Voltages
1. Zener tolerance +- 5%. 2. DC measurement approximate. Oscillator running. 3. No RF drive. Readings taken with a digital multimeter. Power supply voltage set at 13.8V DC. Figure 22 Typical circuit voltages. MDT Construction Manual – Issue 2 Page 39... -
Page 40: Modifications
12.4 U SING A LOUDSPEAKER If you wish to use an external loudspeaker with the MDT, it is necessary to replace the 22 ohm resistor R43 with a wire link. Otherwise the speaker level will be greatly reduced. MDT Construction Manual – Issue 2... -
Page 41: Operation
13.2.1 SSB The Tune control is used to tune in stations. The MDT doesn’t have a fine tune control so you need to adjust the control slowly and carefully to tune in correctly. As you move across a SSB station you will find a spot where the voice becomes clear and sounds natural. -
Page 42: Transmitting
Overdriving will create distortion and excessive harmonic generation and must be avoided. To check your signal you can either, connect the MDT to a dummy load and monitor yourself with headphones on a nearby receiver, or have a friend that lives close by listen to your signal.
Need help?
Do you have a question about the MDT and is the answer not in the manual?
Questions and answers