Table of Contents
Advertisement
Quick Links
Advertisement
Table of Contents

Related Manuals for Verilux VD01


Summary of Contents for Verilux VD01
- Page 1 Model: VD01 VD01-Man-Rev16.indd 1 6/5/13 3:26 PM...
- Page 2 Many other healthy lighting products are available through our catalog and online. Visit us on the web at www.verilux.com to request a free catalog and learn more about all our quality Verilux products, or call us toll-free at 1-800-454-4408. Have a bright day! Nicholas Harmon President, Verilux, Inc.
-
Page 3: Important Safeguards
CAUTION: • For indoor use only. • Avoid placing this lamp in areas that are exposed to direct sunlight or close to heat radiating products such as heaters. • Protect the power cord from being walked on or pinched, particularly at plugs, convenience receptacles and the point where the power cord exits the lamp. • Always unplug lamp before performing bulb replacement or installation. • This lamp is not for use with light dimmers, timers, motion detectors, voltage transformers or extension cords. VD01-Man-Rev16.indd 3 6/5/13 3:26 PM... - Page 4 • Do not lift the lamp by the gooseneck. The lamp should be lifted by the shaft on the base. • Be very careful not to pinch any part of the cord between any metal pieces. • Never cover the lamp or place anything on top of it when it is in operation. • Do not use solvents or cleaners containing abrasives, or ammonia based cleaners on this product. • After cleaning the lamp, all moisture should be properly wiped away and dried before restoring power. • Do NOT use lubricating agent in assembly; please see troubleshooting section if you are having difficulty assembling your lamp. SAVE THESE INSTRUCTIONS VD01-Man-Rev16.indd 4 6/5/13 3:26 PM...
-
Page 5: Mesures De Sécurité Importantes
• Ne pas utiliser avec des gradateurs de lumière, des minuteries, des détecteurs de mouvement ou des rallonges. • Ce produit peut causer des interférences avec des radios, des téléphones sans fil ou des appareils utilisant une télécommande sans fil, telle qu’une télévision. • Si des interférences se produisent, éloigner le produit de l’appareil, brancher le produit ou l’appareil dans une autre prise ou encore déplacer la lampe hors de la ligne de visée du détecteur de télécommande. • Débrancher de la prise électrique lorsque le produit ne sert pas pendant de longues périodes ou lors d’orages électriques afin d’assurer la protection des pièces électroniques. • Ce produit contient du mercure dans son ampoule. Suivre les règlements locaux pour la mise au rebut de l’ampoule. • Prendre soin de ne pas pincer le cordon dans des pièces métalliques. • Toujours débrancher la lampe avant de remplacer ou de poser l’ampoule. • Ne pas utiliser de solvants ni de nettoyants contenant des abrasifs ou de l’ammoniaque. • Toute humidité doit être essuyée et séchée avant de remettre la lampe sous tension. • Débrancher la lampe avant d’effectuer son alignement. CONSERVEZ CES INSTRUCTIONS VD01-Man-Rev16.indd 5 6/5/13 3:26 PM... -
Page 6: Getting Started
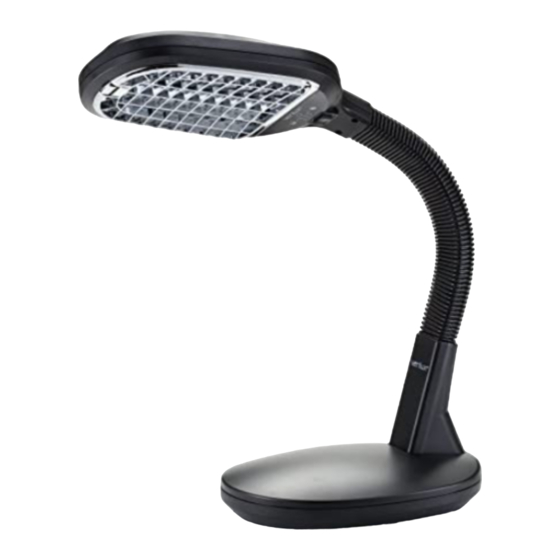
Getting Started Main Parts & Controls E. Polarized Plug A. Lamp Head F. Parabolic Grid Diffuser B. Gooseneck G. Bulb C. Lamp Base H. High/Off/Low Switch D. Power Cord Close-up of Lamp Head VD01-Man-Rev16.indd 6 6/5/13 3:26 PM... -
Page 7: Setup Instructions
Set-up Instructions To prevent damage during shipping, the Verilux bulb is surrounded ® by protective padding. Carefully remove and dispose of the protective padding. Check to ensure that the bulb is fully seated and has not come loose from the socket during shipping. There should be no gap between the bulb and socket. - Page 8 2. To access to the bulb, remove the grid diffuser by depressing the tab and lifting it out (see page 6). 3. Firmly hold the bulb base (B) and pull the bulb (C) from the socket (A) in an outward motion. Notice large gap Correctly seated bulb Incorrectly seated bulb CAUTION: CAUTION: ALWAYS UNPLUG LAMP BEFORE PERFORMING BULB REPLACEMENT OR INSTALLATION. MISE EN GARDE : TOUJOURS DÉBRANCHER LA LAMPE AVANT DE REMPLACER OU DE POSER L’AMPOULE. VD01-Man-Rev16.indd 8 6/5/13 3:26 PM...
-
Page 9: Troubleshooting
Troubleshooting Before requesting service on your Verilux lamp, please read the ® following: • Make sure all power connectors, cords and plugs are inserted fully and securely. • Be sure the bulb is securely seated into the socket (see page 9). • Make sure there is power to the wall outlet or try another outlet. CAUTION: • DISCONNECT LAMP BEFORE PERFORMING ALIGNMENT ACTIVITY. MISE EN GARDE : DÉBRANCHER LA LAMPE AVANT D’EFFECTUER SON ALIGNEMENT. Correct alignment with screw holes can be accomplished by following these steps: 1. -
Page 10: Care And Cleaning
All liquid should be properly wiped away and dried prior to restoring power. CAUTION: DO NOT USE SOLVENTS OR CLEANERS CONTAINING ABRASIVES, OR AMMONIA BASED CLEANERS ON THIS PRODUCT. MISE EN GARDE : NE PAS UTILISER DE SOLVANTS NI DE NETTOYANTS CONTENANT DES ABRASIFS OU DE L’AMMONIAQUE. CAUTION: ALL MOISTURE SHOULD BE PROPERLY WIPED AWAY AND DRIED PRIOR TO RESTORING POWER. AVERTISSEMENT : TOUTE HUMIDITÉ DOIT ÊTRE ESSUYÉE ET SÉCHÉE AVANT DE REMETTRE LA LAMPE SOUS TENSION. VD01-Man-Rev16.indd 10 6/5/13 3:26 PM... -
Page 11: One Year Limited Warranty
Many questions may be answered by visiting www.verilux.com, or you may call our Customer Service Department at 1-800-786-6850 during normal business hours. This limited warranty is provided by: Verilux, Inc., 340 Mad River Park, Waitsfield, VT 05673 Verilux warrants this product to be free from defects in material and workmanship for a period of one year from the date of the original retail purchase from Verilux or an authorized Verilux distributor. - Page 12 Printed in China for Verilux, Inc. © Copyright 2013 Verilux, Inc. All rights reserved. VD01-MAN-Rev16 VD01-Man-Rev16.indd 12 6/5/13 3:26 PM...
Need help?
Do you have a question about the VD01 and is the answer not in the manual?
Questions and answers