Table of Contents
Advertisement
Quick Links
®
Guide on how to operate the electronic personal dosimeter EPD
Mk2
Measuring range
The dosimeter was approved by the Physikalisch-Technische Bundesanstalt for a dosis range
Hp(10) of 10 µSv to 10 Sv at a dose rate of 50 nSv/h to 1 Sv/h in the energy range of 16 keV
to 7 MeV and an angular range of <± 60°.
Note: In the direct beam of pulsed radiation fields (X-ray, accelerator), the dose rate in the
pulse can be much higher than 1 Sv/h. In this case, the dosimeter is not suitable for use
because a significant dose underestimation may result. In the scattered beam and when worn
under a lead apron, the dose rate values are generally within the permissible measurement
range of the dosimeter. Please check your system for the possibility of using the dosimeter.
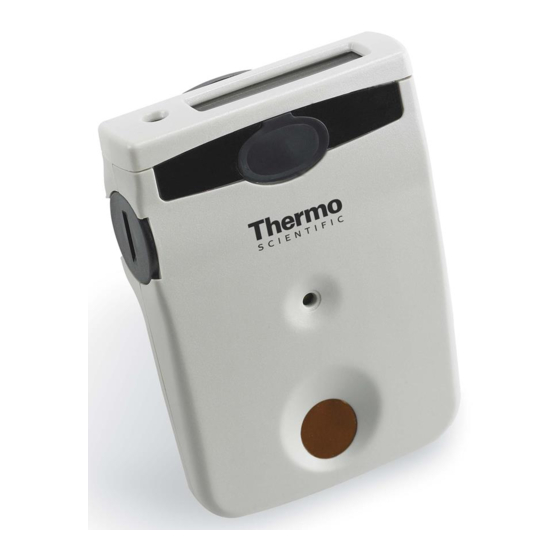
The EPD is equipped with the following operating elements:
Operating elements
LED
LCD display screen, i.e. function control panel
Clip assembly
Battery compartment
Operating button
Sounder
Beta window
FO50KOM27A/ Guide for use
1
As of January 2014
Advertisement
Table of Contents

Related Manuals for Thermo Scientific EPD Mk2


Summary of Contents for Thermo Scientific EPD Mk2
- Page 1 ® Guide on how to operate the electronic personal dosimeter EPD Measuring range The dosimeter was approved by the Physikalisch-Technische Bundesanstalt for a dosis range Hp(10) of 10 µSv to 10 Sv at a dose rate of 50 nSv/h to 1 Sv/h in the energy range of 16 keV to 7 MeV and an angular range of <±...
- Page 2 LED and sounder for warning and fault signaling. An LCD display screen with function control panel to indicate the dose values and settings. A clip assembly to fasten the EPD. A battery compartment to replace the battery. An operating button to adjust the settings on the unit. A beta window to measure the personal surface dose H (07).
- Page 3 Single button operation: Functions / Display screen of the EDP The functions of the unit can be changed and selected by pressing the operating button in different ways. Press and hold the operating button: The unit cycles through the available functions (approx. once per second while the LCD display screen is changing) (10) dose: default setting (blue rimmed) •...
- Page 4 Switching function of the EDP Switching the EPD on: (long press operating button 1 time) The EPD is switched off before starting-up, the LCD display screen is therefore set to OFF. To switch the unit on, the operating button must be pressed for two seconds, after which the display screen will reset to the H (10) condition.
- Page 5 Note on the dose display: The natural background radiation in Germany varies between 0.5 mSv and 2 mSv per year. Thus, doses between 1 and 2 µSv per working day correspond to the background due to natural environmental radiation. Audible warnings: The EPD delivers an audible warning (beep) on two occasions: as an acknowledgment signal when the operating button is pressed •...
- Page 6 Changing the battery Battery warning When the battery symbol appears on the display screen, the battery must be replaced. Opening the battery cap The battery cap is located on the side of the unit and has a slot that helps open the cap with a coin (best suited for this purpose is a 10 cent coin, for example).
- Page 7 Inserting the battery After removing the old battery, the anode side (+ charge) of the new one must be first inserted into the battery compartment of the unit. Replacement batteries can be ordered through our customer service department. Temporarily, the use of a standard 1.5V battery AA/LR6 is also possible. After inserting the new battery, the battery cap is now gently pressed against the opening until the latches on the cap have snapped into place, and then reverted back into the original position by using the coin.
Need help?
Do you have a question about the EPD Mk2 and is the answer not in the manual?
Questions and answers