
Related Manuals for Yardworks 060-1900-8


Summary of Contents for Yardworks 060-1900-8
- Page 1 2-in-1 Electric Lawn Edger model number 060-1900-8 | contact us: 1.866.523.5218 3025736 IMPORTANT: Instruction Read and follow all safety rules and operating Manual instructions before using this product.
- Page 2 060-1900-8 | contact us: 1.866.523.5218...
-
Page 3: Technical Data
060-1900-8 | contact us: 1.866.523.5218 Technical Data Product Safety Know Your Lawn Edger Exploded View Parts List Operating instructions Storage Maintenance Symbols Warranty TECHNICAL DATA Rated voltage 120V~60Hz Rated input power Rated no-load speed 4700 RPM Blade length 7 1/2”... - Page 4 060-1900-8 | contact us: 1.866.523.5218 shock, use only with an extension cord FOR ALL LAWN EDGERS intended for outdoor use, such as an 1) Avoid Dangerous Environments - Don’t extension cord of cord type SW-A, use Lawn Edgers in damp or wet SOW-A, STW-A, STOW-A, SJW-A, locations.
- Page 5 060-1900-8 | contact us: 1.866.523.5218 11) Don’t Abuse Cord - Never carry edger function. Check for alignment of moving by cord or yank it to disconnect from parts, binding of moving parts, breakage receptacle. Keep cord from heat, oil, and of parts, mounting, and any other sharp edges.
-
Page 6: Additional Safety Rules For Lawn Edgers
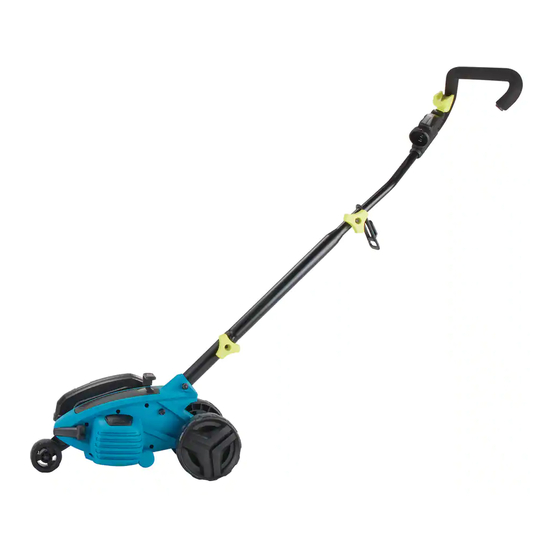
060-1900-8 | contact us: 1.866.523.5218 Figure 1 Method of securing extension cord APPLIANCE CORD CORD SET (A) TIE CORD AS SHOWN (B) CONNECT PLUG AND RECEPTACLE ADDITIONAL SAFETY RULES FOR LAWN EDGERS 1. Keep guards in place and in working order 2. - Page 7 060-1900-8 | contact us: 1.866.523.5218 Power Switch Lever Blade Guard Handle Rear Wheels 2-Prong Power Plug for Upper Tube Extension Cord Extension Cord Retainer with Knobs with Curved Head Bolts Hook Lower Tube Power Safety Lock-off Switch Edge Guide Adjustment Lever...
- Page 8 060-1900-8 | contact us: 1.866.523.5218...
- Page 9 060-1900-8 | contact us: 1.866.523.5218 Item Description QTY. Item Description QTY. Self Tapping Screw Right Switch Cover Flange Torsional Spring Blade Connector Plug Cord Clamp Switch Lever Self Tapping Screw Switch Rear Roller Shaft Handle Sleeve Tube Plug...
- Page 10 060-1900-8 | contact us: 1.866.523.5218 Gear Box Body Felt Seal Oil Seal Bearing Rivet Screw Screw Output Shaft Set Knob Gear Box Cover Button Assembly Spring Screw Holder I Detent Block Screw Left/Rignt Housing Guard Screw Washer Screw Washer...
-
Page 11: Edge Guide
060-1900-8 | contact us: 1.866.523.5218 NOTE: Before using this lawn edger, read this manual carefully. MOUNTING ASSEMBLING THE HANDLE 1. Remove knob and curved head bolt from tube mounting holes. 2. Slide the handle into the end of the upper tube so that holes will line up, then fasten handle tubes together with the knob. - Page 12 060-1900-8 | contact us: 1.866.523.5218 push it down to set Edge Guide in the down position. (See Fig. G, H) See position illustrations on lever. 4. To set the edge guide to the TRENCHING position: Unlock Edge Guide Adjustment Lever and pull it up to set Edge Guide in the up position.
- Page 13 060-1900-8 | contact us: 1.866.523.5218 edge. For the first edging each season, it is best to move forward slowly because grass is thickest then. Subsequent edging will be completed more rapidly. If the lawn edger slows down, back it up an inch or two until the blade comes up to normal speed.
- Page 14 060-1900-8 | contact us: 1.866.523.5218...
- Page 15 060-1900-8 | contact us: 1.866.523.5218...
- Page 16 060-1900-8 | contact us: 1.866.523.5218...
-
Page 17: Preventing Corrosion
060-1900-8 | contact us: 1.866.523.5218 STORAGE Warning! Be sure the tool is unplugged. Remove and clean any debris from the outside of the edger and inside of guard before storage. See MAINTENANCE section. If necessary, the edger may be stored by hanging on a hook by its handle. - Page 18 060-1900-8 | contact us: 1.866.523.5218 Symbol Name Designation/Explanation Volts Voltage Amperes Current Hertz Frequency (cycles per second) Watts Power Minutes Time Alternating Current Type of current Direct Current Type of current Class II Construction Double-insulated construction /min Per Minute Revolutions, strokes, surface speed, orbits etc., per minute.
- Page 19 060-1900-8 | contact us: 1.866.523.5218 TWO-YEAR LIMITED REPAIR WARRANTY HOW TO OBTAIN SERVICE For two (2) Years from the date of purchase Warranty service is available by calling within Canada, YARDWORKS CANADA the toll-free helpline, at 1.866.523.5218. will, at its option, repair or replace for the...
- Page 20 Made in China. Imported by Yardworks Canada Toronto, Canada M4S 2B8...
Need help?
Do you have a question about the 060-1900-8 and is the answer not in the manual?
Questions and answers
How to remove the hose with the yellow tag on it in the handle.