Advertisement
Table of Contents
Advertisement
Table of Contents

Subscribe to Our Youtube Channel
Related Manuals for Yardworks 060-1720-6


Summary of Contents for Yardworks 060-1720-6
- Page 1 Electric Compact Lawn Mower model no. 060-1720-6 Toll-free: 1-866-523-5218 IMPORTANT: IMPORTANT: Read and follow all safety rules and operating instructions Read and follow all safety rules and before using this product. operating instructions before using this product. Instruction Manual...
- Page 2 060-1720-6 | contact us: 1.866.523.5218 SPECIFICATIONS KNOW YOUR MOWER EXPLODED VIEW PARTS LIST ASSEMBLY OPERATION MAINTENANCE TROUBLESHOOTING SYMBOLS SAFETY INFORMATION WARRANTY Motor: 120 V, 60 Hz, 9 A No-load speed: 3600±10% RPM Cutting width: 14” (35.6 cm) Height adjustments: 1 1/4 to 3 3/8”...
-
Page 3: Know Your Mower
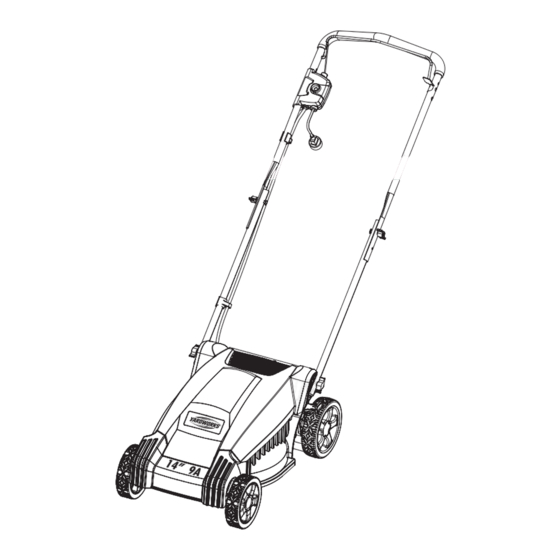
060-1720-6 | contact us: 1.866.523.5218 1. Power lever 2. Upper handle 3. Lower handle pieces 4. Mower housing 5. Wheel 6. Height adjustment lever 7. Safety lock-out button 8. Rear bag KNOW YOUR MOWER • Carefully remove the product and any accessories from the box. Make sure that all items listed in the packing list are included. - Page 4 060-1720-6 | contact us: 1.866.523.5218...
- Page 5 060-1720-6 | contact us: 1.866.523.5218 Item Description Drawing Screw 3220505 Cord hook 3411135-1 Motor cover 34101494-2 Screw (ST4.2×12) 3220748 Press plate 34114495 Compression spring 33310495 B terminal 3650135 Friction block 34202495 Screw (ST4.2×12) 3220404 Motor 36101495 Small pulley...
- Page 6 060-1720-6 | contact us: 1.866.523.5218 Item Description Drawing Split cotter pin 3290135 Axle washer 33310488 Wheel cover 34106488 Lock nut 3221037 Spacer 3331435A Blade insulator 3410535 14” blade 33304493 Blade fixing base 34117470 Motor bushing 3320238-4 Screw (ST4.2×16, Pan Hd) 3220505 Screw (M6×30, Hex Hd.
- Page 7 060-1720-6 | contact us: 1.866.523.5218 Item Description Drawing Torsion spring 33902493 Rear cover 34106493 Tube plug 3420435 Knob 3410835-14 Lower handle 33309493 Knob 3410835-12 Cord hook 34120227 Bolt 3220235-1 Upper handle assembly 31101494...
- Page 8 060-1720-6 | contact us: 1.866.523.5218 ATTACHING THE LOWER HANDLE PIECES TO THE MOWER BASE 1. Align holes at the lower end of each handle arm with posts extending from the mower base side plates. 2. Tighten them using the wing nuts (1) provided.
-
Page 9: Installing The Upper Handle
060-1720-6 | contact us: 1.866.523.5218 INSTALLING THE UPPER HANDLE 1. Align the holes on the upper handle with those on the lower handle pieces. 2. Insert the bolts (1), and tighten them using the wing nuts (2) provided. - Page 10 060-1720-6 | contact us: 1.866.523.5218 INSTALLING THE REAR BAG 1. Lift the rear discharge door (1). 2. Lift the rear bag by its handle (2) and place under the rear door, so that the hooks (3) on the bag frame are seated into the slots (4) in the handle bracket.
- Page 11 060-1720-6 | contact us: 1.866.523.5218 SETING BLADE HEIGHT When shipped, the wheels on the mower are set to a low cutting position. Before using the mower for the first time, raise the cutting position to the height best suited for your lawn. The average lawn should be approximately 1 1/2 to 2”...
- Page 12 060-1720-6 | contact us: 1.866.523.5218 1. Do not tilt the lawn mower when starting the engine or switching on the motor, unless the lawn mower has to be tilted for starting. In this case, do not tilt it more than absolutely necessary and lift only the part which is away from the operator.
-
Page 13: Starting/Stopping The Mower
060-1720-6 | contact us: 1.866.523.5218 STARTING/STOPPING THE MOWER To start the motor: 1. Plug the mower into an approved outdoor extension cord. 2. Press and hold the start button (1). 3. Pull the bail switch (2) toward the handle to start the mower and release the button. - Page 14 060-1720-6 | contact us: 1.866.523.5218 USING THE CORD RETAINER This lawn mower is equipped with a cord retainer in order to prevent the extension cord from discon- necting from the power cord while the mower is in use. The cord retainer hangs from the cord guide bar.
- Page 15 060-1720-6 | contact us: 1.866.523.5218 EMPTYING THE REAR BAG 1. Stop mower, allow blades to completely stop. 2. Lift the rear chute cover. 3. Lift the rear bag by its handle to remove from mower. 4. Empty grass clippings.
-
Page 16: Slope Operation
060-1720-6 | contact us: 1.866.523.5218 SLOPE OPERATION • Mow across the face of slopes, never up and down. Exercise extreme caution when changing direction on slopes. • Watch for holes, ruts, rocks, hidden objects, or bumps which can cause you to slip or trip. Tall grass can hide obstacles. -
Page 17: Mowing Tips
060-1720-6 | contact us: 1.866.523.5218 MOWING TIPS • Make sure the lawn is clear of stones sticks, wires, and other objects that could damage the lawn mower blade or motor. Do not mow over property stakes or other metal posts. Such objects could be accidentally thrown by the mower in any direction and cause serious personal injury to the operator and others. -
Page 18: General Maintenance
• Tighten securely all fasteners and caps and do not operate this product until all missing or dam- aged parts are replaced. Please call YardWorks tools customer service for assistance. Avoid using solvents when cleaning plastic parts. Most plastics are susceptible to damage from various types of commercial solvents and may be damaged by their use. - Page 19 060-1720-6 | contact us: 1.866.523.5218 LUBRICATION All of the bearings in this product are lubricated with a sufficient amount of high grade lubricant for the life of the unit under normal operating conditions. Therefore, no further bearing lubrication is required.
-
Page 20: Replacing The Cutting Blade
060-1720-6 | contact us: 1.866.523.5218 REPLACING THE CUTTING BLADE NOTE: Only use authorised replacement blades. Replace worn or damaged blades and bolts in sets to preserve balance. 1. Stop the motor. Allow blade to come to a complete stop. -
Page 21: Replacing The Wheels
060-1720-6 | contact us: 1.866.523.5218 REPLACING THE WHEELS To ensure smooth operation of wheels, the wheel assembly should be cleaned before storage. • Remove the covers on the wheel. • Remove the opening pins and the washers. • Remove the wheel (1) and replace with new wheel. - Page 22 060-1720-6 | contact us: 1.866.523.5218 PROBLEM POSSIBLE CAUSE SOLUTION Power turned off. Turn power on. Mains socket faulty. Use another socket. Inspect cable, replace if damaged. Extension cable damaged. Motor refuses to Replace fuse. Fuse faulty/blown. start. Increase cutting height and tilt mower to reduce Grass too long.
- Page 23 060-1720-6 | contact us: 1.866.523.5218 Some of the following symbols may be used on this product. Please study them and learn their meaning. Proper interpretation of these symbols will allow you to operate the product better and safer.
-
Page 24: General Safety Rules
060-1720-6 | contact us: 1.866.523.5218 GENERAL SAFETY RULES READ ALL INSTRUCTIONS CAREFULLY • Carefully read all instructions on the mower and in the manual before attempting to assemble and operate the mower. Keep this manual in a safe place for future reference, and consult it regularly. - Page 25 060-1720-6 | contact us: 1.866.523.5218 provided on the circuit(s) or outlet(s) that will be used to power the lawn mower. • In order to prevent electric shock, use this mower only with a CSA/CUL listed extension cord that is approved for outdoor use, such as Type SW–A, SOW–A, STW–A, STOW–A, SJW–A, SJOW–A,...
- Page 26 060-1720-6 | contact us: 1.866.523.5218 • Never pull the mower back toward you while you are walking. If you must back the mower away from a wall or an obstruction, first look down and behind in order to avoid tripping, and then follow these steps: •...
-
Page 27: Operating On A Slope
060-1720-6 | contact us: 1.866.523.5218 OPERATING ON A SLOPE Slopes are a major factor related to accidents involving slips and falls, which can result in severe injury. Operating the mower on a slope requires extra caution. If you feel uneasy on a slope, do not mow it. - Page 28 060-1720-6 | contact us: 1.866.523.5218 SERVICE • When servicing the mower, use only replacement parts that are listed in this manual. The use of parts that do not meet the original equipment specifications may lead to improper performance, and may compromise safety.
- Page 29 060-1720-6 | contact us: 1.866.523.5218 DOUBLE-INSULATED LAWN MOWER Double insulation eliminates the need for the usual three-wire grounded power cord and grounded power supply system. Wherever there is electric current in the mower, there are two complete sets of insulation to protect the user.
-
Page 30: Slope Gauge
060-1720-6 | contact us: 1.866.523.5218 SLOPE GAUGE Use this page as a guide in order to identify slopes that cannot be mowed safely. • DO NOT USE the lawn mower on these slopes. • SIGHT AND HOLD THIS EDGE LEVEL WITH A VERTICAL TREE. -
Page 31: Year Limited Warranty
060-1720-6 | contact us: 1.866.523.5218 2-YEAR LIMITED WARRANTY the movement of any power equipment unit or attachment are the responsibility of the purchaser. For TWO YEARS from the date of purchase within The purchaser must pay transportation charges Canada, YARDWORKS®... - Page 32 Made in China. Imported by YardWorks Canada Toronto, Canada M4S 2B8...
Need help?
Do you have a question about the 060-1720-6 and is the answer not in the manual?
Questions and answers