AVer VC520 Pro Quick Installation Manual
Hide thumbs
Also See for VC520 Pro:
- User manual (74 pages) ,
- Instruction manual (53 pages) ,
- Quick installation manual (10 pages)
Table of Contents
Advertisement
Quick Links
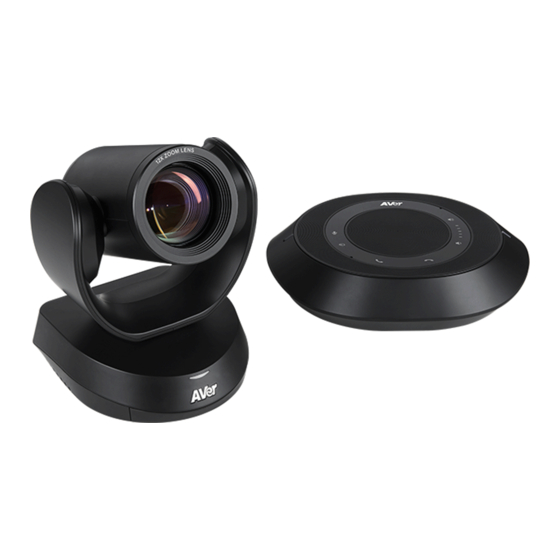
VC520 Pro Conference Camera
Quick Installation Guide
Package Contents
Power Adapter
Camera Unit
Speakerphone Unit
Remote Controller
Power Cord*
Camera Cable
Speakerphone
3.5 mm Audio
L-Mount
USB 3.0 Cable
(10 m)
Cable (10 m)
Cable (0.9m)
Bracket
Screws for
Drilling Paper
Quick Guide
Warranty Card
AAA Batteries
Mount
*The power cord will vary depending on the standard power outlet of the country where it is sold.
More Help
For FAQs, technical support, software and user manual download, please visit:
http://www.averusa.com.
Advertisement
Table of Contents

Related Manuals for AVer VC520 Pro


Summary of Contents for AVer VC520 Pro
- Page 1 VC520 Pro Conference Camera Quick Installation Guide Package Contents Power Adapter Camera Unit Speakerphone Unit Remote Controller Power Cord* Camera Cable Speakerphone 3.5 mm Audio L-Mount USB 3.0 Cable (10 m) Cable (10 m) Cable (0.9m) Bracket ...
- Page 2 Overview Status LED RS232 in/out port IR sensor Ethernet port Speakerphone port DC 12V power jack (Blue cable) USB3.1 Type B port Kensington Lock 9 1011 12 Speakerphone port Line out port (For extended speakerphone Camera port and microphone connection/ (Blue cable) Red cable) Kensington Lock...
-
Page 3: Installation
Installation Connect the camera to power outlet. Power cord Power adapter Connect the camera to the speakerphone using the included compatible cable. [Note] Both speakerphone and camera port are marked in blue. The back cover of the speakerphone will need to be removed to connect the speakerphone cable. -
Page 4: Remote Controller
Call/Answer* *Function requires AVer PTZApp **Not supported for VC520 Pro Camera Select: If you only have one camera and don’t need to adjust custom settings, the default is camera 1. If you press camera 2 or 3 on the remote control, you will find your remote can’t control your camera. -
Page 5: Wall Mount Installation
Wall Mount Installation 1. Use the drilling paper included in the package to drill the holes in the wall where the user wants to mount the camera. 2. Use the screw to secure the L-mount bracket on the wall. 3. -
Page 6: Making A Video Call
, Fuze, GoToMeeting™, Microsoft Lync™, Vidyo, vMix, WebRTC, Wirecast, XSplit. Step 2: Set the VC520 Pro as your primary camera device in your application (Please consult your application setup guide for details). Step 3: Ready to make a video call. - Page 7 Using AVer IP Finder to find the Camera To find the IP address of your cameras, you can use the AVer IP Finder application. Follow the below steps to find the IP address of camera. Download the IP Finder from https://www.averusa.com/business/support/.
-
Page 8: Install Aver Ptzapp
Install AVer PTZApp In AVer PTZApp, user can configure the parameters of the camera. Please go to http://www.aver.com/download-center to download the AVer PTZApp. After downloading, double-click on the file and follow the on-screen instructions to complete the installation. Use AVer PTZApp ... - Page 9 5. Hotkey Control: Enable hotkey control to use keyboard control camera’s movement and backlight. The default is off. A hotkey tip will display when mouse is moved to the PTZ control button in PTZ mode. If the hotkey function is enabled after installing the PTZApp, PTZApp auto launch next time the PC reboots.
-
Page 10: Contact Information
CAUTION - Risk of explosion if battery is replaced by an incorrect type. - Dispose of used batteries in a safe and proper manner. ©2019 AVer Information Inc. All rights reserved. ...
Need help?
Do you have a question about the VC520 Pro and is the answer not in the manual?
Questions and answers