Table of Contents
Advertisement
Quick Links
1. Unpack Unit
•
Remove backing dog from box and remove any loose packing material.
2. Power Up/Install Antenna (if applicable)
•
Transmitter – Insert standard 12v alkaline battery in the transmitter with the positive
(+) side out. Replace metal cap.
•
Backing dog receiver – Install antenna on the backing dog receiver.
•
The unit is equipped with a rechargeable battery. The battery can be charged while left
in the unit, or can easily be removed by loosening two screws, allowing you to charge
the battery at a more convenient location. The unit is shipped with the battery
charged. When the battery becomes fully discharged, allow 12-14 hours on the charger
for a complete recharge.
•
Note – the unit is shipped with the positive battery lead disconnected. You will
need to remove the tape from the lead and connect it to the rechargeable battery
before proceeding with charging and operation.
3. Match the Transmitter and Receiver (With the Transport Latch disengaged, see Fig 3
below)
•
Step 1 - Press and hold the RED button on the launcher receiver -- a green LED light will
flash and then go out.
•
Step 2 - Continue holding the RED button down, and a yellow LED will stay on for
about two seconds. Release the RED button and the LED will start to flash yellow,
indicating the backing dog receiver is in the program mode.
•
Step 3 - Press and release the handheld transmitter button you want to use to activate
the backing dog. A green LED light will flash on the backing dog receiver indicating the
unit is properly programmed and ready to use.
•
Step 4 - Repeat the above to program additional backing dogs to the same transmitter, making
sure you choose a different transmitter button for each additional unit, or if
using the "two-button" transmitter, move the slide switch located on the left side of
the transmitter to the alternate position. You may then program a second backing dog
(or launcher) with the single button.
Auto Backer Instructions
Advertisement
Table of Contents

Subscribe to Our Youtube Channel
Related Manuals for Innotek Auto Backer


Summary of Contents for Innotek Auto Backer
- Page 1 Auto Backer Instructions 1. Unpack Unit • Remove backing dog from box and remove any loose packing material. 2. Power Up/Install Antenna (if applicable) • Transmitter – Insert standard 12v alkaline battery in the transmitter with the positive (+) side out. Replace metal cap.
- Page 2 Upgraded Units with the 12-Volt Rechargeable Battery Figure 1: Underside view Positive lead must be pushed onto battery terminal (they are shipped unplugged) Figure 2 : Charge The sealed battery needs charging before using, and the unit should be stored with the battery fully charged.
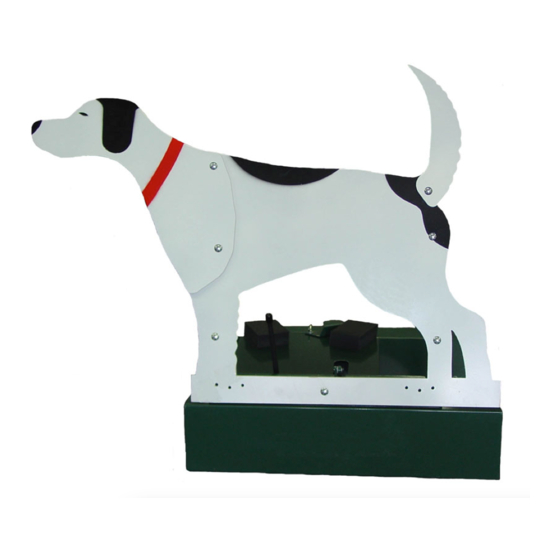
- Page 3 Figure 3: Unit with dog silhouette up First undo the transport latch and raise silhouette. This has to be done under its own power -- it cannot be forced up.
- Page 4 Figure 4: View with Unit Cover Removed Link Bar must be unattached from dog silhouette (See Figure 3) to completely remove unit cover. The 9-volt battery in the radio receiver needs to be replaced periodically. If after use the unit begins to "act up", a new 9-volt battery in the radio receiver unit will often return the backing dog to normal operation.
- Page 5 Figure 5: View showing setup of limit switch Figure 6: View showing limit roller and rotating bar relationship...
Need help?
Do you have a question about the Auto Backer and is the answer not in the manual?
Questions and answers
Need to replace motor and gear drive for Innotek remote backing dog. Are these parts available?