Advertisement
Quick Links
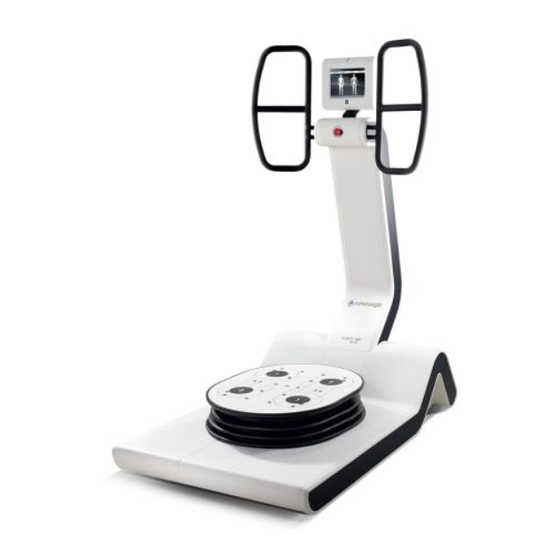
HUBER install : critical steps
• Make sure you have the requested tools ( see install guide)
• Follow the install guideline steps
• Unpacking ( slide
boxes to be able to repack at the end of the show.
• Moving the column ( slide 5)
and the column should not be lift by the handles
• Moving the platform ( slides 8-9)
peoples at least, well positioned around are requested.
• Placing the column over the platform( slide 10)
bolt if not made carefully
• Connecting wires ( slide
but should me made appropriately
• Set up ( slide 15-17 )
initialization are the most critical .
this step.
2): make sure you save all the protection elements and
: The sensors in the handles are sensitive
11): only 3 socket , it's easy, no tool requested
: platform alignment ( horizontality) and software
HUBER 360 install
: the plate is heavy and to move it 3
: risk of bend or twist the
I would recommend to wait after me for
1
Advertisement

Related Manuals for Chattanooga Huber 360


Summary of Contents for Chattanooga Huber 360
- Page 1 11): only 3 socket , it’s easy, no tool requested but should me made appropriately • Set up ( slide 15-17 ) : platform alignment ( horizontality) and software initialization are the most critical . I would recommend to wait after me for this step. HUBER 360 install...
-
Page 2: Box Opening
BOX OPENING IMPORTANT Check the fitting to ensure proper repacking at the end of the show You will find 3 boxes inside. HUBER 360 install... - Page 3 Check the nuts and accessory bags in one of the small box HUBER 360 install...
- Page 4 Remove Wood foam and plastic film protections Make sure you save them for the repacking HUBER 360 install...
- Page 5 VERY IMPORTANT Do not lift by the column handles For the repacking Place the column foot plate in this dedicated space Place the column aside on the floor ( with protection under)You can use the box top HUBER 360 install...
- Page 6 Remove the Wood legs Cut the straps that are attached to the wood base IMPORTANT: for repacking new straps ( I will provided it ) shall be placed to lock the platform on the base HUBER 360 install...
- Page 7 Remove the Black sides covers ( not sure they will be placed over here ) On both side remove the white plastic elements In order to acess the metal structure to move the platform on the floor those parts will be replaced at the end of the install. HUBER 360 install...
- Page 8 In case you can’t find those 4 handles in the kit, you will have to lift the platform by placing Important : Do not place your hands on this your hands on the the metal structure plastic flexible place for the lift HUBER 360 install...
- Page 9 Fo the lift: 3 peoples are required ( on a triangle) One on each side and one on the top side ( the heavy component) HUBER 360 install...
- Page 10 IMPORTANT : make sure the 3 electric wires leaving the column are free and well positioned to be connected to the platform This step the MOST CRITICAL step of the install HUBER 360 install...
- Page 11 Electronic Connections They are 3 wires to connect -The grey one with white socket -2 whites with green socket Important: check the wires and socket name to connect accordingly HUBER 360 install...
- Page 12 Place and fix the 2 pieces of white wood floor on the top of the platform using the screws HUBER 360 install...
- Page 13 Place and fix the white plasctic covers on both side. Important : Position with fingers all screws before tighten with the tool . HUBER 360 install...
- Page 14 Install all the white plastic covers elements HUBER 360 install...
- Page 15 VERY IMPORTANT : DO NOT STAND ON THE PLATFORM DURING THIS STEP OF THE PROCESS on « ON » position Connect to the main Make sure the STOP button on the column is on the correct position HUBER 360 install...
- Page 16 When the device is on, it starts with an initialisation screen Press on « Initialiser » At this stage the platform will move for a few secondes Make sure no one is standing or touching the platform HUBER 360 install during this step.
- Page 17 The goal is to position the bubble right in the center by adjusting the height of the feets It may take some time to do it IMPORTANT: make sure nuts are locked at the end of the process HUBER 360 install...
Need help?
Do you have a question about the Huber 360 and is the answer not in the manual?
Questions and answers