Table of Contents
Advertisement
Quick Links
Advertisement
Table of Contents

Related Manuals for ALLNIC AUDIO L-10000


Summary of Contents for ALLNIC AUDIO L-10000
- Page 1 ALLNIC AUDIO L-10000 OTL/OCL LINE-STAGE PREAMPLIFIER OWNER’S MANUAL...
- Page 2 Thank you for purchasing the Allnic Audio L-10000 OTL/OCL (Output Transformer- Less/Output Capacitor-Less) Line-Stage Preamplifier. We are certain your trust in Allnic Audio and its dealers worldwide, as well as your appreciation for the sound of this high-quality device, will be rewarded by its excellent operation for years to come.
-
Page 3: Table Of Contents
CURRENT METERS TUBES SPECIFICATIONS WARRANTY FIGURES Please read about SAFETY before you attempt to use the L-10000 OTL/OCL Line-Stage Preamplifier - we care about our customers and the equipment, and we want you to enjoy this product for a long time! -
Page 4: Introducing The L-10000 Otl/Ocl Line-Stage Preamplifier
The widest musical dynamics • In the L-10000, there is no coupling device between the preamplifier and the power amplifier; that is, the final gain/output tubes are directly connected to the power amplifier. Thus, the benefits listed above are fully present in the Allnic L-10000 preamplifier. - Page 5 The L-10000 OTL/OCL has no voice of its own, none. It is silent, except for the music emanating from the blackest of backgrounds. In addition, the stunningly realistic sonic quality is matched by the simple elegance, flexibility and ergonomic functionality of the L-10000’s...
-
Page 6: What's In The Box
NOT connect it to your AC outlet. Please contact your Allnic dealer. We advise that you keep the box and other packing materials that your L-10000 OTL/OCL came in. It will be useful if you sell your L-10000 OTL/OCL or in the unlikely event you need to ship it for service. -
Page 7: Cleaning
INITIAL SET-UP A. LOCATION, LOCATION, LOCATION Like all audio products using tubes, the Allnic Audio L-10000 OTL/OCL needs to be placed on a solid stand in a location that provides for good air circulation around the preamplifier. DO NOT cover the top of the preamplifier. -
Page 8: Power Connection
B. POWER CONNECTION The L-10000 OTL/OCL uses a standard three prong male 15 amp IEC connection for AC input. You need to use a power cord with a female three prong 15 amp IEC connector at one end. To the left of the IEC connector (facing the left side of the unit as in Figure 1), there is a power on-off switch. -
Page 9: Initial Power On
Push the power on-off switch to the left of the IEC connector (facing the left side of the unit as in Figure 1) so it is in the “on position”. That will power up the L-10000 OTL/OCL. From this point on, you need only use the far left hand button marked “power”... -
Page 10: Operation
GAIN STAGE BALANCING USING THE CURRENT METERS - IMPORTANT! There is one current meter for each channel on the front of the L-10000 (See Figure 4). These meters indicate the status of the current supply to the gain tubes in the L-10000 OTL/OCL. If the gain stages are set up and functioning properly, the needles of the meters should be in the centre between the two parallel lines in the middle of each meter. -
Page 11: Tubes
Audio and its authorized representatives are not liable in any way whatsoever for any injury or loss incurred by the user or for damage to the L-10000 OTL/OCL, any of its parts, or tubes or replacement tubes resulting from the user changing or attempting to change tubes. -
Page 12: Specifications
SPECIFICATIONS FOR THE ALLNIC AUDIO L-10000 OTL/OCL LINE-STAGE PREAMPLIFIER Line level × 5 pairs: • Inputs: Balanced (XLR) × 2 Unbalanced (RCA) × 3 3 pairs: • Outputs: Unbalanced (RCA) × 1 pair Balanced (XLR) × 2 pair 10kΩ Balanced/Unbalanced •... -
Page 13: Warranty
Date of purchase is the date indicated on the invoice for the product issued by Allnic Audio or its authorized representative. For the warranty to be valid, a defective product must be returned to Allnic Audio’s authorized representative for service prior to any unauthorized attempt to repair. -
Page 14: Figures
FIGURES Figure 1 – L-10000 OTL/OCL Left Side Panel View... - Page 15 Figure 2 – L-10000 OTL/OCL Rear Panel View Figure 3 – L-10000 OTL/OCL Remote Control...
- Page 16 Figure 4 – L-10000 OTL/OCL Front Panel View...
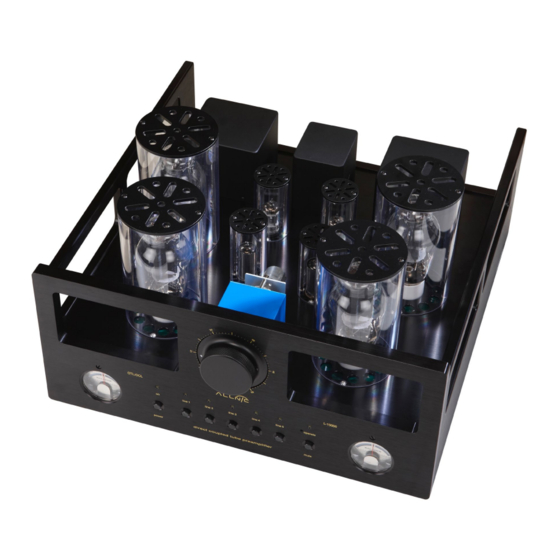
- Page 17 Figure 5 – L-10000 OTL/OCL Top View...
Need help?
Do you have a question about the L-10000 and is the answer not in the manual?
Questions and answers
How do I access the MAINs Fuse in the Allnic L-10000 Signature Preamp? Also, what is the type of fuse used in the unit? Small? Amperage? Slow Blow?