Table of Contents
Advertisement
Quick Links
Advertisement
Table of Contents

Related Manuals for AVer M11-8M


Summary of Contents for AVer M11-8M
- Page 1 M11-8M Instruction Manual ...
-
Page 2: Table Of Contents
Content Package Contents ................1 Optional Accessories ................1 Overview ....................2 Function Buttons .................. 2 Control Panel ................2 OSD Mode .................. 3 Compound Key ..................3 LED Indicator ..................3 Device Connection ................4 Power Connection to Wall Outlet ..........4 Power Connection to PC/Laptop .......... - Page 3 OSD Menu Buttons ............10 Playback Menu Buttons ..........10 Slid Show .................. 10 Interval ..................11 Storage ..................11 Delete File ................. 11 Delete All ................... 11 Using the Camera ................12 Camera Head Angle ..............12 Camera Body Angle ..............12 Shooting Area ................
-
Page 4: Package Contents
Package Contents The items below are included with this product. If any item is missing, contact the dealer from whom you purchased this product. M11-8M unit USB Cable QR Code Card Optional Accessories Carrying Bag Anti-glare Sheet ... -
Page 5: Overview
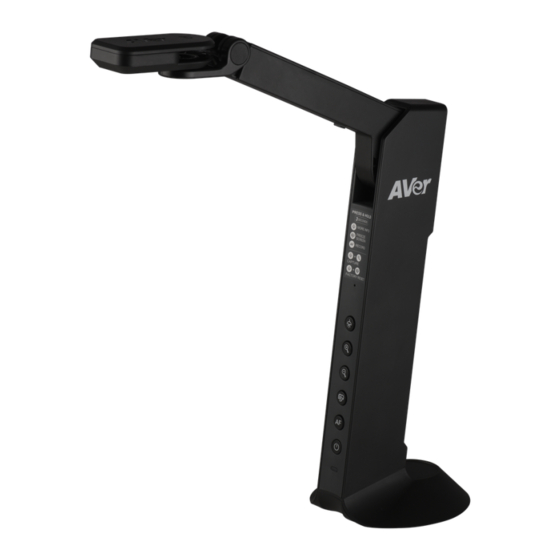
Overview Camera Head LED Lighting Micro SD Card Slot Built-in MIC USB Port Mini USB/ Power Port Functional Buttons HDMI Out Port Status Indicator Stand Base Function Buttons Control Panel Button Function Lamp on/off Press and hold 3 seconds to call out OSD menu. Zoom in ... -
Page 6: Osd Mode
OSD Mode Button Function Back to last menu level page Exit from OSD menu Up(selection item) Down(selection item) Selection enter Compound Key Press keys to operate the compound key function. Button Function Back to factory default settings. ... -
Page 7: Device Connection
(Not included) [Note] Use the USB cable which included in package connects to mini USB/ Power port of M11-8M with USB power adapter (not included)to wall outlet. User needs to purchase a 5V/1A USB power adapter (not included) to connect the USB cable to wall outlet. -
Page 8: Power Connection To Pc/Laptop
When the camera is start-up, the power indicator is in flashing red. USB power requirement of M11-8M is USB 3.0 5V/0.9A. For Storage, Format, Capture, Recording and Playback functions, please change to “Power Supply Only” mode ... -
Page 9: Hdmi Connection
HDMI Connection Connect M11-8M to HDMI display with HDMI output port. Wall Outlet USB cable USB Power adapter (Not included) HDMI cable (Not included) USB Connection Connect USB flash drive to USB port to save the capture and recording file. -
Page 10: Insert A Micro Sd Card
Insert a Micro SD Card Insert the card to micro SD card slot. [Note] Micro SD card can storage capture images and recording files. The supported micro SD card capacity maximum is 32G (FAT32). -
Page 11: Operate The Camera With Avertouch
Operate the Camera with AVerTouch Connect the camera to PC/laptop and Install the AVerTouch application. AVerTouch USB cable AVerTouch [Note] Download AVerTouch application at: https://averusa.com/education/support/avertouch Please set the camera to USB mode. Go to OSD menu > Setting > ... -
Page 12: Playback Mode
Playback Mode View the capture images and recording files. Switch to Playback Mode 1. In camera mode, press and hold button for 3 seconds to call out OSD menu. 2. Use button move to Setting > USB to PC > Power ... -
Page 13: Osd Menu Buttons
OSD Menu Buttons Button Function Back to last menu level page Up(selection item) Down(selection item) Selection enter Playback Menu Buttons Button Function Image /video selection + + : Fast forward while playback video + ... -
Page 14: Interval
Interval Set the interval before displaying the next picture. The length can be set up to 120 sec. Storage Select the source of the images and videos. Delete File Permanently delete the image or video in selected. A Warning Message will appear. -
Page 15: Using The Camera
Using the Camera Camera Head Angle Move the camera head as figure shown. [CAUTION] To avoid damage the camera head, hold the edge of the camera head to rotation the camera head. Camera Body Angle [CAUTION] To avoid damage the camera unit, DO NOT pull the arm angle over 107°. -
Page 16: Shooting Area
Shooting Area When camera position is 342.4mm high, the shooting area will be A3 size. 315mm ... -
Page 17: Object Position
Object Position The icon on top of camera head can help user to place objects in a positive direction. Storage the Camera ... -
Page 18: Specification
Specification Sensor 1/3.06" CMOS sensor Pixel Count Frame Rate Max.60fps(display) Image mode Normal/Motion /High Quality Effect Color / B&W / Negative Focusing Auto/Manual Shooting Area A3,420mm(H) * 315mm(V) Zooming 20x digital zoom Power Source Mini-USB in, 5V/0.9A 4 Watts(lamp on) Consumption 3.5 Watts(lamp off) USB Bus Power... - Page 19 Hold the bottom of the camera with both hands to move the camera. Do not grab the lens or arm to move the camera. Do not pull the camera arm and camera part in the opposite direction. COPYRIGHT ©2020 AVer Information Inc. All rights reserved.
- Page 20 The information contained in this documentation is subject to change without notice. In no event will AVer be liable for direct, indirect, special, incidental, or consequential damages arising out of the use or inability to use this product or...
- Page 21 More Help For FAQs, technical support, software and instruction manual download, please visit: https://www.averusa.com/education/support/ Contact Information AVer Information Inc. www.averusa.com 668 Mission Ct. Fremont, CA 94539, USA Toll-free: 1(877)528-7824 Local: 1(408)263-3828 Support.usa@aver.com V1.00...
Need help?
Do you have a question about the M11-8M and is the answer not in the manual?
Questions and answers