Advertisement
Quick Links
Advertisement

Subscribe to Our Youtube Channel
Related Manuals for Dancover TITAN Dome 320


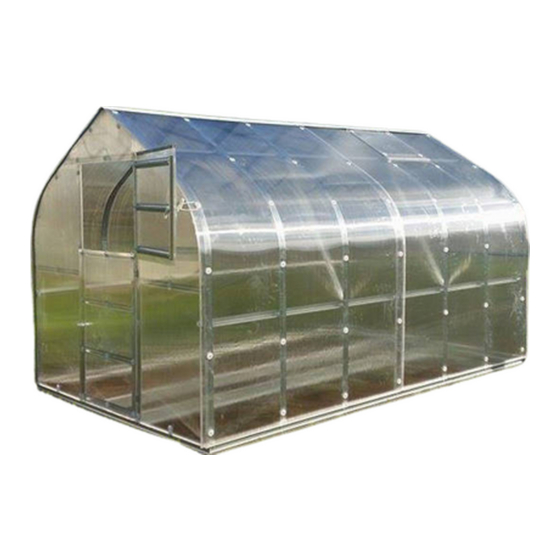
Summary of Contents for Dancover TITAN Dome 320
- Page 1 Manual Greenhouse TITAN Dome 320 03-04-2020...
- Page 2 Dear clients! After making the decision of buying a greenhouse you received a carefully made item. Its framework is made from special (1mm of thickness and 78mm width) profiles produced from galvanized metal which are extremely strong. Due to uncomplicated instruction this greenhouse is easy to construct. Because of additional items, you will be able to accomplish your ideas.
- Page 3 THE LIST OF PARTS Name Length, TITAN Dome NR. 1 Top post 1070 NR. 2 NR. 3 Side-bottom post 1600 NR. 4 Ground attachments NR. 5 Post reinforcement rails 4000 NR. 6 Post reinforcement rails 2030 NR. 7 1330 NR. 8 Roof ridge reinforcement NR.
- Page 4 Plastic H profile for connection Plastic holder for opening the doors Bolt with loop Sealing rubber gray Closure profile U 1,30 2,70 4,20 5,40 6,90 Skylight parts SKYLIGHT NO. 1 Upper part of skylight with hinges SKYLIGHT NO. 2 Bottom part of skylight SKYLIGHT NO.
- Page 5 Scheme for cutting polycarbonate Diagram for cutting one polycarbonate 2100x6000 mm sheet for standard greenhouse (dou- ble door at the front end, wall at the back end): Use appropriate side of polycarbonate! Side with protective layer, which protects from UV radiation, must be on the outside. Protective layer is covered with plate which contains writings;...
-
Page 6: Installation Instruction
Installation instruction 1. Foundation is assembled by using front end and back end parts of foundation (17) and foundation side parts (15). All parts must be connected in such manner that it would form a rectangle. Use foundation corners (18) and connect all these parts together by using bolts M5-12 (26), M5 nuts (29). - Page 7 3. Excavate the pits (25 cm in diameter, 40 cm in depth) for side – bottom posts (NR. 3) at attachment points in the foundation (3.1 - 3.2 pic). pits 3.2 pic. 3.1 pic. 4. Using screws M5-12 (26) and nuts M5 (29) attach polycarbonate installation plates (22) to front end and back end parts of foundation (17) (4.1 - 4.2 pic).
- Page 8 Attaching posts to foundation at side Attaching posts to foundation at the corners middle of sides 6.2 pic. 6.3 pic. 7. Side-bottom posts (NR. 3) are tightened by installing post reinforcement rails (NR. 5) using screws M5-12 (26) and nuts M5 (29) (example 7).
- Page 9 NOTE: if assembly of greenhouse is carried out by one person or if greenhouse is longer than 2 m – each arch can be assembled separately and connected to framework before adding reinforcement rails (NO.5 and NO.6) 9.1 pic. 9.2 pic. 10.
- Page 10 12.1 pic. Polycarbonate attachment corners (large corner) (20) Attachment corners for polycarbonate and posts (small corner) (21) 12.3 pic. 12.2 pic. 13. Tighten the holders of end post and door post (NO.1) to front and back of large corners (20) which are at the top ends of post reinforcements (NO. 1). Use screws M5-12 (26) and nuts M5 (29) (13.1 –...
- Page 11 14. Tighten door post and end post (NO. 9) to door post and end post holders (NO. 10). Top part of post must be tightened to door post and end post holders (NO. 10) and bottom part directly to front end part of foundation (17) using screws M5-12 (26) and nuts M5 (29). Same actions must be used at the front end and at the back end (14.1 –...
- Page 12 16 рic. 17. Tighten the skylight profile (NO. 13) in between side posts at the point of your choice. Use screws M5-12 (26) and nuts M5 (29). NOTE: it is not recommended to place skylight in a place where two polycarbonate panels go on top of each other (i.e. at posts 4th, 7th, 10th, 13th and so on) (17 pic.) 17 рic.
- Page 13 Use appropriate side of polycarbonate! Side with protective layer, which protects from UV radiation, must be on the outside. Protective layer is covered with plate which contains writings; other side (which has to be on the inside) is covered with clear tape. If sheets need to be cut, we recommend using electric saw, handsaw with fine teeth or sharp knife.
- Page 14 21. Attach side-front 2110 x 850 mm polycarbonate parts to front end of greenhouse from both sides (2nd and 3rd sheets in polycarbonate cutting diagram), mark the bending radius with marker and cut out the bend, or simply attach the sheet to framework using screws M5- 40 (28), nuts (29) and spacers (31), and then cut the polycarbonate according to profile of framework by using sharp knife or jigsaw.
- Page 15 23. Attach sealing rubber to top channels of polycarbonate side sheets at the top of back end and front end of greenhouse. Then install the top polycarbonate covering (23.1 – 23.3 pic). Roof cover (36) (36) 23.1 piс. 23.2 piс. 23.3 piс.
- Page 16 25. Screw 2100 x 2980 mm polycarbonate roof covering to greenhouse profile in appropriate places, starting at the bottom (foundation part) and going upwards. Use screws M5-40 (28), nuts (29) and spacers (31). Sheets that meet at the middle of greenhouse must go on top of each other (~5-10), only after placing them in such manner tighten the screws M5-40 (28), nuts (29) and spacers (31).
- Page 17 Install automatic or manual opener (depending on configuration); one part of it must be attached to bottom part of skylight (SKYLIGHT NO. 2), other – to top reinforcement rail (NO. 5) (27.1 pic). Tighten the 700 x 650 mm skylight polycarbonate to assembled small framework of skylight;...
- Page 18 29. Assembly of bottom and top part of the door. All parts listed in set of bottom part of door (DOOR NO.4; DOOR NO.5; DOOR NO.3; ) must be connected in such way that they would form a rectangle, tighten it with screws M5-12 (26) and nuts (29). Tighten the hinges of bottom part of the door to the post of door-end (NO.9);...
- Page 19 30. Insert the screw with loop (35) into dedicated place (at the equal height with top door- window handle). Make a loop from provided plastic holder for door opening (34) (30.1 – 30.2 pic). 30.1 piс. 30.2 piс.
-
Page 20: Contact Information
Contact information Head office: Dancover A/S For more information Nordre Strandvej 119 G please visit: 3150 Hellebæk www.dancovershop.com Denmark National contact Denmark: 70 26 76 20 Spain: 911 436 828 denmark@dancover.com espana@dancover.com UK: 020 8099 7570 Italy: 02 479 21 198 uk@dancover.com...
Need help?
Do you have a question about the TITAN Dome 320 and is the answer not in the manual?
Questions and answers