Advertisement
Quick Links
29/10/2017 Ver 1.5
MATRIX FRAME & FRAME TOUCH
MATRIX FRAME - Installation Manual
(Inc. MiniFrame)
Installation Manual
Copyright © MATRIX-CABINET 2015. All Rights Reserved.
This document contains information of commercial value, proprietary
of MATRIX-CABINET. It is prohibited to copy, use, or transfer this
document and/or any part thereof to anyone without the prior written
permission of MATRIX-CABINET.
Page 1
Advertisement

Related Manuals for Matrix FRAME


Summary of Contents for Matrix FRAME
- Page 1 Copyright © MATRIX-CABINET 2015. All Rights Reserved. This document contains information of commercial value, proprietary of MATRIX-CABINET. It is prohibited to copy, use, or transfer this document and/or any part thereof to anyone without the prior written permission of MATRIX-CABINET.
- Page 2 If these instructions are not followed exactly, possible bodily injury may occur. The MATRIX FRAME unit is suitable for mounting on wall only. To avoid shock, do not perform any non-authorized servicing. Disconnect the product from the power line before removing covers.
-
Page 3: Product Specification
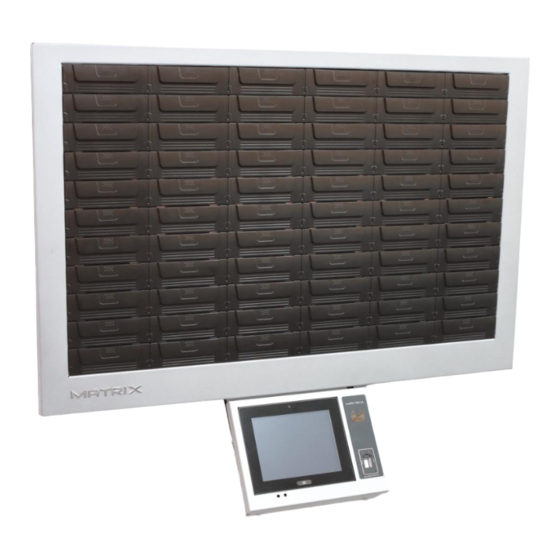
General This document contains an overview of the MATRIX FRAME unit major hardware parts and provides a step by step installation The MATRIX FRAME is a wall mounted unit with configurable bins structure. The unit is fully controlled by a dedicated PC offering highest level of security and management. - Page 4 Step 1 – installing the FRAME unit It is highly recommended to install the unit on a concrete or brick wall. In case of installation on a drywall, use the dedicated masonry anchor showed below: 1) Mark the recommended height of 1.83m (72inch) from floor at the center of the unit For MiniFrame recommended height is 1.73m (68inch) from floor...
- Page 5 3) Drill and connect the other 4 screws tightly 4) Take the FRAME unit out of the package using the two strips 5) Lift the unit from both sides and hang it with the hooks until it is hanged secured...
- Page 6 6) Insert the supplied key to the side lock and turn it 90 degrees. Press on the right side button and full the lower side of the frame cover. Lift the cover to remove it completely. 7) In order to secure the system from possible thefts (by lifting and taking the entire unit), drill and connect another screw on the bottom right side.
- Page 7 8) Close the frame cover by placing the upper side first. Press on the side button (make sure that the key is still turned) and push bottom until it's fasten. Release the side button and take out the key by...
- Page 8 10) Connect the connection cable to the left socket at the bottom of the FRAME unit (behind the PC) 11) Connect the FRAME power adaptor plug to the right socket at the bottom of the FRAME unit and secure with the plastic connector (behind the PC)
- Page 9 Open the computer rear cover by pressing the two metal tabs away from the metal casing. Insert TCPIP cable and drive it across the back opening, then close the lid back. Connect the other end to the camera. MATRIX FRAME - Installation Manual Page 9...
- Page 10 Open the computer rear cover by pressing the two metal tabs away from the metal casing. Insert TCPIP cable to the middle RJ45 port (right LAN port) and drive it across the back opening, then close the lid back. Connect the other end to your local network. MATRIX FRAME - Installation Manual Page 10...
- Page 11 2. Press firmly on each of the 18 buttons on the bottom side of the unit until all the bins have opened (You may need to used considerable force) 3. Turn and pull, insert the key when finish MATRIX FRAME - Installation Manual Page 11...
- Page 12 5. Connect the flat cable connector to the connector in the Pod board. Make sure it is firmly connected 6. Close the FRAME Touch and Pod covers and reconnect the FRAME power adaptor plug to the socket at the bottom of the FRAME Touch.
- Page 13 MATRIX FRAME - Installation Manual Page 13...
- Page 14 MATRIX FRAME - Installation Manual Page 14...
Need help?
Do you have a question about the FRAME and is the answer not in the manual?
Questions and answers