
Related Manuals for Acekare Yomper 2.5 Plus

Summary of Contents for Acekare Yomper 2.5 Plus
- Page 1 Makes life easier Yomper 2.5 Plus Removable electric motorization for wheelchair User guide v2.5 du 2019/05/14 S.A.R.L. Acekare, 7 rue de Mireport, 33310 LORMONT - FRANCE 1 / 46...
- Page 2 Data sheet Autonomy: from 18 à 32km depending on the battery Max. speed (on flat area): 6km/h Maximum speed (angled area 3%): 4km/h Motor power : 250 W Motor voltage: 24 V Operating temperature: -25°C to +50°C Theoretical consumption in a straight line: 5,9Wh/km Theoretical consumption while driving: 22,5Wh/km Total weight: 6,00kg (batterie 6Ah), 6,4kg (batterie 10Ah) Note : these values have been measured with a passenger of 100kg.
-
Page 3: Table Of Contents
Table des matières Introduction ........................5 Use ........................... 5 Before using the Yomper ....................5 Caution ........................6 Interférences électromagnétiques (EMI) ................8 Liste of components ..................... 9 Before you go with your Yomper ..................13 Installing the Yomper mounting bracket (by a professional) ..........13 1.6.1 Mounting bracket for rigid wheelchair .............. - Page 4 14.4 Storage ........................39 Information and maintenance of the battery part ..............40 15.1 Autonomy......................... 40 15.2 Maintenance and running of the battery ................. 40 15.3 Cleaning ........................40 15.4 Storage ........................40 Résolution de problèmes....................41 Warranty ........................45 17.1 Included in warranty ....................
-
Page 5: Introduction
Yomper or your manual wheelchair is considered as a bad use of the Yomper. ACEKARE is not responsible for any material damages or bodily harm that may occur during the wrong use of the Yomper or, because the instructions of this manual were not followed. -
Page 6: Caution
1.3 Caution All precautions detailed by the supplier of your manual wheelchair must be followed and added to the recommendations defined in this manual. Any negligence to follow these recommendations may cause serious bodily harm or death. The handling or use of the Yomper by someone who hasn’t received the instructions of this manual may •... - Page 7 Always switch off the control box when you’re parked to avoid the wheelchair to get moving • accidentally. • The Yomper is not made for a use under heavy rains, under the snow, on wet or frozen areas, it may cause dysfunctions or damages.
-
Page 8: Interférences Électromagnétiques (Emi)
1.4 Interférences électromagnétiques (EMI) Interferences come from radio sources, for exemple : radio/TV transmitters, mobile phones, walkie-talkies, etc. There are numerous sources of EMI in our environment, some can be avoided, others are not visible. Electronic systems such as the Yomper are sensitive to EMI, depending on their strength. These interferences may cause the unintentional start of the Yomper or damages in the control system, potentially resulting in failures and costly repairs. -
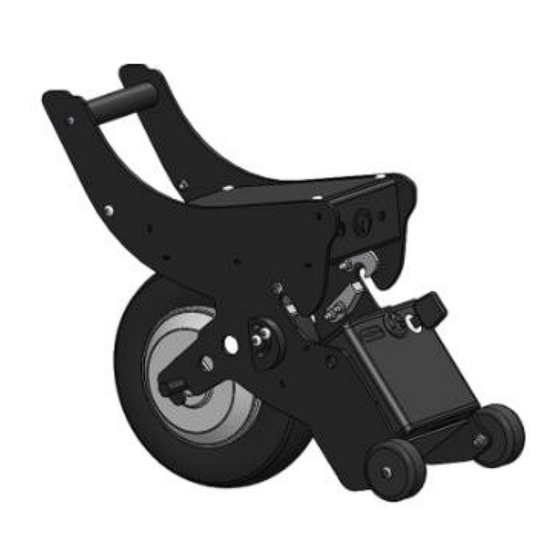
Page 9: Liste Of Components
1.5 Liste of components Here is the list of the components that constitute the Yomper : Yomper parts Aluminium frame Brushless motor24V 250 W Electronic controler Yomper Power switch button. Blink fast when Yomper is switch on and not connected to the control box button. - Page 10 10 / 46...
- Page 11 11 / 46...
- Page 12 Mounting bracket for rigid wheelchair Mounting bracket for foldable wheelchair 12 / 46...
-
Page 13: Before You Go With Your Yomper
1. Before you go with your Yomper Installing the Yomper mounting bracket (by a professional) The installation must be carried out in our workshops or by your medical equipment dealer. 1.6.1 Mounting bracket for rigid wheelchair The mounting bracket of the Yomper is delivered already assembled. It consists of the following elements: •... - Page 14 • The F-point is 190mm from the ground • The set is perfectly screwed and does not move • Flanges (A) are well oriented (NT point down ) Be careful, if the flanges are misaligned, the Yomper stop will not work, which can cause a fall during a two-wheeled passage.
-
Page 15: Mounting Bracket For Foldable Wheelchair
1.6.2 Mounting bracket for foldable wheelchair • 2 flanges (A and A ') – YPU0204 • 1 Clip (B) – YPU0209 • 1 pivot (C) – YPU0202 • 1 bar-left side + spacers (D) – YPU0200 + spacers • 1 bar-central part (E) – YPU0212 •... - Page 16 • The distance between the 2 black nylon washers (8) must be 122mm • The support must close and open without discomfort, and lock securely. • For proper operation of the system, it is necessary to have L = 2mm 1.6.2.1 1.6.2.2 •...
- Page 17 • If the stop is incorrectly adjusted, adjust the position of the stop (H) on the counter nut (G ') (coarse adjustment) and then the position of the yomper stop (final fine adjustment). Attention to the adjustment of the stop (H): it must be facing the front wheels of the wheelchair Check that the Yomper can always be set up and removed easily from the bracket.
-
Page 18: Checking The Battery
1.7 Checking the battery 1.7.1 1.7.2 Checking the correct battery circuit The battery is positioned directly in its housing on the Yomper. Just put it in place respecting the meaning. To avoid any errors, a decryption is integrated in the upper part of the battery. Once the battery is installed, give a key turn to lock and secure the battery in its slot. -
Page 19: Battery Life Indicator
1.7.3 Battery life indicator A battery indicator is located on the front of the battery. It is broken down into 4 levels and gives an approximate indication of the battery charge level. 19 / 46... -
Page 20: Setting Up The Control Box
1.8 Setting up the control box 1.8.1 On the leg • Check the direction of the strap • Put in place the strap "blocker" • Clip and rotate the strap so that the housing bracket is properly positioned • Tighten the strap •... -
Page 21: On The Wheelchair
1.8.2 On the wheelchair • Pay attention to the direction of positioning • Use the supplied serflex as well as the rubber "blocker" • Tighten on the tube • Cut the protruding part of the serflex • Snap and rotate the control box to lock. 21 / 46... -
Page 22: Setting Up And Ignition Of The Yomper
1.9 Setting up and ignition of the Yomper First of all: • Check that the control box is in the off position (screen off, LED off). • Turn on the Yomper by pressing the POWER button (4). A flashing LED indicates that the Yomper is waiting for its connection with the control box. - Page 23 Place the Yomper on the floor behind the wheelchair and roll it forward as indicated by the arrow. Always push the Yomper. The spout of the frame comes to be supported on the drawbar. The Yomper lifts and locks automatically on hitch bar of the wheelchair.
-
Page 24: Using The Yomper
3 Using the Yomper 3.1 Basic operation The Yomper has 2 modes: indoor and outdoor. In each mode, you have 5 speeds configurable by your care, within the limits set by a healthcare professional. 3.1.1 Indoor mode Indoor (green LEDs) : the Yomper effortlessly drives you to the desired speed, and stops as soon as it senses resistance (for example, braking on the handrails). -
Page 25: Switching On The Control Box
3.2 Switching on the control box Turn on the control box (slide the ON/OFF button on the control box) During the connection phase, LEDs 1, 3 and 5 Flash. The case lights up, the display shows: connected, then goes to the default display of the Yomper (control unit autonomy level and Yomper autonomy). -
Page 26: Starting The Yomper Engine
3.3 Starting the Yomper engine Press the main button on the control unit twice The Yomper starts instantly at speed 1 (see the led Strip), respecting the parameterized Acceleration (cf parameters) The led Strip is fixed while the Yomper engine is running The Yomper power LED flashes slowly 26 / 46... -
Page 27: Stop Of The Yomper
3.4 Stop of the Yomper In indoor and outdoor mode Press the main button once, the Yomper engine stops The Yomper power LED switches back to fixed If you stop, thespeed level will go back to 1 for safety (to avoid a too violent reboot inadvertently). Attention: you have to brake the wheelchair, the Yomper does not have brakes, it goes freewheeling In indoor mode (green led Strip) You can also brake on the handrails to stop the engine of the yomper... -
Page 28: Change Of Indoor/Outdoor Mode
• At least once (1), a new support has no effect on the • The actual speed at which you propel the Yomper depends on: Selected speed (from 1 to 5) From current mode (indoor, LED Strip in green, outdoor, LED Strip in red) The setting of the Yomper 3.7 Change of indoor/outdoor mode •... -
Page 29: Extinction Of The Yomper
• You can leave the Yomper on: it goes into standby mode, and can remain in this state for several days. It is still strongly advised to turn it off physically every night. • If you leave the Yomper on, you can re-light the control unit, and reuse the Yomper as soon as the connection is established (fixed LED). -
Page 30: Remove The Yomper
3.10 Remove the Yomper Prerequisite: • Switch off the control box • Unplug the third-party inverter Press the handle and the unlocking cable. At the same time, press the handle to bring it to the low position and lift the front of the Yomper. -
Page 31: Use His Wheelchair, Yomper Off
4 Use his wheelchair, Yomper off You can leave your Yomper off attached to your chair all day safely: • The Yomper is by design a freewheel system and placed in the axis of the wheels: you will hardly feel it, even off •... -
Page 32: Use By A Third Person (Option)
5 Use by a third person (option) To avoid mishandling, we recommend connecting the third-party inverter after attaching the yomper to the wheelchair. • Set up the third person dimmer on the handle • Connect the third person drive to the rear of the Yomper •... -
Page 33: Changing The Oled Display
not be kinked in the tubing of the wheelchair or the Yomper. 6 Changing the OLED display • When the Yomper is stopped (flashing LED) • A long press on "<" or ">" changes the display • By default the display shows: Control box battery level Yomper autonomy level Speed of the Yomper... -
Page 34: Setting Up The Yomper
9 Setting up the Yomper To change the setting, the Yomper must be stopped or turned off. Press the ">" button (furthest away from you) for more than 5 seconds. The menu works the following way: • Main button: choice validation •... -
Page 35: Maximum Speed
10 Maximum speed The maximum parameterized speed of the Yomper is brided during the factory setting according to your order form (and at 6km/h by default). It will always be possible to the reseller with the appropriate hardware to modify this factory setting. 35 / 46... -
Page 36: Yomper Refill
11 Yomper refill We recommend charging the battery when the last light is on: • Switch off the yomper thanks to the button provided for this purpose (CF § 2) • Plug the charger into the 220V mains: • Connect the charger to the battery as shown below: 36 / 46... - Page 37 Charging the charger light is Red then it turns Green after the battery is charged. Battery charging charged battery To fully charge the battery (if it was completely empty), it is necessary to: • Approx. 4H for 24V 6ah battery •...
-
Page 38: Charging The Control Box
12 Charging the control box To load the control box: • Connect the micro USB cable to the box (18) control • Check that the housing is turned (if the button is off, there is no charge) • Connects the cable to the mains or to a USB device for charging •... -
Page 39: Special Conditions Of Use
13 Special conditions of use Use in steep slope : it is necessary to lean forward not to tilt backwards. Sidewalk crossing : the Yomper must be stopped (pressing the main button) before going up or down a sidewalk. Use in 2-wheel mode : the yomper must be stopped (pressing the main button) before making 2 wheels or you may switch back when the yomper engine touches the ground. -
Page 40: Information And Maintenance Of The Battery Part
15 Information and maintenance of the battery part 15.1 Autonomy The autonomy will depend on several parameters: • the total weight of the wheelchair in charge, • the difference in your journey, • the frequency of stops and then restarts, •... -
Page 41: 16 Résolution De Problèmes
16 Résolution de problèmes Breakdown Cause possible Solution Battery is not properly Check the battery installation on its Power inserted support Check the battery charge level and Power The battery is discharged charge it if necessary This is normal, when the slope is too The engine forces when Motorised wheel large you have to manually assist the... - Page 42 inserted installation on its support Check the The battery battery charge eating level and discharged charge it if necessary This normal, when the slope is The engine Motorised too large you forces in the wheel have manually assist Yomper. Check that the maximum allowable...
- Page 43 that Yomper "Cale" during intense exertion. After a few seconds, you will be able to leave, advise to help Yomper important slopes, can use the Yomper without problem more flat surfaces. If you have many courses requiring constant Yomper effort, or in case significant user...
- Page 44 decreases its end of battery life replacement. Battery Contact your Loading charging is dealer damaged replacement Initialization problem error occurs during pairing steps, process resumes from scratch. After attempts, the control must restarted. If the problem Pairing persists, make Electronic not done.
-
Page 45: Warranty
ACEKARE will repair or replace to the warranty holder, free of charge, the parts being covered by the warranty after a verification by an authorized representative of ACEKARE and if the latter has found defects in materials and/or workmanship. - Page 46 Manufacturer and distributor France SARL Acekare 7 rue de Mireport 33310 LORMONT, France 09 80 80 85 15 contact@acekare.com 46 / 46...
Need help?
Do you have a question about the Yomper 2.5 Plus and is the answer not in the manual?
Questions and answers
Can I purchase a replacement mounting bar?
Yes, replacement mounting bars for the Acekare Yomper 2.5 Plus are available. The components listed include:
- 1 bar-left side + spacers (D) – YPU0200 + spacers
- 1 bar-central part (E) – YPU0212
- 1 bar-right side
These parts indicate that individual mounting bars can be identified and potentially replaced.
This answer is automatically generated