
Related Manuals for Numatic TGB 8572/200T


Summary of Contents for Numatic TGB 8572/200T
- Page 1 TGB 8572/200T B AT T E RY S C R U B B E R D RY E R Owner Instructions Warning! Read instructions before using the machine www.numatic.co.uk...
-
Page 2: Table Of Contents
B AT T E RY S C R U B B E R D RY E R TGB 8572/200T Index Machine Overview ........ Pages 2-3 PLEASE READ Control Panel Overview ........ Page 4 BEFORE COMMENCING Machine Set up Guide ........ Page 5... -
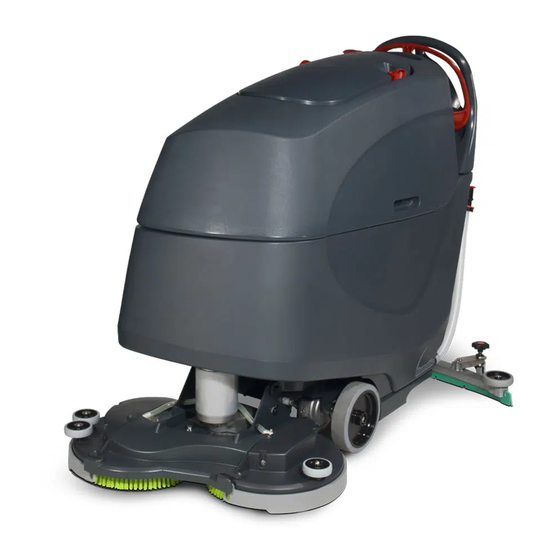
Page 3: Machine Overview
Machine Overview... -
Page 4: Control Panel Overview
Vacuum Pick Up On / Off Battery Charge Level Indicator Forward / Reverse Hours Meter Brush On / Off / Control Handle Traction Status Light In the event of a breakdown contact your Numatic dealer or the Numatic Technical help line +44 (0)1460 269268... -
Page 5: Machine Set Up Guide
Fuse Location Less Battery Models - Numatic International Ltd recommends using MK Batteries for the 8572/200T in the TGB machine mentioned in this manual. For full battery specifications see page 21. ENSURE THAT NO METAL OBJECTS COME INTO CONTACT WITH BATTERY TERMINALS WHILE THE BATTERIES ARE EXPOSED. -
Page 6: Fitting The Brush / Pad
BEFORE MAKING ANY ADJUSTMENTS Fitting the Brush / Pad. 2 x 370mm Brush or a 2 x 360mm Pad on the TGB 8572/200T. Featuring the Nulock brush system. The brush is simply pushed and twisted to lock, making fitting and removal a simple process. -
Page 7: Fitting The Hose Guide
Floor tool when finished. Filling the Clean Water Tank The TGB 8572/200T is equipped with a large capacity clean water tank allowing for large areas to be covered in a single fill. To fill the clean water tank, extend the hose located to the rear of the machine in the centre of the removable filler cap (1). Pull out hose. -
Page 8: Fill Level Indicator
Do not operate machine unless the Operator Manual has been read and fully understood. The machine is now ready to be moved to the cleaning site. Before performing the cleaning operation, place out appropriate warning signs and sweep or dust-mop the floor. www.numatic.co.uk... -
Page 9: Lowering The Floor Tool
(Fig.B). Middle speed is the optimum cleaning speed. Set the flow rate (Fig.C). The TGB 8572/200T is equipped with an electronic braking system. Simply release the hand operated start / stop trigger and the machine will stop. -
Page 10: Brush Pressure
First pre-scrub the floor with the floor tool in the raised position, allow the chemical time to work then scrub the area a second time with the floor tool lowered. If streaking occurs wipe floor tool blades clean. NOTE: Care must be taken to reduce speed when cornering or when manoeuvring around obstacles www.numatic.co.uk... -
Page 11: Machine Cleaning
Regular Maintenance ALWAYS ENSURE THAT THE MACHINE IS SWITCHED OFF PRIOR TO ANY MAINTENANCE USING THE MASTER CONTROL ON/OFF KEY. REMOVE THE KEY PRIOR TO ANY MAINTENANCE OPERATION. After use, empty waste water tank using emptying hose and flush out with clean water. -
Page 12: Changing Floor Tool Blades
Replacement is a reversal of the removal process. Floor Tool Overview 1. Retaining pins x 4 2. Rear blade 3. Blade carrier 4. Front blade (slotted) 5. Floor tool main body NOTE: The blades are designed to be reversible, thus extending their useful working life. www.numatic.co.uk... -
Page 13: Machine Charging
Machine Charging Always ensure that the machine is switched off prior to charging. The battery meter displays the charge level of the batteries; As the machine is used and the batteries are discharged, when fully charged, all meter lights are illuminated. the meter lights will go out from right to left. -
Page 14: Charging Lights Sequence
NEVER DISENGAGE THE BRAKE WHEN THE MACHINE IS ON A SLOPE / GRADIENT. Note: Drive functions on the machine will not work whilst in free-wheel mode. Remember to re-engage the drive when you reach your final destination / before using the machine.. www.numatic.co.uk... -
Page 15: Specifications
Replace fuse & reduce load (page 5) Handle safety fuse blown Replace fuse (or contact service engineer) Failure to rectify the problem or in the event of a breakdown contact your Numatic dealer or Numatic Technical helpline +44 (0)1460 269268 T 01460 68600... - Page 16 Contact Service Agent www.numatic.co.uk...
-
Page 17: Rating Label / Personal Protective Equipment /Recycling
NOTE: A risk assessment should be conducted to determine which PPE should be worn. Safety Critical Component: In the event of a breakdown contact your Numatic dealer or the Charging Leads: H05VV-F x 1.0 mm x 3 Core Battery Charger: 220V / 240V (50-60Hz) -
Page 18: Safety Precautions
Operators shall be adequately instructed as to the correct use of the machine. If this product does not have a factory installed Numatic battery charger, then it is the responsibility of the owner and user of the product to ensure that the charging system and battery combination are compatible, fit for purpose and safe to use. - Page 19 Undo battery terminals and remove. Remove batteries. The batteries are to be disposed of safely, as according to local government guidelines. 10. Only use genuine Numatic replacement batteries. 11. Do not allow the batteries to become fully discharged; it may not be possible to re-charge them.
-
Page 20: Recommended Spare Parts
903066 2.5 Amp Fuse (Safety Fuse) 208888 Clean Water Filter 903683 Anti-Static Strap 903283 Filter Basket 204115 Drive wheel (Traction) 903285 Filter Basket Lid 237688 Foam Filter Body 208947 Foam Filter 208949 Float Switch Attachment Schematic Diagram TGB 8572/200T www.numatic.co.uk... -
Page 21: Battery Wiring Diagram
4 x 98A\H Stud Terminal Gel Type 12V Battery As Per Numatic Item: 230138 x4 RED WIRES x3 RED WIRES For optimum performance Numatic International Ltd recomend the use of the following batteries in the Twintec machines. Order Machine Numatic Recommended Battery Number... -
Page 22: Eu Declaration Document
EU Declaration of Conformity www.numatic.co.uk... -
Page 23: Warranty
Warranty T 01460 68600... -
Page 24: Company Address
Tel: 0861 686 284 www.numatic.co.za Numatic International Schweiz AG. Sihlbruggstrasse 142, 6340 Baar. SCHWEIZ Tel: 0041 (0) 41 76 80 76 - 0 www.numatic.ch Numatic International ULDA. Centro de Negócios da Maia, Rua Albino José Domingues, 581, 4470 – 034 Maia PORTUGAL Tel: +351 220 047 700 www.numatic.pt...
Need help?
Do you have a question about the TGB 8572/200T and is the answer not in the manual?
Questions and answers