Table of Contents
Advertisement
Advertisement
Table of Contents

Related Manuals for Tumaker Voladora NX +


Summary of Contents for Tumaker Voladora NX +
- Page 1 Included software Voladora NX + First steps Warranty Declaration of conformity...
-
Page 2: Table Of Contents
Voladora NX + TABLE OF CONTENTS Printer Specifications..................p.3 Main parts of the printer................p.4 Elements included in the printer..............p.5 Installation and set up...................p.6 Printer Calibration..................p.7 Loading and change of filament..............p.8 Nozzle change....................p.9 Simplify Printing Software................p.9 Filament sensor...................p.10 Door sensor....................p.11 Security....................p.12 Basic recommendations ................p.12 WARRANTY.....................p.13 DECLARATION OF CONFORMITY..............p.16... -
Page 3: Printer Specifications
PRINTER SPECIFICATIONS Nozzle Diameter: 0.2 - 0.4 - 0.6 - 0.8 - 1.2 225x295x200 Printer Volume: Nozzle Temperature: 45ºC - 350ºC Printer Size: 45x41x41 20ºC: 200ºC - 1’15” / Nozzle Heat Up Time: Package Size: 50x50x61 250ºC - 1’50” / 300ºC - 2’35” Package Weight: 26 kg Printer Weight: 24 kg Materials: PLA, PETG, PP, Flex, Nylon... -
Page 4: Main Parts Of The Printer
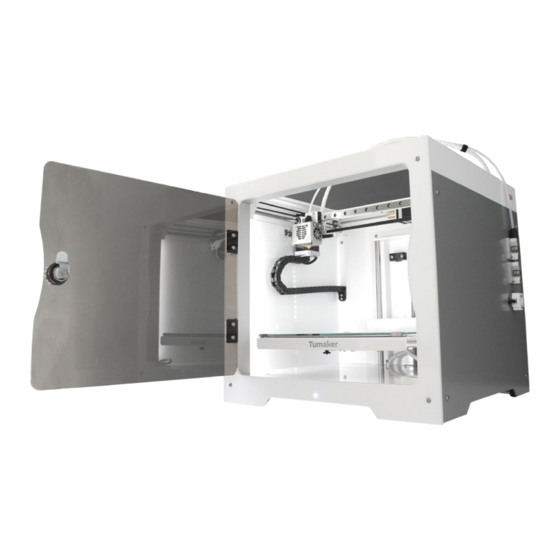
MAIN PARTS OF THE PRINTER HEAD OR HOTEND It moves in the X and Y axes by melting the filament of material and depositing it on the platform or heated bed. It has a nozzle that heats up to the required temperature according to the corresponding printing material. -
Page 5: Elements Included In The Printer
ELEMENTS INCLUDED IN THE PRINTER Make sure that the following items have been delivered with the printer, otherwise please contact us. FIXING NOZZLE SPATULA GLASS POWER CORD LACQUER CHANGING TOOL CABLE WIRING LIGHT INDICATIONS To start with the installation and set up, connect the power cable to the slot on the back of the printer and The light indicator will stay on while the printer is on. -
Page 6: Installation And Set Up
INSTALLATION AND SET UP 2. Open the Settings tab - Connectivity Connect the printer to the network in two steps: 3. Connect via Ethernet or WiFi always selecting the - Use a computer to connect to the Wifi of your printer with STATIC option the password “tumakerLS”. -
Page 7: Printer Calibration
PRINTER CALIBRATION Voladora NX + The calibration process is essential for explained below. optimal printer operation and quality prints. The distance between the Using a sheet of 80g/m² A4 paper, Voladora NX + nozzle and the bed has to be perfectly the calibration wizard of the Repetier measured. - Page 8 LOAD AND CHANGE OF FILAMENT SPOOL To load the filament or change the spool we have to follow the same steps, with the difference that if we only have to load the filament and there is no spool placed in the printer we will skip the first step. This process will be done using the Repetier Server controls.
-
Page 9: Nozzle Change
8. Release the trigger and retighten until the tool reaches the end of the thread. SIMPLIFY3D PRINTING SOFTWARE Tumaker’s 3D printing stations include the Simplify3D™ and you will love the intelligent support option. professional manufacturing suite, a software with all the... -
Page 10: Filament Sensor
FILAMENT SENSOR The filament sensor detects if the 3D printer has enough filament to print. If it doesn’t, it will stop the printing process and will make it possible to change it in order to continue the printing process. Please, make sure that your filament detector is active (check the Activate Filament Detector table down below). -
Page 11: Door Sensor
DOOR SENSOR The door sensor is a new feature of the Voladora NX +. If the door is suddenly opened while the machine is printing, the printer will pause the printing to avoid any alterations or damages that may occur. When the door is correctly closed, the printing process will start again from where it was left. -
Page 12: Security
6 months is and power-up instructions. recomended It is advisable to change the materials recommended nozzle periodically, every time by Tumaker to ensure proper you change spools or material. printer operation. Write us and we will provide them to you. -
Page 13: Warranty
The warranty period shall commence at the time of the original purchase of the Product by the first end user. Tumaker products are not consumer items. They are oriented elements for professional and industrial use. Tumaker offers a warranty period of 1 year valid only if it... - Page 14 What is not covered by the Limited Warranty? a third-party printing material (one that has not been supplied by Tumaker) or from the use of a consumable in 1. User manuals or third party software, content, data an unsuitable condition (with adhering elements, grease or links, configuration, included in or downloaded from residues or other similar incidents).
- Page 15 Responsability You have 7 business days to return a Tumaker product. Tumaker shall not be liable to the Buyer for the failure or This period applies from the day you receive the order inability of Tumaker products to function properly. Nor for and the postmark or transport company’s stamp will be...
-
Page 16: Declaration Of Conformity
De acuerdo con las disposiciones de la Directiva 99/05/CE del Parlamento Europeo Jon Bengoetxea Zurriarain y del Consejo de 9 de marzo de 1999, transpuesta a la legislación española CEO Tumaker S.L mediante el Real Decreto 1890/2000, de 20 de noviembre de 2000. - Page 17 Voladora NX+...
- Page 18 Tumaker S.L. cuentanos@tumaker.com Ihurreta bidea, 13 www.tumaker.com Pabellón 25, 2º 20180 Oiartzun Call us at 943 49 12 44 Gipuzkoa...
Need help?
Do you have a question about the Voladora NX + and is the answer not in the manual?
Questions and answers