Codan Sentry-H 6110-MP Operator's Manual
Hide thumbs
Also See for Sentry-H 6110-MP:
- Quick reference card (2 pages) ,
- Quick reference card (2 pages)
Table of Contents
Advertisement
Advertisement
Table of Contents

Subscribe to Our Youtube Channel
Related Manuals for Codan Sentry-H 6110-MP


Summary of Contents for Codan Sentry-H 6110-MP
- Page 1 Sentry-H 6110-MP OPERATOR GUIDE...
- Page 2 © Copyright 2019 Codan Communications. Codan part number 15-04200-EN Issue 1, December, 2019. CODAN®, Sentry®, and CALM® are trademarks of Codan Limited. Other brand, product, and company names mentioned in this document are trademarks or registered trademarks of their respective holders.
-
Page 3: Table Of Contents
TABLE OF CONTENTS Table of Contents Preparing your radio Charging and installing batteries....................3 Attaching a ground wire to the radio..................5 Inserting a 6110-MP into a backpack ..................7 Selecting and connecting your antenna..................8 Testing your radio before deployment ..................10 Operating the radio Front panel and screen overview ..................... - Page 4 TABLE OF CONTENTS Troubleshooting ........................56 Definitions..........................62 Menu Navigation ........................65...
-
Page 5: Charging And Installing Batteries
Before any deployment, it is vital to ensure that your batteries are fully charged and that you have a sufficient number of batteries for your mission. Compatible batteries The 6110-MP is recommended for use with the following batteries available from Codan. Codan Part Number Battery Battery Chemistry... - Page 6 CAUTION: To prevent damaging the 6110-MP and the battery, you must ensure that the battery is correctly aligned to the battery connector (J7) on the 6110-MP before attaching the latching battery compartment to the radio. battery connector (J7) Sentry®-H latching battery 6110-MP compartment latch battery Page 4 Sentry-H 6110-MP Operator Guide...
-
Page 7: Attaching A Ground Wire To The Radio
The 6110-MP radio has a ground lug located underneath the left handle of the radio, connect the grounding kit (Codan Part Number: 15-60083) to the ground lug by pressing down on the lug to reveal the ground clip insertion slot. - Page 8 Attaching a ground wire to the radio Page 6 Sentry-H 6110-MP Operator Guide...
-
Page 9: Inserting A 6110-Mp Into A Backpack
Inserting a 6110-MP into a backpack All Codan supplied backpacks come with an adjustable harness that holds the radio firmly in position. The radio can be oriented so that the antenna port (J1) is located on either the right or left side of the backpack. -
Page 10: Selecting And Connecting Your Antenna
It is crucial that you choose an antenna that meets your requirements. The table below provides an overview of Codan tactical antennas and the capabilities of each antenna over distance. Correct installation and positioning of your antenna is essential for quality HF communication. - Page 11 (SWR) values are acceptable. This test is recommended for any antenna used, including supported broadband antennas. Note: The accessory pass-through located at the top of the Codan backpack allows the antenna cable or antenna whip to remain connected while the backpack is closed.
-
Page 12: Testing Your Radio Before Deployment
2320 handset. Note: You can press PTT at any time to abort the self-test. Switch on the Radio (page 15). Press the key. Select Self Test Screen from the Function Select screen. Press (Start). Page 10 Sentry-H 6110-MP Operator Guide... - Page 13 Note: The PTT button is not included in this test, pressing PTT will abort all tests. Once the tests have completed, a summary report will display the results. Review any failed test results and address them before deployment. Sentry-H 6110-MP Operator Guide Page 11...
- Page 14 As each channel is tested, it will display an SWR value for each channel. An icon will appear that indicates if SWR value is at an acceptable level for transmission on the channel. Review each channel for a good SWR reading, address any poor SWR readings before deployment. Page 12 Sentry-H 6110-MP Operator Guide...
- Page 15 Select the channel or frequency you want to test from the Channel or Scratch Mode on the Operational screen (page 19). Press the key. Press the Push-To-Talk (PTT) button on the H-250 or 2320 handset (page 23). Check the SWR value and address any problems before deployment. Sentry-H 6110-MP Operator Guide Page 13...
- Page 16 Hopping. All of which should be tested before deploying your radio into the field. Speak to your HF Network Administrator to resolve any critical issues you are experiencing before deploying your radio into the field. Page 14 Sentry-H 6110-MP Operator Guide...
-
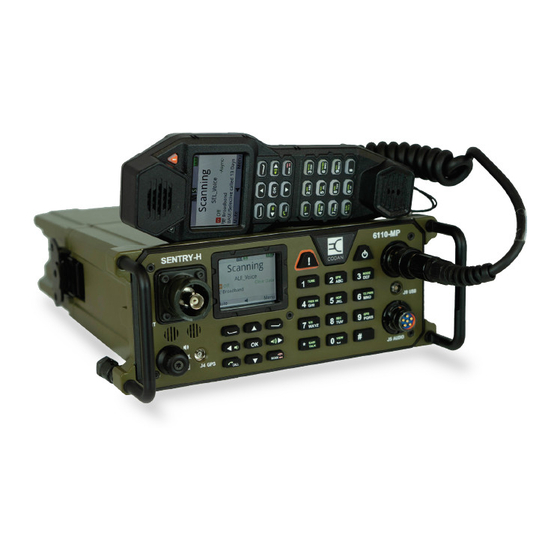
Page 17: Front Panel And Screen Overview
Front panel and screen overview Front panel and screen overview The Sentry-H 6110-MP front panel internal gps screen power key antenna alert key control point antenna port (J6) port (J1) usb port (J9) front panel speaker H-250 discreet port (J5) - Page 18 Mute type indicator, refer to the Select mute type (page 26) table for details of the various mute states. • Scanning • Transmission power , and • Receive/Transmit indicator. • Rx/Tx level indicator • Missed Calls Page 16 Sentry-H 6110-MP Operator Guide...
- Page 19 Time and Date settings. When a tab bar is selected, you can use the navigation keys to cycle through the tabs. You can then use the keys to navigate into the menu. tab menu bar not selected active menu inactive menu tab menu bar selected Sentry-H 6110-MP Operator Guide Page 17...
- Page 20 The menu bar is displayed at the bottom of the screen and displays context for the software keys The menu also displays several contextual icons, including: • Volume/Speaker mode indicator • Numeral input is available • Alpha Numeric input is available • Left/Right navigation is available Page 18 Sentry-H 6110-MP Operator Guide...
- Page 21 Elements of the Operational screen Note: Depending on your access level and the current setup of the radio, some menu items may not appear where shown. Contact your HF Network Administrator for more information. Sentry-H 6110-MP Operator Guide Page 19...
- Page 22 The Menu screen The menu screen displays all user and system-level configurations for the radio, provides information about the radio and allows access to advanced views and administrator login on the radio. Page 20 Sentry-H 6110-MP Operator Guide...
- Page 23 Note: You can turn off the screen and key lighting entirely by activating discreet mode. To change the screen brightness: Press the key. Scroll to the brightness level you require and press the key. Sentry-H 6110-MP Operator Guide Page 21...
- Page 24 Press (Save) to save the change. Select the next available theme To switch between a Military Light and Military Dark theme: Hold the key. Theme Channel screen Menu screen Military Light (Default) Military Dark Page 22 Sentry-H 6110-MP Operator Guide...
-
Page 25: Handsets
H-250/U type, with built-in earphone, noise- cancelling microphone, and PTT (Push To Talk) button. It is connected to the H-250 Audio port (J5) on the front panel of the radio. Sentry-H 6110-MP Operator Guide Page 23... - Page 26 IP67 for water and immersion. With an internal microphone and earphone/speaker, and cradle, the smart handset is designed to provide extended operation and control of the 6110-MP radio. Note: The 2320 handset and the front panel user interfaces are independent of one another. Page 24 Sentry-H 6110-MP Operator Guide...
-
Page 27: Speaker And Mute
(digital voice mute D). The voice signal is output to the front panel speaker, an H-250 audio accessory or a connected 2320 handset. Note: The current mute state is set across all connected control points or H-250 audio accessories. Sentry-H 6110-MP Operator Guide Page 25... - Page 28 Note: By default, mute is automatically closed after 5 seconds of inactivity. Note: Opening and closing mute will affect all connected control points and H-250 audio accessories. Press (Mute) to toggle mute open/closed. Page 26 Sentry-H 6110-MP Operator Guide...
-
Page 29: Discreet Mode And Zeroise
WARNING: If the H-250 Discreet Mode Override audio option is enabled, the audio will still be emitted from any audio device connected to the H-250 (J5) port. Contact your HF Network Administrator for more information. Sentry-H 6110-MP Operator Guide Page 27... - Page 30 To lock or zeroise (erase) the radio: Turn the discreet mode switch to the Active Pull the switch outward then turn to the right to the Zeroise position to initiate the action. Select the desired activity if prompted. Page 28 Sentry-H 6110-MP Operator Guide...
-
Page 31: Secure Communications
CES-128 encryption if available. Digital Voice When enabled on your radio, the Standard Digital Bundle (Codan Part Number: 15-10624) enables Digital Voice. Digital Voice overcomes the potential poor voice quality that comes as a result of atmospheric effects and interference from other equipment and transmissions. Digital Voice brings clarity to voice communications over HF by removing the background noise that is typical with an analogue signal. - Page 32 The DV current rate will display in status area 1. Repeat this process until you have cycled through to the bitrate you desire. Active clear digital voice (in Tx) Active encrypted digital voice (in Tx) digital voice digital voice data rate data rate Page 30 Sentry-H 6110-MP Operator Guide...
- Page 33 Frequency hopping Codan’s Frequency Hopping capability (Codan Part Number: 15-10629-000) uses GPS timing to synchronise radios accurately. The 6110-MP radio may require a GPS antenna (Codan Part Number: 78-01253) connected to the radio’s GPS antenna port (J4) to get GPS time synchronisation.
-
Page 34: Entering And Editing Text
A Ruggedised USB Keyboard (Codan Part Number: 78-11005) can be connected to the USB port on the front of the radio (J9), a standard USB A (female) to 2320 USB adaptor cable (Codan Part Number: 08-07436-001) is required. In addition to text entry, navigation of the radios user interface can be achieved using a keyboard. - Page 35 To enter a special character in an address, message or station: Hold the key to see the available special characters. Navigate to the character you require using the navigation keys, then press (Insert). Sentry-H 6110-MP Operator Guide Page 33...
-
Page 36: Scanning, Channel And Scratch Modes
The radio is capable of fixed channel communication without the need to establish a network call. Fixed channel operation allows for voice transmission in both clear and digital voice and can be used in conjunction with encryption and frequency hopping. Page 34 Sentry-H 6110-MP Operator Guide... - Page 37 Scratch or fixed frequency mode tunes the 6110-MP receiver and transmitter to a fixed arbitrary frequency. Scratch mode allows for voice transmission in both clear and digital voice and can be used in conjunction with encryption and frequency hopping. Sentry-H 6110-MP Operator Guide Page 35...
- Page 38 Menu bar (page 18) Use the keypad to enter the frequency you want to tune. Press to change. Note: You can also use the navigation keys to change the frequency. Page 36 Sentry-H 6110-MP Operator Guide...
-
Page 39: Hf Networks
An HF Network in the context of your radio is a call system with associated scan tables and several settings to control privacy and call establishment. The Sentry-H 6110-MP radio supports 2G ALE, 3G ALE and Codan Selcall call systems. - Page 40 Note: The radio will automatically use appropriate call systems when scanning multiple HF networks. To set or change the HF network: Press Press (Options). Select HF Networks. Select the desired HF network from the list. Press Page 38 Sentry-H 6110-MP Operator Guide...
-
Page 41: Call Types
Request diagnostic information from a station that is configured to respond to this call type. Message Send a text message call. Phone Relay a phone call to a Codan HF station with a Codan Telephone Interconnect. Selective A selective call is a voice call. Send Position Send your GPS position to another station. - Page 42 A Wildcard call may be made to all stations that are tuned to or scanning the same frequency in a 2G ALE/CALM HF network. The Wildcard address syntax may be used with the Alert, Message, Phone, Selective, or Send Position call type. Page 40 Sentry-H 6110-MP Operator Guide...
- Page 43 Broadcast A 3G ALE Broadcast call is a call made to all stations on your 3G ALE call HF network that are configured to accept broadcast calls. Entering the address 1023 starts the call. Sentry-H 6110-MP Operator Guide Page 41...
-
Page 44: Answering And Ending A Call
Answering and ending a call Answering and ending a call Answering a call Press the PTT button to answer a call. Ending a call To end a call: Press the key to end a call. Page 42 Sentry-H 6110-MP Operator Guide... -
Page 45: Making A 2G Or 3G Ale Call
Select a call type using the keys. Enter the address of the station you are calling. Press the key. Enter a text message or select a menu item if prompted. Press to begin the call. Sentry-H 6110-MP Operator Guide Page 43... - Page 46 ALE and press Enter the address of the stations you want to call. Press the key. Enter a text message or select a menu item if prompted. Press to begin the call. Page 44 Sentry-H 6110-MP Operator Guide...
- Page 47 (A and B may be any specified upper-case letter or number), and with any upper-case letter or number in the second and last characters (in this case), for example, A2BM, ADB1, AZBE, A3B8 Sentry-H 6110-MP Operator Guide Page 45...
- Page 48 In-link messages can be sent while on a 2G ALE selective or alert call. To send an In-Link message during a Selective or Alert call: Press , the InLink Message screen is displayed. Type your message. Press (Options), scroll to Call and press to send the message. Page 46 Sentry-H 6110-MP Operator Guide...
- Page 49 Enter 1023 into the address field (1023 is the 3G ALE Broadcast Address). Press the keys to select the call type you want to make. Press the key. Enter a text message or select a menu item if prompted. Press to begin the call. Sentry-H 6110-MP Operator Guide Page 47...
- Page 50 Select a call type using the keys. Enter the address of the station you are calling. Press the key. Enter a text message or select a menu item if prompted. Press to begin the call. Page 48 Sentry-H 6110-MP Operator Guide...
-
Page 51: Making A Selcall Call
Enter the address that you want to call. Press the key. Select a channel if prompted. Press the key. Enter a text message or select a menu item if prompted. Press to begin the call. Sentry-H 6110-MP Operator Guide Page 49... -
Page 52: Stations
Optional: Change the name for the call type. Press the (Save) key. Note: You can create several call types across multiple networks for your contact by pressing the (Options) key and selecting the Add Call option. Page 50 Sentry-H 6110-MP Operator Guide... -
Page 53: Adding A Station
, then edit the call as required. • If there is no matching station, edit the call as required. Press (Save) to save the information. If the station does not exist, enter a name for the station, then press (Save). Sentry-H 6110-MP Operator Guide Page 51... -
Page 54: Gps
• From the main menu, select (General), then (GPS). Note: The Sentry-H 6110-MP radio uses two Global Navigation Satellite Systems (GNSS) to calculate position information with improved accuracy and reduced time for signal acquisition. Page 52 Sentry-H 6110-MP Operator Guide... - Page 55 Viewing GPS Information Distance and bearing The Sentry-H 6110-MP radio calculates distance and bearing information between your GPS position and a waypoint. A waypoint is a collection of GPS information for a location. When you select a waypoint, the transceiver automatically calculates the distance and bearing from your current GPS information to the waypoint.
-
Page 56: Update The Radio Profile With A Usb Thumb Drive
To update or configure the radio: Connect a USB memory stick to the J9 USB port using a USB Memory Stick Adaptor cable (Codan Part Number: 08-07436-001). Select Program Profile. Navigate to and select the profile you want to program onto the radio. - Page 57 Update the radio profile with a USB thumb drive Once the profile has been programmed into the radio, you may be asked to restart, press (Yes) to restart. Sentry-H 6110-MP Operator Guide Page 55...
- Page 58 I get an RF burn while The radio is not adequately earthed. Attach an earth lead or transmitting counterpoise as per the instructions provided with the antenna. Page 56 Sentry-H 6110-MP Operator Guide...
- Page 59 To make a call enter an address for the station, group or special call you want to make. At least one item must be selected This setting requires at least one valid option selected. Sentry-H 6110-MP Operator Guide Page 57...
- Page 60 3 and 15 characters in length Invalid input The key input is not valid on this screen. Invalid network member name Network member names must be alpha-numeric and between 3 and 15 characters in length Page 58 Sentry-H 6110-MP Operator Guide...
- Page 61 PTT rejected Rx-only frequency The radio is set to receive only. Push-to-talk is not available Rate selection not permitted The selected digital voice rate is not permitted on this radio, select a different rate Sentry-H 6110-MP Operator Guide Page 59...
- Page 62 2 seconds, then release to power down the radio, press the power key again to restart the radio. If the problem persists, contact your HF Network Administrator or Codan representative. System busy The selected action is not available as the radio is performing another action.
- Page 63 Unable to perform channel test with ALE group Channel tests can only be performed between address stations, group and broadcast addresses are not available Unable to perform channel test with no Enter the station address that you want to test address Sentry-H 6110-MP Operator Guide Page 61...
- Page 64 CALM Codan automated link management Control Point direct current electronic serial number global positioning system high frequency intermediate frequency liquid crystal display link quality analysis press-to-talk radio frequency RF unit Page 62 Sentry-H 6110-MP Operator Guide...
- Page 65 A radial array or a grid network of metallic wires arranged horizontally around the base of an antenna to provide an effective earth plane. frequency The number of cycles per second of a radio wave, usually expressed in kilohertz. Sentry-H 6110-MP Operator Guide Page 63...
- Page 66 PTT button. A handset may also have a display and a keypad. HF network The part of the radio configuration that defines specific details for making calls using Codan Selcall, 2G ALE or 3G ALE. macro A set of instructions to automate a task you perform with the radio.
- Page 67 Menu Navigation Menu Navigation Menu Map Scan Tables Sentry-H 6110-MP Operator Guide Page 65...
- Page 68 ASIA PACIFIC (Head Office) Codan Limited 2 Second Avenue Technology Park Mawson Lakes SA 5095 AUSTRALIA T: +61 8 8305 0311 F: +61 8 8305 0411 E: support@codancomms.com...
Need help?
Do you have a question about the Sentry-H 6110-MP and is the answer not in the manual?
Questions and answers