Advertisement
Quick Links
THE PERFECT BALANCE OF FUNCTION AND STYLE
LAUNDRY - DISHWASHING - COOKING - COOLING
Installation and Operating Instructions
Fully Integrated Dishwasher
MDI800
Please read these instructions carefully before attempting to install or use this appliance.
We recommend that you keep these instructions in a safe place for future reference.
Advertisement

Related Manuals for montpellier MDI800


Summary of Contents for montpellier MDI800
- Page 1 LAUNDRY - DISHWASHING - COOKING - COOLING Installation and Operating Instructions Fully Integrated Dishwasher MDI800 Please read these instructions carefully before attempting to install or use this appliance. We recommend that you keep these instructions in a safe place for future reference.
- Page 2 Welcome Thank you for choosing this Montpellier Integrated Dishwasher. Our Integrated Dishwasher has been designed to provide you with the best combination of style, reliability and performance to give you years of trouble-free use. You may be familiar with a similar product, but please take time to read these instructions carefully before installing or using your Integrated Dishwasher to ensure you get the most from your purchase.
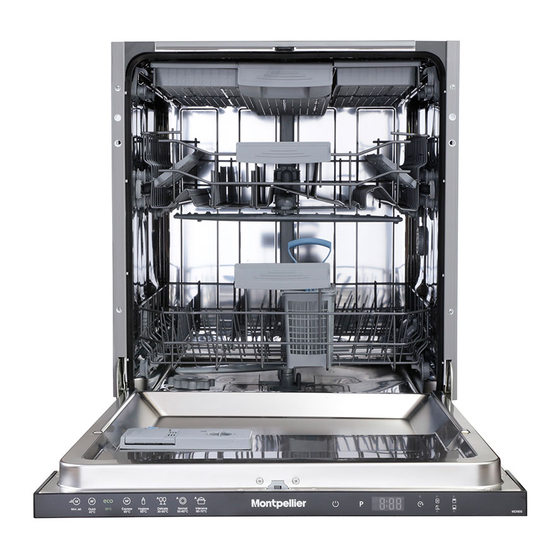
- Page 3 1. Upper basket with racks 2. Upper spray arm 3. Lower basket 4. Lower spray arm 5. Filters 6. Rating plate 7. Control Panel 8. Detergent and rinse-aid dispenser 9. Salt dispenser 10. Upper basket track latch 11. Upper Cutlery Basket 12.
- Page 4 CONTENTS: Section 1. Installation Section 2. Safety Advice Section 3. Operating the Appliance Section 4. Maintenance...
- Page 5 Section 1. Installation Position the appliance in a dry, well ventilated room with a solid level floor. The room temperature must not fall below +5° or rise above +35°. This appliance is fitted with adjustable feet so that you can ensure it is sitting level.
- Page 6 Water Outlet Hose The water drain hose can be connected either directly to the water drain hole or to the sink outlet spigot using a special bent pipe (if available). The hose connection should be at a minimum of 50cm and at a maximum of 110 cm from the floor.
- Page 7 Section 2. Safety Advice This appliance is manufactured and intended for DOMESTIC use only. Any guarantee offered with the appliance is not valid for any installation in a commercial environment. This appliance MUST BE EARTHED! Never try and disconnect the power by pulling the supply cable – hold the plug firmly and pull it out of the socket.
- Page 8 Section 3. Operating the Appliance 3.1. Before Operating the Appliance 3.1.1. Adding Salt · The sole use of 3-in-1 tablets is not recommended as failure to add salt to the salt container will leave your dishwasher exposed to limescale damage which is not covered by the manufacturers guarantee.
- Page 9 Remove the Rinse Aid Filler Cap (1). Add Rinse Aid until the rinse aid level indicator becomes dark (2). Replace the Filler Cap (3). If the rinse aid level is sufficient the indicator light will be dark on the control panel (2B).
- Page 10 3.1.4. Combined Detergent – Recommended Usage If you are using a combined detergent, add a rinse aid agent to your machine and switch the rinse agent setting to its lowest position (1) and activate the tablet detergent button in order to obtain better results. Depending on the water hardness you may need to fill the salt container with salt.
- Page 11 4 5 6 After resting the machine, with the door open, While touching the program button 2 turn on the machine with the power button. 1 Continue to touch the program button until “SL” appears on the display. 3 Release the program touch button when “SL” disappears from the display.
- Page 12 Upper Cutlery Basket The upper cutlery basket is designed for you to place forks, spoons and knives, long dippers and small items. Because it can easily be taken out of the machine, it allows your dishes to be taken out of the machine along with the basket after washing.
- Page 13 Alternative basket loads Lower Basket Top basket Faulty loads Important Note for Test Laboratories For detailed information on performance tests, please contact following address: “dishwasher@standardtest.info” . In your email, please provide the model name and serial number (20 digits) which you can find on the appliance door...
- Page 14 Program items Programme No Mini 18' - (P1) Programme Quick 30’ names and 40°C( P2 ) (reference ) temperatures 50°C ( P3) Type of food Pre-wash Coffee, milk, Coffee, milk, tea, cold waste to rinse and tea, cold meats, meats, vegetables , loosen residue vegetables, not not kept for long...
- Page 15 Program items Programme No Hygiene 60°C (P6) Autu Delicate Auto Normal Auto intensive Programme Super 50’ names and 65°C ( P5) 30-50°C 50-60°C 60-70°C temperatures Type of food Soups, sauces, Dishes with Old soups,sauces pastries egg,rice waste pasta, eggs, dense dirt waiting patato and owen foods, fried foods pilaf, potato and for a long time or...
- Page 16 SWITCHING ON THE MACHINE AND SELECTING A PROGRAMME 1.) Power On/Off Touch Button After the Power On/Off touch is pressed, two dashes appear in the program display, until touching any button. Touch the ‘’On/Off touch button’’ with your fingertip for 1 sec to turn the machine on or off. 2.) Program Touch Button Use the Program touch button to select a suitable program for your dishes.
- Page 17 If you only have dishes in the lower basket, press the ½ key and select the lower lamp illuminated. As this will only wash items in the lower basket, make sure that there are no items in the upper basket. Note : If you have used an extra feature on the latest washing program, this feature will remain active on the next washing program until the machine is switched off and on again.
- Page 18 Cancelling and resetting a program To cancel a program currently in progress or in a standby position. 1- Open the door of the machine. The last selected program will appear on the display (3). 2- Press and hold the program touch button (2) for 3 seconds. The display (3) will count from ‘’3 to 1’’ and then show ‘’0:01”...
- Page 19 8 8 8 8 7 7 7 7 4 5 6 Buzzer sound set up Setting up the buzzer. 1- Press the Power On/Off touch button” (1) (if it is in OFF position). 2- Press and hold the “Delay ” (4) and “Half load ”...
- Page 20 Section 4. Maintenance 4.1. Cleaning the Filter The filter helps prevent large pieces of food or other items entering the pump and causing damage. It is important that you examine and clean the filter system on a regular basis. Blocked filters are not covered under the Guarantee! The filter assembly is located inside the appliance just...
- Page 21 4.3. Cleaning the Spray Arms Small particles of food will over time get into the spray arms and cause blockages. Periodically remove the spray arms (as shown below) and wash them in warm soapy water. Blocked spray arms are not covered under the Guarantee! To remove the lower spray arm pull it upwards, so that the upper...
- Page 22 4.5. Error Codes Error Code Error Description Control Make sure the water inlet tap is totally open and that there is no Inadequate water supply water leak Close the water inlet tap, remove the water inlet hose from the tap and clean the filter at the connection end of the hose Restart your machine, contact the Repairtech helpline if the error resumes Continuous water input...
- Page 23 4.6. Before Calling Service If you appear to have a problem with your dishwasher, please take a few minutes to check the following ‘trouble shooting’ guide. The problem may be easily solved without the need for a service call. Dishwasher Will Not Start •...
- Page 24 Knocking Noise From Inside The Cabinet • The spray arm is catching against an item in the basket – reposition the items • Items of crockery are loose in the basket and water pressure is causing them to move – reposition the items of crockery The Crockery Is Not Clean •...
- Page 25 Supplier's trade mark MONTPELLIER Supplier's model MDI800 Capacity of dishwasher The energy efficiency class Annual energy consumption in kWh per year (AEC) ( 280 Cycle )*...
- Page 26 Your 2 year Manufacturer’s guarantee THIS DOES NOT AFFECT YOUR STATUTORY RIGHTS. Your new Montpellier appliance carries a free guarantee which protects you against the cost of repairs during the first 24 months from date of purchase provided that: Any claim is accompanied by evidence of the model reference, model serial number and proof of purchase, such as a Sales Receipt, showing that the appliance was purchased within the 24 months prior to the date of claim.
- Page 27 Montpellier Domestic Appliances Ltd. Unit 1, Tewkesbury Retail Park, Northway Lane, Tewkesbury, Gloucestershire GL20 8JU www.montpellier-appliances.com The symbol on the product or on its packaging indicates that this product may not be treated as household waste. Instead it shall be handed over to the applicable collection point for the recycling of electrical and electronic equipment. By ensuring this product is disposed of correctly, you will help prevent potential negative consequences for the environment and human health, which could otherwise be caused by inappropriate waste handling of this product.
Need help?
Do you have a question about the MDI800 and is the answer not in the manual?
Questions and answers