
Related Manuals for Duco DucoBox Energy Comfort 325


Summary of Contents for Duco DucoBox Energy Comfort 325
- Page 1 DucoBox Energy Comfort ENGLISH Installation guide L2000782 (Revision B.1 | 25.03.2020)
-
Page 2: Table Of Contents
VEURNE, B-8630 Vero Duco - Handelsstraat 19 - 8630 Veurne - Belgium tel +32 58 33 00 33 - fax +32 58 33 00 44 - info@duco.eu - www.duco.eu L2000782 Installation guide for DucoBox Energy Comfort (Revision B.1 | 25.03.2020) -
Page 3: Introduction
2� Wet rooms: kitchen, bathroom, toilet, etc� 01.A Versions Unit Optional accessories Product Item number Product Item number DucoBox Energy Comfort 325 0000-4485 Siphon flat (Energy & Eco) 0000-4376 Communication Print 0000-4251 Humidity Box Sensor (Energy Comfort) 0000-4545 Mounting chair upright (Energy Comfort) -
Page 4: 01�C Dimensions
ENGLISH Frost protection The unit features frost protection as standard in order to protect it at very low outdoor temperatures and enable it to operate correctly� The supply flow rate is slowed down gradually such that more warm air passes across the heat exchanger� This prevents the heat exchanger from freezing up�... -
Page 5: Product Sheet
Pre-/dis-assembly instructions www�duco�eu www�duco�eu www�duco�eu www�duco�eu Annual electricity consumption (AEC in kW for temperate climate) Annual heating savings (AHS in kWh of... -
Page 6: Regulations And Safety Instructions
This unit is not intended for use by people (including when you take it out of the packaging� If you have any children) with reduced physical, sensory or mental doubt about this, please contact Duco / your Duco capabilities, or who lack experience or know-how, sales outlet�... -
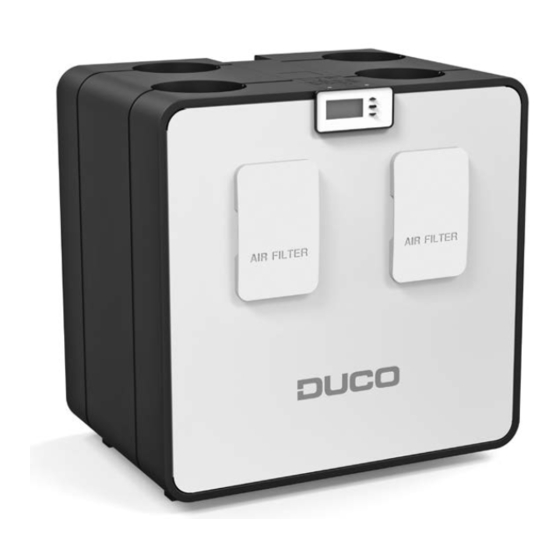
Page 7: Components And Connections
ENGLISH 04 Components and connections 04.A Parts Air duct connections Cap of the air filter Air filter Coarse 65% (≈ G4) Air duct connections Bypass (valve) Air filter Coarse 65% (≈ G4) Air duct connections Power cable 230 VAC Condensate drain connection Air duct connections Pressure sensor Condensate drain connection... -
Page 8: 04�B Connectors
A Wi-Fi router can be connected to the ethernet port PWM-IN Switch Contact 3 on the Communication Print in order to link the Duco Ventilation App to the DucoBox Energy Comfort� The app Connector for can then be paired with the Wi-Fi network�... -
Page 9: Wiring
The DucoBox Energy Comfort is able to communicate with slave components via a wireless (RF) or wired link� Both types of com- munication can be combined in one system� Communication with non-Duco components is possible via the Switch Sensor or one of the connections on the optional Communi- cation Print (see page 8)�... -
Page 10: 05�C Rf (Wireless Communication)
Communication with building management systems is available, for reading out information as well as controlling the ventilation system� This requires the DucoBox Energy Comfort to be equipped with an optional Communication Print� Please refer to informati- on sheet (L8000003) ModBus at www�duco�eu for more information� L2000782 Installation guide for DucoBox Energy Comfort (Revision B.1 | 25.03.2020) -
Page 11: Fitting
06 Fitting 06.A General guidelines The smooth running of your Duco ventilation system is totally dependent on the choice and the quality of implementation of the duct system! Accordingly, take account of the following guideli- nes when choosing the installation location. -
Page 12: 06�B Fastening The Ducobox Energy Comfort
ENGLISH 06.B Fastening the DucoBox Energy Comfort Maintain at least 60 to 100 cm clear at the front of the DucoBox Energy Comfort to enable maintenance to be carried out on the unit� Wall mounting The DucoBox Energy Comfort can be fastened to a wall or if there is no wall available that will do, the DucoBox Energy Comfort can be installed on an optional mounting plinth�... -
Page 13: 06�C Placing The Humidity Box Sensor (Optional)
Make sure the DucoBox Energy Com- fort is not under current� Push the Humidity Box Sensor onto the ETA duct of the DucoBox Energy� Place an air duct between the Duco- Box Energy Comfort and the Humidity Box Sensor� Attention: the position of the ETA... -
Page 14: 06�D Connecting Air Ducts
06.E Vents You should preferably use Duco vents, DucoVent Basic or DucoVent Design� See the technical data sheet or fitting instructions for the DucoVent Basic or Design for details� It is best to bear a few rules in mind when fitting vents: •... -
Page 15: Commissioning
ENGLISH 07 Commissioning 07.A DucoBox Energy Comfort start-up The unit must not be powered up until everything has been connected correctly. This includes the air ducting systems as well as all electrical components� Failure to connect correctly can result in the permanent destruction of the DucoBox Energy Comfort or to serious physical injury! Switch on the power to the DucoBox Energy Comfort (plug into power socket)�... - Page 16 (not included in the supply) When using a standard trap connection, a water seal You should preferably use this Duco flat diaphragm of at least 80 mm must be provided� It also requires trap, since it saves space and is less prone to air to be filled with water before start-up.
-
Page 17: Electrical System
ENGLISH 08 Electrical system 08.A Pairing components Pairing control components with the DucoBox Energy Comfort Activate advanced mode: • Scroll down to ADVANCED and press enter� • Enter the installer’s code 9876 and press enter� Go to the INSTALLATION menu� Start the WIZARD�... -
Page 18: 08�C Tips
Use the Duco Network Tool or the Duco Ventilation App to read out information from components� Never pair more than one system with RF components at the same time. This could result in components on the wrong system being paired or in components failing to respond�... -
Page 19: Air-Side Calibration
ENGLISH 09 Air-side calibration Calibrating the DucoBox Energy Comfort can be split into various steps: 1� Pre-setting supply and exhaust vents 2� Calibrating flow rates The system needs to be configured for it to work correctly. This will ensure its operation is as quiet as possible and energy-efficient. 09.A Pre-setting vents The exhaust and supply vents are installed in a moisture-laden/stale air extraction or fresh air supply duct�... -
Page 20: 09�C Verification
ENGLISH 09.B Calibrating flow rates The DucoBox Energy Comfort calibration mode can be activated using the display menu� IMPORTANT, BEFORE CALIBRATING Close all windows and doors. Ensure that all duct openings in the DucoBox Energy Comfort are fully closed and that the DucoBox Energy Comfort cover is closed! Avoid air leaks in the ventilation ducts. - Page 21 Duco recommends to check the calibrated flow rates after the calibration (see page 20)� L2000782 Installation guide for DucoBox Energy Comfort (Revision B.1 | 25.03.2020)
-
Page 22: Display Menu
The DucoBox Energy Comfort features a graphic display which enables all the necessary parameters of the unit to be easily adjus- ted� Settings and calibration can also be carried out using the free-of-charge Duco Ventilation App provided a Communication Print is in place�... - Page 23 The selected ventilation position on the unit is permanent (indicated in purple in ‘Controls’) until the user activates another po- sition� Control is needed if you want to set temporary manual positions� Duco recommends the AUTO position for an optimal and energy-economic operation�...
- Page 24 The timer program is deactivated as standard. Set the desired time and ventilation level using the The timer program can also be adjusted using the Duco Venti- arrow keys� Confirm using enter ( )� lation App� Add more time points�...
-
Page 25: 10�D Advanced Settings
ENGLISH 10.D Advanced settings Gaining access to menus intended for installers only requires advanced mode to be activated� When advanced mode is active, addi- tional items will appear on the menu, which enable the unit to be put into operation� Activate advanced mode Press any button at random on the DucoBox Energy Comfort display�... -
Page 26: 10�E Menu Structure
(= DucoBox Energy Comfort + paired components) to factory settings� The calibration will be lost� This code will enable the Duco service team to read out the composition of your ventilation system and its paired components�... -
Page 27: Maintenance & Service
All warranty conditions concerning the DucoBox and Duco's ventilation systems can be found on the Duco website� All complaints are to be reported to Duco by the Duco distributor with a clear description and the order/invoice number under which the products were delivered� In order to register the complaint, please use the complaint registration form found on the Duco website and the product's serial number in your message to service@duco�eu�... - Page 28 Installed by: L2000782 Document last modified on 25.03.2020 (revision B.1)
Need help?
Do you have a question about the DucoBox Energy Comfort 325 and is the answer not in the manual?
Questions and answers