Table of Contents
Advertisement
Quick Links
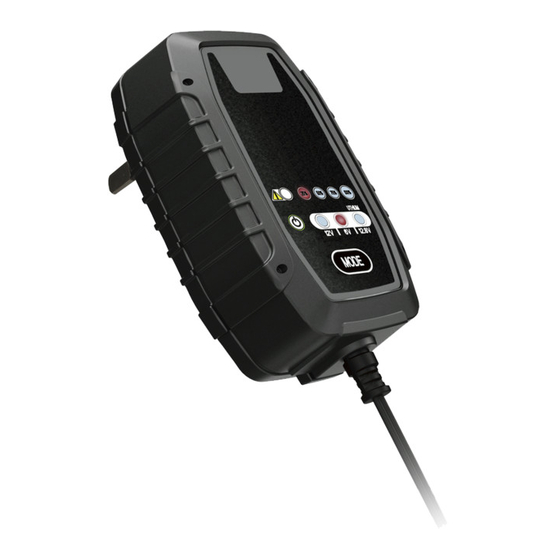
Technical data
Input
220-240V AC 50 Hz 0.3A
Output
12V DC 0.8A
6V DC 0.8A
12.8V DC 0.8A
Max. operation temperature: 40ºC
Charges: 1) 6/12V Lead Acid Flooded, Gel, Maintenance-Free, AGM Batteries 1.2Ah - 26Ah
2) 12.8V Lithium Iron Phosphate (LiFePO4) 2Ah-15Ah
IMPORTANT SAFETY INSTRUCTIONS – SAVE THESE INSTRUCTIONS
Charging Modes. The MW LF-CC008A has three (3) modes. The Lithium charge mode require the mode button to be pressed and held
for three (3) seconds to enter the enhanced mode. This "Enhanced" modes require your full attention before selecting. Do not operate the
charger until you confirm the appropriate charge mode for your battery. Below is a brief description:
12V NORM
For charging 12-volt Flooded, Gel,
Maintenance-Free batteries.
14.5V
0.8A
1.2-26Ah Batteries
6V NORM
For charging 6-volt Flooded, Gel,
Maintenance-Free batteries. When selected,
the LED will illuminate.
7.3V
0.8A
1.2-26Ah Batteries
12.8V LITHIUM
Press & Hold Mode
For charging 12.8-volt lithium iron phosphate
batteries. When selected, the LED will
illuminate.
14.
5V
0.8A
2Ah-15Ah Batteries
PREPARING TO CHARGE
a)
If necessary to remove battery from vehicle to charge, always remove grounded terminal from battery first. Make sure all
accessories in the vehicle are off, so as not to cause an arc.
b)
Be sure area around battery is well ventilated while battery is being charged.
c)
Clean battery terminals. Be careful to keep corrosion from coming in contact with eyes.
d)
Study all battery manufacturer's specific precautions while charging and recommended rates of charge.
e)
Determine voltage of battery by referring to car owner's manual and make sure that the output voltage selector switch is set at
correct voltage. If charger has adjustable charge rate, charge battery initially at lowest rate.
CONNECTING TO BATTERY
a)
Set any charger switches to "off" position and remove ac cord from electric outlet before connecting or disconnecting DC
output clamps or eyelets. Never allow clamps or eyelets to touch each other.
b)
Identify the correct polarity of the battery terminals. The positive battery terminal is typically marked with (POS, P, +). The
negative terminal is typically marked with (NEG, N, -).
c)
Position cords and cables to reduce risk of damage by hood, door or moving parts (including fan blades, belts, and pulleys)
or other parts that could cause injury to persons.
d)
Do not connect to carburetor, fuel lines, or sheet-metal body parts.
e)
Determine which post of battery is grounded (connected) to the chassis. If negative post is grounded to the chassis (as in
most vehicles) see (f). If positive post is grounded to the chassis, see (g).
f)
For Negative-grounded vehicle, connect POSITIVE (RED) clamp from battery charger to POSITIVE (POS, P, +) post of
battery. Connect NEGATIVE (BLACK) from battery charger to the NEGATIVE (NEG, N, -) post of battery.
g)
For Positive grounded vehicle, connect NEGATIVE (BLACK) from battery charger to NEGATIVE (NEG, N, –) post of
battery. Connect POSITIVE (RED) clamp from battery charger to the POSITIVE (POS, P, +) post of battery.
h)
When disconnecting charger, turn switches to off, disconnect AC cord, remove connectors in reverse sequence from
connecting procedure.
7-Step Intelligent Lead Acid
and Lithium Battery Charger
User Manual
MB3902
Advertisement
Table of Contents

Related Manuals for PowerTech MB3902


Summary of Contents for PowerTech MB3902
- Page 1 7-Step Intelligent Lead Acid and Lithium Battery Charger MB3902 User Manual Technical data Input 220-240V AC 50 Hz 0.3A Output 12V DC 0.8A 6V DC 0.8A 12.8V DC 0.8A Max. operation temperature: 40ºC Charges: 1) 6/12V Lead Acid Flooded, Gel, Maintenance-Free, AGM Batteries 1.2Ah - 26Ah 2) 12.8V Lithium Iron Phosphate (LiFePO4) 2Ah-15Ah...
- Page 2 CHARGING The battery charger must be connected to the battery according to the instructions above. Starting the charging process: Once you have established that the battery clamps or eyelets have been correctly connected, you can start the charging process. To do so, insert the charger plug into the AC socket. The charger will start in Standby mode, indicated by the STAND BY LED.
- Page 3 WARNINGS For indoor use ONLY! Do not charge non-rechargeable batteries. Use this charger with 6V or 12V Lead Acid battery only During charging the battery must be placed in well ventilated area. The battery is to be disposed of safety. This appliance can be used by children aged from 8 years and above and persons with reduced physical, sensory or mental capabilities or lack of experience and knowledge if they have been given supervision or instruction concerning use of the appliance in a safe way and understand the hazards involved.
Need help?
Do you have a question about the MB3902 and is the answer not in the manual?
Questions and answers