Table of Contents
Advertisement
Quick Links
WARNING: FOR OUTDOOR USE ONLY.
Decorative Product: Not for use as a heating appliance.
WARNING: If the information in this manual is not
followed exactly, a fire or explosion may result causing
property damage, personal injury, or loss of life.
— Do not store or use gasoline or other flammable vapors
and liquids in the vicinity of this or any other appliance.
— A propane cylinder not connected for use shall not
be stored in the vicinity of this or any other appliance.
— WHAT TO DO IF YOU SMELL GAS
• Shut off gas to the appliance
• Extinguish any open flame
• If odor continues, keep away from the appliance
and immediately call your gas supplier or the fire
department.
— Installation and service must be performed by a quali-
fied installer, service agency, or the gas supplier.
Questions, problems, missing parts? Before returning to your retailer, call
our customer service department at 1-855-607-6557, 8:00 am - 4:30 pm CST,
Monday through Friday or email contact@factorybuysdirect.com
OUTDOOR GAS FIREPLACE
OWNER'S OPERATION AND
INSTALLATION MANUAL
DF450SS - G & DF450SS - L
NATURAL GAS MODELS
CONVERTIBLE TO PROPANE GAS
MODELS
PFS
®
US
Advertisement
Table of Contents

Subscribe to Our Youtube Channel
Related Manuals for Duluth Forge DF450SS-G


Summary of Contents for Duluth Forge DF450SS-G
- Page 1 OUTDOOR GAS FIREPLACE OWNER'S OPERATION AND INSTALLATION MANUAL MODELS DF450SS - G & DF450SS - L NATURAL GAS MODELS CONVERTIBLE TO PROPANE GAS ® WARNING: FOR OUTDOOR USE ONLY. Decorative Product: Not for use as a heating appliance. WARNING: If the information in this manual is not followed exactly, a fire or explosion may result causing property damage, personal injury, or loss of life.
-
Page 2: Table Of Contents
TABLE OF CONTENTS Safety ............3 Operation ..........24 Specifications ..........5 Inspecting Burners........25 Qualified Installing Agency ......5 Care And Maintenance ......27 Product Features ........5 Service Hints ........... 28 Product Identification ......... 6 Technical Service........28 Unpacking.......... -
Page 3: Safety
SAFETY IMPORTANT: Read this owner’s Carbon Monoxide Poisoning: Early signs of carbon monoxide poisoning resembles the manual carefully and completely flu, with headaches, dizziness, or nausea. If before trying to assemble, op- you have these signs, the fireplace may not erate, or service this heater. - Page 4 SAFETY 7. Do not operate appliance when subject Children and adults should to excessive wind. Position the appliance be alerted to the hazards of where it will be shielded and not subject high surface temperatures and to high winds. See Locating the Fireplace should stay away to avoid burns page 8.
-
Page 5: Specifications
SPECIFICATIONS Models DF450SS-G and DF450SS-L Ignition Electronic Ignitor Gas Type Natural Propane (when converted) Maximum Input Rating 24,000 BTU/Hr 24,000 BTU/Hr Regulator Pressure Setting 6" W.C. 6" W.C. Main Burner Orifice Size 2.05 mm 1.66 mm Inlet Gas Pressure* Max. 10.5" W.C. -
Page 6: Product Identification
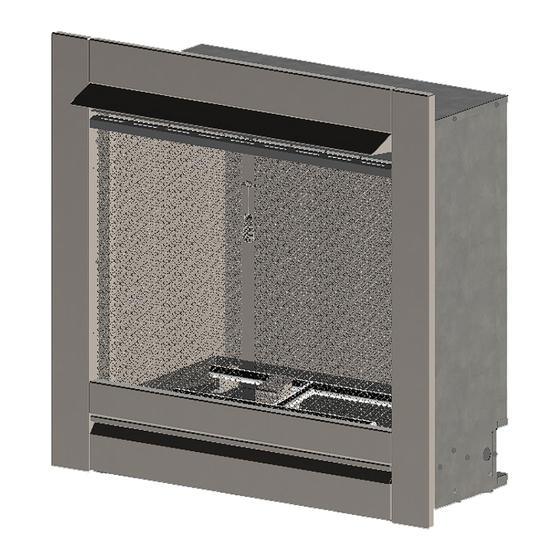
PRODUCT IDENTIFICATION Front Panel Stainless Mesh Screens Access Door Fireplace Controls (Inside Panel) Figure 1 - Vent-Free Outdoor Fireplace Insert UNPACKING 1. Remove packing strips. 6. At this time, only remove the protective plastic film from the fireplace surface if it is 2. -
Page 7: Air For Combustion And Ventilation
AIR FOR COMBUSTION AND VENTILATION An erratic flame could also lead to exces- This appliance is intended for installation sive sooting. This is not a safety issue on an outdoor patio or in your yard. It but is visually undesirable. must never be installed inside a building. - Page 8 INSTALLATION LOCATING THE FIREPLACE When selecting a location for your fireplace, At least 25% of the total wall area is com- ensure that the clearances are met. pletely open, and 1. This application must be installed in an At least 30% of the remaining wall area is open-air situation with natural ventila- open and unrestricted.
- Page 9 INSTALLATION Height with Front Frame 31 9/16" Width of Front Frame 32 1/8" Recessed Unit Depth 13 1/4" Firebox Viewing Height 20 3/8" Firebox Viewing Depth 25 3/4" Floor to Firebox Opening 6 7/8" Recessed Unit Width 26 1/8" Width of Nailing Standoffs 27 5/8"...
- Page 10 INSTALLATION CLEARANCES TO COMBUSTIBLES WARNING: In order to avoid WARNING: You must main- the possibility of exposed insula- tain the minimum clearances. If tion or vapor barrier coming in possible, provide greater clear- contact wit the appliance body, it ances from floor, ceiling, and is recommended that any exist- adjoining wall.
- Page 11 INSTALLATION WARNING: Do not allow any combustible materials to overlap the firebox front. WARNING: Do not allow combustible or noncombustible materials to cover any necessary openings like louvered slots. WARNING: Never cover any air inlets on the front of the firebox.
- Page 12 INSTALLATION STANDOFF BRACKET INSTALLATION Install four standoff brackets using the sheet Before completing, ensure that the front metal screws provided in the hardware kit. frame assembly can be removed from the See Figure 7. fireplace unit at the planned depth. It is Adjust the standoff brackets based on the important to maintain all stated dimensions estimated thickness of the frame plus the...
- Page 13 INSTALLATION www.factorybuysdirect.com 200423-01A...
- Page 14 INSTALLATION FINISHING CLEARANCES FOR REMOVAL FRONT FRAME Before placing unit into final position it is Additionally, the standoff brackets should important to know the total thickness/height be adjusted so that removable front frame, of the finished hearth. The base of the when attached, extends past the thick- fireplace should be level with or higher than ness of the finished hearth.
- Page 15 INSTALLATION REMOVABLE FRONT FRAME ASSEMBLY Note: Frame parts have a protective film to protect the pieces during shipment. The protective film must be removed before operating the appliance. Only remove film as needed during assembly to protect the front facing surfaces of the parts from being scratched. If removing the protective film is necessary, place parts on a smooth surface.
- Page 16 INSTALLATION 3/8 Hex Nut Screen Rod QTY. 2 Cover 1 Each Side Screen Rod Cover Orientation #8 Lock Screw # 8-32 Washer QTY. 4 #2 Phillips 2 Each Side QTY. 2 1 Each Side Figure 11 - Front Frame - Screen Rod Cover Assembly Figure 12 - Attaching Front Frame www.factorybuysdirect.com 200423-01A...
- Page 17 INSTALLATION CONVERTING TO PROPANE GAS 1. Disconnect the burner hose from the NG 4. Connect the LP pilot orifice to the pilot orifice retainer. Disconnect the NG orifice assembly. Reconnect the pilot gas tube. retainer from the burner. 5. Connect the LP orifice retainer with burner 2.
- Page 18 INSTALLATION CONNECTING TO GAS SUPPLY WARNING: A qualified service WARNING: Do not over-tighten technician must connect appliance gas connections. to gas supply. Follow all local codes. WARNING: This appliance CAUTION: use pipe joint requires a 3/8" NPT (Nation- sealant that is resistant to gas al Pipe Thread) inlet connec- (Propane or Natural Gas).
- Page 19 INSTALLATION Typical Inlet Pipe Diameters incoming gas pressure, appliance regulator damage could occur. Install external regula- Use 3/8 " black iron pipe or greater. Installa- tor with the vent pointing down as shown in tion must include an equipment shutoff valve, Figure 14.
- Page 20 INSTALLATION REMOTE PROPANE GAS ENCLOSURES INSTALLATION GUIDELINES If the unit is permanently connected to a • Bottom opening must provide a gas piping system from a remote supply minimum of 1/2 square inches for each tank, installation must be in accordance pound of propane contained in the tank with local codes or, in absence of local (see example below).
- Page 21 INSTALLATION CHECKING GAS CONNECTIONS WARNING: Test all gas piping and connections, internal and external to unit, for leaks after installing or servicing. Correct all leaks at once. WARNING: Never use an open flame to check for a leak. Apply a noncorrosive leak detection fluid to all joints.
- Page 22 INSTALLATION INSTALLING GRATE (OPTIONAL ACCESSORY FOR DF450SS-G) Install grate before placing glass media into burner pan (see above). Place grate assembly onto burner pan. Secure with 2 screws as shown in Figure 20. INSTALLING GLASS MEDIA 1. For model DF450SS-L, install grate before placing glass media for easier installation.
- Page 23 INSTALLATION INSTALLING LOGS ( OPTIONAL ACCESSORY FOR DF450SS - G ) 3. Place log #4 into the groves on the left WARNING: Failure to position sides of log #1 and #2 (see Figure 23). the parts in accordance with 4. Place log #5 into the groves on the right these diagrams or failure to use sides of logs #1 and #3 (see Figure 23).
-
Page 24: Operation
OPERATION FOR YOUR SAFETY READ BEFORE LIGHTING • Immediately call your gas supplier from WARNING: If you do not follow a neighbor's phone. Follow the gas sup- these instructions exactly, a fire plier's instructions. or explosion may result causing • If you cannot reach your gas supplier, call property damage, personal the fire department. -
Page 25: Inspecting Burners
OPERATION Note: If pilot does not stay lit, refer to 9. Make sure fireplace screen is in place Troubleshooting, pages 29 through 32. Also before operating fireplace. contact a qualified service technician or gas 10. If fireplace will not operate, follow the supplier for repairs. - Page 26 Install propane injector orifice if this is the case. BURNER FLAME PATTERN For model DF450SS-G the burner flames (actual logs will vary from those shown). If should rise approximately 3" to 6" above the burner flame pattern is incorrect then: burner.
-
Page 27: Care And Maintenance
CARE AND MAINTENANCE WARNING: Turn off appliance and let it cool before servicing. CAUTION: you must keep control areas, burner, and circulating air passageways of appliance clean. Inspect these areas of appli- ance before each use. Have appliance inspected yearly by a quali- fied service technician. -
Page 28: Service Hints
CARE AND MAINTENANCE PILOT CAUTION: Never use a wire, needle, or similar object to clean pilot. This can damage pilot unit. Use a vacuum cleaner, pressurized air, or a small, soft bristled brush to clean. A yellow tip on the pilot flame indicates dust and dirt in the pilot assembly. -
Page 29: Troubleshooting
TROUBLESHOOTING WARNING: If you smell gas: • Shut off gas supply. • Do not try to light any appliance. • Do not touch any electrical switch. • Immediately call your gas supplier. Follow the gas supplier's instructions. • If you cannot reach your gas supplier, call the fire department. WARNING: Only a qualified service technician should service and repair fireplace. - Page 30 TROUBLESHOOTING Problem Possible Cause Corrective Action When ignitor button is 1. Gas supply is turned off or 1. Turn on gas supply or open pressed in, there is a equipment shutoff valve is equipment shut off valve. spark at pilot but no closed.
- Page 31 TROUBLESHOOTING Problem Possible Cause Corrective Action Burner backfiring during 1. Burner orifice is clogged or 1. Clean burner orifice (. see combustion. damage. Care and Maintenance, 2. Gas regulator is damaged. page 27) or replace burner orifice 2. Replace gas regulator.. High yellow flame during 1.
-
Page 32: Replacement Parts
TROUBLESHOOTING Problem Possible Cause Corrective Action Fireplace shuts off in use. 1. Not enough fresh air is avail- 1. Refer to Air for Combustion able. and Ventilation, page 7. 2. Gas leak See Warning State- 2. Contact local gas supplier. ment at the top of the page 3. -
Page 33: Parts
PARTS MODELS DF450SS - G & DF450SS - L www.factorybuysdirect.com 200423-01A... - Page 34 MODELS DF450SS - G & DF450SS - L This list contains replaceable parts used in your heater. When ordering parts, follow the instructions listed under Replacement Parts on page 32 of this manual. ITEM DF450SS-G DF450SS-L DESCRIPTION Firebox Body 162007-02...
-
Page 35: Accessories
14RCOGM - Fire Glass 1/4 in for Fire Pans, 10 lb Bag, Premium Reflective Copper 14REMGM - Fire Glass 1/4 in for Fire Pans, 10 lb Bag, Premium Reflective Emerald **Comes Standard w/ DF450SS-G Outdoor Fireplace OPTIONAL LOG & GRATE UPGRADE LS450SS-G - 7 pc. -
Page 36: Warranty
WARRANTY KEEP THIS WARRANTY Model _______________________________ Serial No. ____________________________ Date Purchased _______________________ Keep receipt for warranty verification. REGISTER YOUR PRODUCT AT WWW.FACTORYBUYSDIRECT.COM FACTORY BUYS DIRECT LIMITED WARRANTIES New Products Standard Warranty: Factory Buys Direct warrants this new product and any parts thereof to be free from defects in material and workmanship for a period of one (1) year from the date of first purchase from an authorized dealer provided the product has been installed, maintained and operated in accordance with Factory Buys Direct’s warnings and instructions.
Need help?
Do you have a question about the DF450SS-G and is the answer not in the manual?
Questions and answers