Table of Contents
Advertisement
Quick Links
®
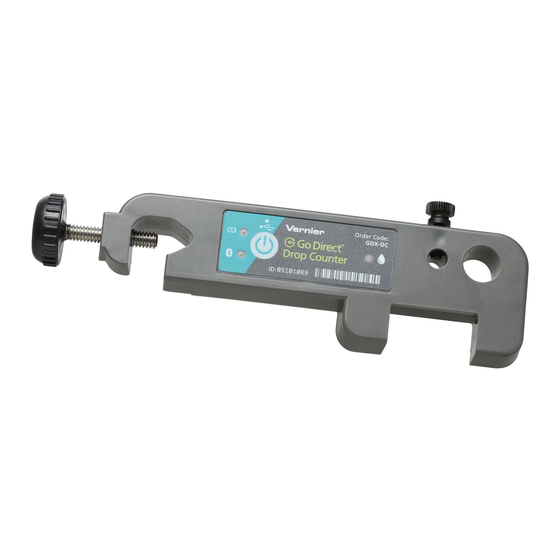
Go Direct
Drop
Counter
(Order Code GDX-DC)
Go Direct Drop Counter is used to
perform accurate, automatic titrations. This digital sensor can be used in
conjunction with a pH Sensor, ORP Sensor, Conductivity Probe, or other sensor
to accurately record the volume of titrant added during a titration.
Go Direct Drop Counter has many features that makes it easy to use:
Adjustable clamp, fits most laboratory ring stands and lattices
l
Wide drop-detecting area
l
Large sensor slot, fits most conventional stick-style sensors
l
Smaller, adjustable slot for temperature sensors
l
Red LED, near the detecting area, flashes to indicate a drop has been
l
recorded
Note: Vernier products are designed for educational use. Our products are not
designed nor are they recommended for any industrial, medical, or commercial
process such as life support, patient diagnosis, control of a manufacturing
process, or industrial testing of any kind.
What's Included
Go Direct Drop Counter
l
Plastic reagent reservoir
l
Plastic valve with a double stopcock fitting
l
Vernier microstirrer (a magnetic stirrer that fits on the tip of your sensor)
l
Micro USB Cable
l
Compatible Software
See
www.vernier.com/manuals/gdx-dc
Go Direct Drop Counter.
Getting Started
Please see the following link for platform-specific connection information:
www.vernier.com/start/gdx-dc
Bluetooth Connection
1. Install Graphical Analysis 4 on
your computer, Chromebook™, or
mobile device. See
www.vernier.com/ga4 for software
availability.
2. Charge your sensor for at least
2 hours before first use.
3. Turn on your sensor by pressing
for a list of software compatible with the
USB Connection
1. Install Graphical Analysis 4 on your
computer or Chromebook. If using
LabQuest 2, make sure LabQuest
App is up to date. See
www.vernier.com/ga4 for software
availability or
www.vernier.com/downloads to
update LabQuest App.
the power button once. The
®
Bluetooth
LED will blink red.
4. Launch Graphical Analysis 4.
5. Click or tap Sensor Data
Collection.
6. Click or tap your Go Direct sensor
from the list of Discovered
Wireless Devices. Your sensor's ID
is located near the barcode on the
sensor. The Bluetooth LED will
blink green when it is successfully
connected.
7. Click or tap Done to enter data-
collection mode.
Charging the Sensor
Connect Go Direct Drop Counter to the included USB Charging Cable and any
USB device for two hours. Connecting Go Direct Drop Counter to the electrode
amplifier during charging is optional.
Charging
Fully charged
Powering the Sensor
Turning on the sensor
Putting the sensor in sleep
mode
Connecting the Sensor
See the following link for up-to-date connection information:
www.vernier.com/start/gdx-dc
Connecting via Bluetooth
Ready to connect
Connected
1
2. Connect the sensor to the USB port.
3. Launch Graphical Analysis 4 or turn
on LabQuest 2. You are now ready
to collect data.
Orange LED next to the battery icon is solid
while the sensor is charging.
Green LED next to the battery icon is solid
when the sensor is fully charged.
Press button once. Red LED indicator flashes
when unit is on.
Press and hold button for more than three
seconds to put into sleep mode. Red LED
indicator stops flashing when sleeping.
Red LED next to the Bluetooth icon flashes
when sensor is awake and ready to connect.
Green LED next to the Bluetooth icon flashes
when sensor is connected via Bluetooth.
Advertisement
Table of Contents

Related Manuals for Vernier Go Direct GDX-DC


Summary of Contents for Vernier Go Direct GDX-DC
- Page 1 Plastic reagent reservoir Plastic valve with a double stopcock fitting Powering the Sensor Vernier microstirrer (a magnetic stirrer that fits on the tip of your sensor) Micro USB Cable Press button once. Red LED indicator flashes Turning on the sensor when unit is on.
- Page 2 Using the Product achieved—a rate of one drop every two seconds, or slower. Close the bottom 1. Assemble the equipment. (Note: The Vernier Stir Station, pH Sensor, 100 valve. mL beaker, and utility clamp are not included with the Vernier Drop Counter.)
- Page 3 2. Fill the reagent reservoir about 3/4 full with the titrant solution. 3. Choose to calibrate the Drop Counter in your data-collection program. Use Go Direct Drop Counter with other Vernier sensors such as our 4. Open the bottom 2-way (on-off) valve to begin releasing drops through the Ion-Selective Electrodes, Conductivity Probe, or other Vernier pH Sensors.
- Page 4 To reduce potential radio interference to other users, the antenna type and its gain should be so chosen that the equivalent isotropically radiated power (e.i.r.p.) is not more than that permitted for successful communication. Vernier warrants this product to be free from defects in materials and RF exposure warning: The equipment complies with RF exposure limits set forth for an uncontrolled environment.
- Page 5 The Bluetooth word mark and logos are registered trademarks owned by the Bluetooth SIG, Inc. and any use of such marks by Vernier Software & Technology is under license. Other trademarks and trade names are those of their respective owners.
Need help?
Do you have a question about the Go Direct GDX-DC and is the answer not in the manual?
Questions and answers