Table of Contents
Advertisement
Quick Links
®
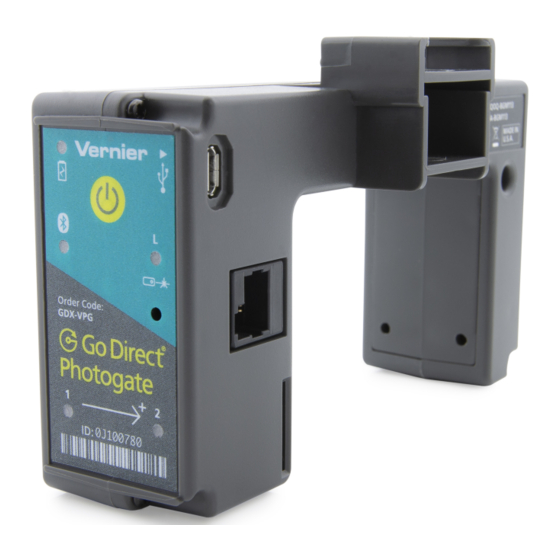
Go Direct
Photogate
(Order Code GDX-VPG)
Go Direct Photogate is used for velocity,
acceleration, and timing measurements of objects
passing through the gate. The object blocks infrared
beams as it passes through the gate. Motion data can
be determined from the timing of beam blocking.
This general-purpose photogate can be used for a
wide variety of experiments in physics and physical science classes. Examples
include
measuring the speed of a rolling object
l
measuring freefall acceleration
l
measuring the acceleration of a cart on a ramp
l
studying the swing of a pendulum
l
timing the period of a rotating object
l
measuring the speed of objects undergoing collisions
l
Go Direct Photogate is a double-gate sensor that includes two photogates built
into the arms of the sensor. This configuration allows for accurate velocity
measurements without needing to know anything about the geometry of the
object. The internal gates can also be used individually as traditional single-gate
photogates when desired. Go Direct Photogate also includes a single laser gate
for use with objects passing outside of the arms of the sensor. Using the laser
gate requires a visible-light pen laser (not included).
Go Direct Photogate can be used alone or with other Go Direct Photogates. An
optional accessory cable (order code: VPG-CB-GDX) allows you to daisy-chain
two Go Direct Photogates together to increase the timing accuracy for
measurements between two gates.
Note: Vernier products are designed for educational use. Our products are not
designed nor are they recommended for any industrial, medical, or commercial
process such as life support, patient diagnosis, control of a manufacturing
process, or industrial testing of any kind.
What's Included
Go Direct Photogate
l
Accessory Rod
l
Micro USB Cable
l
Compatible Software
See
www.vernier.com/manuals/gdx-vpg
Direct Photogate.
Getting Started
Please see the following link for platform-specific connection information:
www.vernier.com/start/gdx-vpg
for a list of software compatible with Go
Install Graphical Analysis 4 on your computer, Chromebook™, or mobile
device. See www.vernier.com/ga4 for software availability. If using LabQuest 2,
make sure LabQuest App is up to date. See www.vernier.com/downloads to
update LabQuest App.
Bluetooth Connection
1. Charge your sensor for at least 2
hours before first use.
2. Turn on your sensor by pressing the
power button once. The Bluetooth
LED will blink red.
3. Launch Graphical Analysis 4 or turn
on LabQuest 2.
4. If using Graphical Analysis 4, click
or tap Sensor Data Collection. If
using LabQuest 2, choose Wireless
Device Setup > Go Direct... from
the Sensors menu.
5. Click or tap your Go Direct sensor
from the list of Discovered Wireless
Devices. Your sensor's ID is located
near the barcode on the sensor.
6. If using Graphical Analysis 4, click
or tap Done. If using LabQuest 2,
tap OK. The Bluetooth LED will
blink green when it is successfully
connected. You are now ready to
collect data.
Note: This is a multi-channel sensor. For instructions on changing the default
channel selections, see
www.vernier.com/start/gdx-vpg
Charging the Sensor
Connect the included Micro USB Cable to the Go Direct Photogate and then to
any USB device for two hours.
You can also charge up to eight Go Direct Photogates using our Go Direct
Charge Station, sold separately (order code: GDX-CRG). An LED on each Go
Direct Photogate indicates charging status.
Charging
Fully charged
1
USB Connection
1. Connect the sensor to the USB
port.
2. Launch Graphical Analysis 4 or
®
turn on LabQuest 2. You are now
ready to collect data.
LED indicator next to the battery icon is orange
while sensor is charging.
LED indicator next to the battery icon is green
when sensor is fully charged.
Advertisement
Table of Contents

Related Manuals for Vernier Go Direct Photogate


Summary of Contents for Vernier Go Direct Photogate
- Page 1 (not included). blink green when it is successfully Go Direct Photogate can be used alone or with other Go Direct Photogates. An connected. You are now ready to optional accessory cable (order code: VPG-CB-GDX) allows you to daisy-chain collect data.
- Page 2 USB and is fully charged. Connect the sensor following the steps in the Getting Started section of this user manual. Go Direct Photogate has multiple sensor channels that provide a variety Charging via USB, LED indicator next to the battery icon is solid of data options for measuring the motion of an object.
- Page 3 Object Velocity collect your desired data. This channel is the default sensor channel of Go Direct Photogate. The channel reports the velocity of an object as it passes through the arms of Go Direct Objects with more than two flags, such as a picket fence, will report Photogate.
- Page 4 The Remote Gate sensor channels are used when a Go Direct Photogate is daisy-chained to a second Go Direct Photogate or to a Time of Flight Pad. Experiments Using Go Direct Photogate Using these channels require accessory cables not included with the Go Direct...
- Page 5 Experiment: Investigate the relationship between impulse and momentum Mounted on a dynamics track using a photogate bracket and pulley using a Go Direct Photogate and a Go Direct Force and Acceleration sensor. Used with photogate bar tape Sensor channel: Object Velocity...
- Page 6 TAPE Storage and Maintenance Laser Pointer LASER To store Go Direct Photogate for extended periods of time, put the device in Laser Pointer Stand STAND sleep mode by holding the button down for at least three seconds. The red LED...
- Page 7 You are cautioned that changes or modifications not such marks by Vernier Software & Technology is under license. Other trademarks and trade names are those of expressly approved by the party responsible for compliance could void your authority to operate the equipment.
Need help?
Do you have a question about the Go Direct Photogate and is the answer not in the manual?
Questions and answers