Makita DHR171 Instruction Manual
Hide thumbs
Also See for DHR171:
- User manual ,
- Instruction manual (500 pages) ,
- Instruction manual (72 pages)
Table of Contents
Advertisement
Quick Links
Advertisement
Table of Contents

Related Manuals for Makita DHR171


Summary of Contents for Makita DHR171
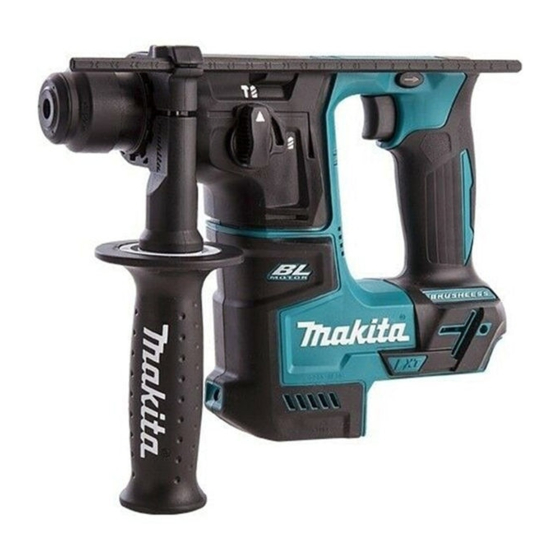
- Page 1 INSTRUCTION MANUAL Cordless Rotary Hammer DHR171 Read before use.
-
Page 2: Specifications
SPECIFICATIONS Model: DHR171 Drilling capacities Concrete 17 mm Steel 10 mm Wood 13 mm No load speed 0 - 680 min Blows per minute 0 - 4,800 min Overall length 273 mm Rated voltage D.C. 18 V Standard battery cartridge... - Page 3 Work area safety Keep work area clean and well lit. Cluttered or dark areas invite accidents. long hair can be caught in moving parts. dust extraction and collection facilities, ensure liquids, gases or dust. Power tools create sparks Use of which may ignite the dust or fumes.
- Page 4 Properly CORDLESS ROTARY HAMMER maintained cutting tools with sharp cutting edges SAFETY WARNINGS are less likely to bind and are easier to control. Wear ear protectors. cause hearing loss. Use of the power tool tool. for operations different from those intended could Hold power tool by insulated gripping sur- result in a hazardous situation.
-
Page 5: Functional Description
If you can see the red indicator on the upper side of the button, it is not locked completely. also void the Makita warranty for the Makita tool and charger. CAUTION:... - Page 6 capacity When the tool or battery is overheated, the tool stops automatically and the lamp blinks. In this case, let the tool and battery cool before turning the tool on again. Only for battery cartridges with the indicator When the battery capacity is not enough, the tool stops automatically.
- Page 7 Rotation only For drilling in wood, metal or plastic materials, rotate the action mode changing knob to the symbol. Use a twist drill bit or wood drill bit. 1. Reversing switch lever CAUTION: rotation before operation. CAUTION: Changing the direc- tion of rotation before the tool stops may damage the tool.
- Page 8 Clean the shank end of the drill bit and apply grease before installing the drill bit. uniform depth. Loosen the side grip and insert the depth gauge to the desired depth and tighten the side grip 1. Shank end Grease 1.
- Page 9 NOTE: When the dust cup set is installed on the tool, remove the grip from the standard side grip, and then attach it to the optional grip base set. Before installing the dust cup set, remove the bit from the tool if installed. in the protrusions on the tool barrel while widening it.
-
Page 10: Operation
and pull it out. 1. Dust cup 1. Groove Hook Screw NOTE: If the cap comes off from the dust cup, attach it with its printed side facing up so that groove on the housing on either side and then secure it with a screw. OPERATION CAUTION: CAUTION:... -
Page 11: Maintenance
Centers, always using Makita replacement parts. Set the action mode changing knob to the symbol. OPTIONAL ACCESSORIES install them to the tool. - Page 12 If you need any assistance for more details regarding these accessories, ask your local Makita Service Center. NOTE: Some items in the list may be included in the differ from country to country. Jan-Baptist Vinkstraat 2, M a k i t a E u r o p e N . V .
Need help?
Do you have a question about the DHR171 and is the answer not in the manual?
Questions and answers