Advertisement
Available languages
Available languages
Quick Links
INSTRUCTIONS MANUAL
MODEL# CE1401
1
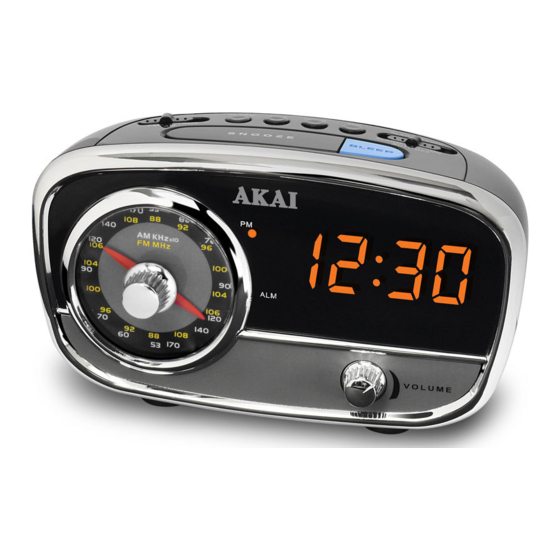
PRODUCT DESCRIPTIONS
AM/FM/AUX switch
1
ALARM set button
2
TIME set button
3
HOUR set button
4
MINUTE set button
5
ALARM / RADIO switch
6
SLEEP button
7
SNOOZE Bar
8
RADIO TUNING knob
9
PM indicator
10
TIME display
11
ALARM ON indicator
12
VOLUME knob
13
2
GETTING STARTED
Begin by plugging the power cord into a standard household
outlet. The display will flash indicating the clock needs to be set.
3
SETTING THE TIME
1. Press and hold the TIME set button located on the top of
the clock.
2. While pressing and holding the TIME set button, use your
other index finger to press the HOUR button. Intermittently
pressing and releasing the HOUR button will advance the hour
for the time of day in one hour increments. Press the hour button
as necessary until the correct hour is displayed.
Noted: When setting the hour be sure you are in the correct AM
or PM time period. When the "PM" indicator appears on the
display, the time displayed is in the 12 hour period between
12:00 noon and midnight.
3. While pressing and holding the TIME set button, use your
other index finger to press the MINUTE button. Intermittently
pressing and releasing the MINUTE button will advance the
minutes for the time of day in one minute increments. Press
the minute button as necessary until the correct minute is
displayed.
4. When the desired time setting is reached for both the hour
and minutes, release our finger from the TIME button. The
desired time of day will now be displayed.
4
USING THE RADIO
1. Slide the ALARM/RADIO switch all the way to the right to
the ON position.
2. Select AM or FM by sliding AM/FM switch to the desired
band. The AM/FM switch is located on the top of the clock.
3. To adjust the volume, turn the VOLUME knob to desired
listening level. It is recommended to turn the volume to a low
level before tuning the radio to the desired station.
4. Select the desired radio station by turning the RADIO
TUNING knob to adjust radio frequency. The RADIO TUNING
knob is located on the front of the clock.
Note: For best performance be sure the radio antenna is fully
extended and is not twisted. The radio antenna is a thin black
wire extending from the back of the clock.
5. To turn the radio off, slide the ALARM/RADIO switch to the
OFF position.
5
UNING A MUSIC PLAYER
1. Begin by plugging your music device into the clock using a
3.5mm audio cable. The audio cable must be plugged into the
headphone port on your music device. The other end of the
cable is attached to the back of the clock.
2. Slide the ALARM/RADIO switch all the way to the right to
the ON position.
3. Slide FM/AM/AUX switch to AUX position.
4. To adjust the volume, turn the VOLUME knob to desired
listening level.
5. Operated your music device normally according to the
manufactures instructions.
6. To turn the music off, Slide the ALARM/RADIO switch to
the OFF position.
6
SETTING THE ALARM TIME
1. Press and hold the ALARM set button located on the top of
the clock.
2. While pressing and holding the ALARM set button, use your
other index finger to press the HOUR button, intermittently
pressing and releasing the HOUR button will advance the
hour for the alarm time in one hour increments. Press the
hour button as necessary until the desired alarm hour is
displayed.
Noted: When setting the hour be sure you are in the correct AM
or PM time period. When the "PM" indicator appears on the
display, the time displayed is in the 12 hour period between
12:00 noon and midnight.
3. While pressing and holding the ALARM set button, use your
other index finger to press the MINUTE button, intermittently
pressing and releasing the MINUTE button will advance the
minute for the alarm time in one minute increments. Press the
minute button as necessary until the desired alarm minute is
displayed.
4. When the desired alarm time setting is reached, release your
finger from the ALARM set button.
Advertisement

Subscribe to Our Youtube Channel
Related Manuals for Akai CE1401


Summary of Contents for Akai CE1401
- Page 1 INSTRUCTIONS MANUAL SETTING THE TIME UNING A MUSIC PLAYER MODEL# CE1401 1. Press and hold the TIME set button located on the top of 1. Begin by plugging your music device into the clock using a the clock. PRODUCT DESCRIPTIONS 3.5mm audio cable.
- Page 2 Note: In the event of a power failure, the battery backup will ACTIVATING THE ALARM ON/OFF SLEEP TO MUSIC automatically continue to operated the clock and maintain time and alarm time. However to prolong battery life the time will not be displayed.
- Page 3 APARAT DE RADIO CU CEAS 2. Glisati comutatorul ALARM / RADIO spre dreapta în pozitia PORNIREA TREZIREA PE RADIO SAU PLAYER Începe prin conectarea cablului de alimentare într-o priză de uz MODEL CE-1401 1 . Programati ora alarmei asa cum este descris mai sus. casnic standard.
- Page 4 INSTALAREA SAU INLOCUIREA BATERIEI Reciclarea echipamentelor electrice şi electronice uzate BACKUP (optional) Acest simbol prezent pe produs sau pe Notă : Optiunea baterie de rezervă nu este necesara pentru ambalaj semnifică faptul că produsul functionarea de alarmei. Este necesar a avea o baterie de respectiv nu trebuie tratat ca un deşeu rezervă...
Need help?
Do you have a question about the CE1401 and is the answer not in the manual?
Questions and answers