Table of Contents
Advertisement
Available languages
Available languages
Advertisement
Table of Contents

Related Manuals for Akai AR-130


Summary of Contents for Akai AR-130
- Page 1 NOTICE D’EMPLOI INSTRUCTION MANUAL MANUAL DE INSTRUCCIONES AR-130 Lire attentivement la notice avant d’utiliser l’appareil Before operating this product, please read user manual completely Lea atentamente el manual de instrucciones antes de utilizar el aparato...
-
Page 2: Alimentation Secteur
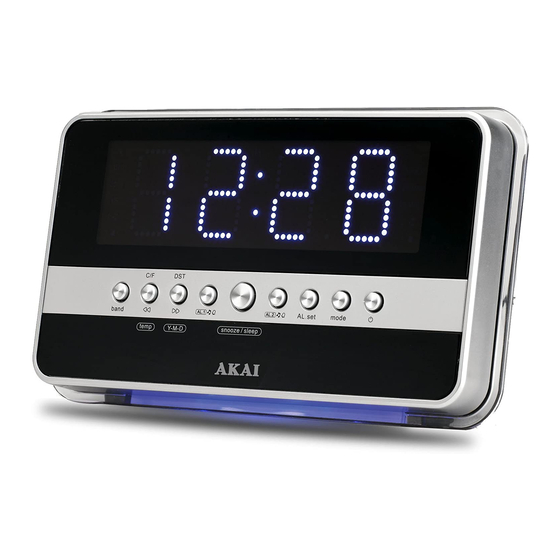
FRANÇAIS 13. CORDON D’ALIMENTATION AC BOUTON GAMMES D'ONDES AM/FM BOUTON>>| / A-M-J / HEURE D’ÉTÉ 14. CAPTEUR DE TEMPÉRATURE BOUTON SNOOZE / SLEEP (INTÉRIEURE) BOUTON DE RÉGLAGE DE L’ALARME 15. ANTENNE FM BOUTON MARCHE/ARRÊT 16. CAPTEUR INFRAROUGE 17. PRISE ENTREE AUDIO AUX (LINE-IN) BOUTON |<<... -
Page 3: Fonction Sleep (Sommeil)
Activation (pendant l’ajustement des données) : Appuyez sur le bouton |<< / TEMP / °C / °F (6) pour ajuster les données vers l'arrière. Appuyez sur le bouton >>| / J-M-A / heure d’été (2) pour ajuster les données vers l’avant Maintenez le bouton |<<... -
Page 4: Spécifications
FONCTIONS AVEC LE CAPTEUR INFRAROUGE 1. Lorsque la radio est désactivée, l’infrarouge infrarouge indique la température intérieure Placez votre main au-dessus du capteur (16) 1 seconde pour afficher la température intérieure 2. Lorsque la radio est activée, utilisez le capteur infrarouge pour activer la fonction sleep Placez votre main au-dessus du capteur (16) 2 secondes pour activer le mode sleep, le mot ‘Slp’... - Page 5 PRECAUTIONS D’EMPLOI Ne jamais approcher une flamme près de l’appareil, comme poser une bougie sur l’appareil Ne jamais placer l’appareil dans une étagère fermée, comme dans une bibliothèque ou équivalent, ce qui empêche une bonne ventilation autour de l’appareil. Pour éviter tout risque d’incendie ou d’électrocution, ne pas exposer l’appareil à la pluie ou à l’humidité. Ne pas exposer l’appareil directement au soleil ou à...
- Page 6 Mise au rebut en fin de vie Attention ! Ce logo apposé sur le produit indique qu’il s’agit d’un appareil dont le traitement en tant que déchet rentre dans le cadre de la directive 2002/96/CE du 27 janvier 2003, relative aux déchets d’équipements électriques et électroniques (DEEE).
- Page 7 ENGLISH 1. AM/FM BAND BUTTON 2. >> / Y-M-D / DST BUTTON 3. SNOOZE / SLEEP BUTTON 4. ALARM SET BUTTON 5. ON / OFF BUTTON 6. << / TEMP / °C/°F BUTTON 7. ALARM 1 RADIO / BUZZ BUTTON 8.
-
Page 8: Power Connection
POWER CONNECTION Plug the AC power cord to a household outlet AC source. This unit is equipped with a battery back up system, it requires a 3V CR2032 flat lithium battery (not included). Insert the battery in the battery compartment, making certain that the positive and negative (+ and -) battery terminals are attached to the corresponding terminals on the plate in the battery compartment. -
Page 9: Setting Alarm Output And Alarm On/Off
2. SETTING ALARM OUTPUT AND ALARM ON/OFF A. Change the alarm output Press AL 1 (7) / AL 2 (8) button to Music position to select wake up by Radio, set to Buzzer position to select wake up by Buzzer, set to Alarm off position to disable all alarm. -
Page 10: Radio Operation
DST – Daylight saving time Press >> / Y-M-D / DST button (2) and hold for 3 seconds to toggle on and off DST function. RADIO OPERATION Press the On / Off button (5) to turn radio on. Select AM/FM band press the AM/FM band button (1). Select the station using the Tune knob (19). - Page 11 WARNING 1. No naked flame sources, such as lighted candles, should be placed on the apparatus. 2. Do not place the product in closed bookcases or racks without proper ventilation. 3. Where the mains plug is used as the disconnect device, the disconnect device shall remain readily operable.
-
Page 12: Infrared Sensor Function
INFRARED SENSOR FUNCTION 1. The radio Off mode, infrared display in door temperature Hand on top of sensor (16) within 1 second to show the in door temperature 2. The radio On mode, use the infrared sensor to turn sleep function On Hand on top of sensor (16) within 2 seconds to turn the sleep on, the word ‘Sleep’... - Page 13 4. The radio On mode, use the infrared display radio frequency and in door temperature Hand on top of sensor (16) Hand on top of sensor (16) within 1 second to show the within 1 second to show the radio frequency. indoor temperature 5.
- Page 14 End of Life Disposal Warning ! This logo set on the product means that the recycling of this apparatus comes within the framework of the Directive 2002/96/CE of January 27, 2003 concerning the Waste of Electrical and Electronic Equipment (WEEE). This symbol means that used electrical and electronic products should not be mixed with general household waste.
- Page 15 ESPAÑOL 1. BOTÓN AM/FM 2. BOTÓN >> / Y-M-D / DST 3. BOTÓN SNOOZE / SLEEP 4. BOTÓN ALARM SET 5. BOTÓN ON / OFF 6. BOTÓN << / TEMP / °C/°F 7. BOTÓN ALARM 1 RADIO / BUZZ 8. BOTÓN ALARM 2 RADIO / BUZZ 9.
- Page 16 CONEXIÓN DE FUENTE DE ENERGÍA Conecte el cable de fuerza AC en una tomada. Esta unidad está equipada con un sistema de batería auxiliar. Es necesário utilizar una batería de lítio de 3V CR2032 (no incluída). Inserte la batería en el compartimiento de batería, certifíquese de que los terminales positivos y negativos (+e -) están posicionados correctamente en el compartimiento.
- Page 17 Presione el botón >> / Y-M-D / DST (2) para retornar el valor Mantenga presionado el botón << o >> por 2 segundos para activar el avance o retorno rápido. 2. CONFIGURANDO LA FORMA DE ALARMA Y ACTIVANDO/ DESACTIVANDO A. Mudando la forma de alarma Presione el botón AL 1 (7) / AL 2 (8) para la posición Music para seleccionar la opción de despertar con Rádio, seleccione la opción Buzzer para despertar con campanilla, seleccione la...
-
Page 18: Función Sleep
B. Presione el botón << / TEMP / °C / °F (6) durante la operación normal para consultar la temperatura en el ambiente, luego de 5 segundos el vuelve a mostrar las horas. C. Presione el botón << / TEMP / °C / °F durante la operación normal para acceder la indicación de temperatura y mantenga presionado por 3 segundos para mudar la unidad de la temperatura entre °C / °F... - Page 19 Observación: faja de temperatura: 0 a +50°C o 32 to 122°F RESET El botón reset (11) está localizado en la parte de atrás de la unidad. Use un lápiz esferográfica para presionar siempre que la batería es substituída o cuando la unidad presentar problemas. Ésto retornará todas las configuraciones para los valores originales, y usted perderá todas las informaciones almacenados (configuraciones de alarma y relój).
- Page 20 SENSOR INFRAROJO 1. Con la rádio desconectada, el infrarojo indica la temperatura ambiente Coloque la mano sobre el sensor (16) por 1 segundo para consultar la temperatura ambiente 2. Con el modo rádio activado, use el sensor infrarojo para activar la función sleep Coloque la mano sobre el sensor (16) por 2 segundos para activar la función sleep, la indicación ‘Slp’...
- Page 21 3. Con el alarma activado, use el sensor infrarojo para activar la función snooze - Coloque la mano sobre el sensor (16) por 1 segundo para definir 9 minutos para la función snooze. 4. Con el modo rádio activado, use el infrarojo para consultar la frecuencia de la rádio y la temperatura ambiente Coloque la mano sobre el sensor (16) por 1 segundo para ver la temperatura ambiente Coloque la mano sobre el sensor (16) por 1 segundo para...
- Page 22 Desecho del producto Atencion ! Este juego de logo sobre el producto quiere decir que el reciclaje de este aparato viene dentro del marco de la Directiva 2002/96/CE del 27 de enero de 2003 concernir la Basura(el Gasto) de Equipo Eléctrico y Electrónico (WEEE). Su producto esta marcado con este simbolo.
- Page 23 AR-130...