Table of Contents
Advertisement
Quick Links
See also:
Manual
Issue date 08-01
288F0370
MP3000_cover
1
MP3000
High-Power FM/AM/CD/MP3 Receiver with Detachable Face
Autoradio FM/AM à Lecteur CD/MP3 de Forte Puissance et à Face Amovible
Receptor FM/AM/Reproductor de CD/MP3 de Alta Potencia y con Panel Extraíble
Rádio FM/AM/CD/MP3 de Alta Potência
com Face Removível
Robert Bosch Corporation
Important Notice
Sales Group —
Prior to Installation, "Demo
Blaupunkt Division
Mode" should be defeated.
2800 South 25th Avenue,
See page 7.
Broadview, Illinois 60155
8/23/01, 2:11 PM
Advertisement
Table of Contents

Related Manuals for Blaupunkt MP3000


Summary of Contents for Blaupunkt MP3000
- Page 1 Issue date 08-01 288F0370 MP3000_cover MP3000 High-Power FM/AM/CD/MP3 Receiver with Detachable Face Autoradio FM/AM à Lecteur CD/MP3 de Forte Puissance et à Face Amovible Receptor FM/AM/Reproductor de CD/MP3 de Alta Potencia y con Panel Extraíble Rádio FM/AM/CD/MP3 de Alta Potência com Face Removível...
-
Page 2: Fcc Warning
FCC WARNING This equipment has been tested and found to comply with the limits for a Class B device, pursuant to Part 15 of the FCC Rules. These limits are designed to provide reasonable pro- tection against harmful interference in a residential installa- tion. -
Page 3: Attaching The Front Panel
Handling the Front Panel Attaching the Front Panel Place the right hand side of the front panel so that the parts A of the front panel are engaged with the parts B of the unit as shown below. Then push the left hand side of the front panel until it is securely locked. -
Page 4: Identification Of Controls
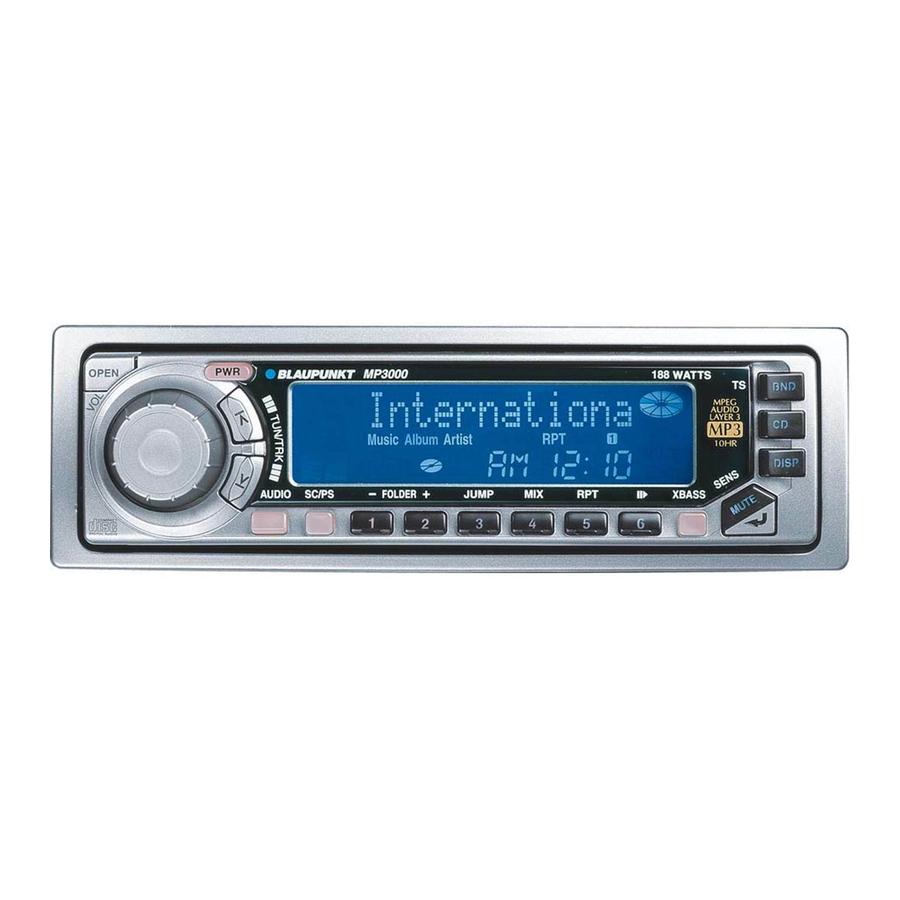
Identification of Controls Front Panel OPEN MP3000 14 13 OPEN button Open the flip down front panel. PWR button Turns the power of the unit on or off. TUN/TRK button Used to tune in to the desired station. LCD Display window CD button Select the operating source (CD, CD changer or AUX). -
Page 5: Turning The Power On/Off
Press the to turn on or off the unit. When you turn on the unit, “BLAUPUNKT MP3 - I WANT MY MP3!” will be displayed before actual power on. When you turn off the unit, “BYE - BYE” will be displayed before actual power off. -
Page 6: Mode Selector
Switching the Source (Selecting auxiliary input) You can connect the auxiliary equipment (Portable cassette player, etc) to this radio via optional AUX-IN cable. (See page 17) Each time the is pressed, the operation source will change over as shown below; RADIO Press the to return to radio mode. -
Page 7: Display Speed/Scroll Type Selection
The items supported for display priority for each media are as shown in the table below. When an item that is not supported is selected, “NO NAME” is displayed, following which TRACK/TIME is displayed. Media DISP Priority TEXT ID3-Tag Scroll FOLDER NAME FILE NAME TRACK/TIME... - Page 8 Enhancing the bass sound After installation we recommend defeating the Demo Mode. For extended bass centered @ 72Hz, Blaupunkt’s XBASS func- When power is turned off, the unit switches to demonstration tion can be set for either each band and CD/MP3/CDC/AUX mode.
-
Page 9: Turn On/Off Message Edit
Turn on/off message edit You can edit the turn on/off message and store it in memory. Following four messages can be edit with 12 characters each. When you turn on the unit, “MESSAGE 1” will be displayed then “MESSAGE 2” will momentarily displayed before actual power on. -
Page 10: Radio Reception
Radio Reception Seek Tuning Press the to select the desired AM or FM band. BND / TS (FMT & AMT are Travel Store bands.) Press the to tune in stations. Tuning automati- TUN/ TRK cally stops at a broadcasting frequency. When tuned in to FM stereo broadcasting stations, the “... -
Page 11: Storing The Station Names
Storing the station names You can assign a name to each radio station and store it in memory. As much as 30 station names can be stored com- posed with 12 characters each. Storing the station names Tune in a station whose name you want to store. Press the DISP for more than 2 seconds. - Page 12 CD Operations Playing the CD player Loading Discs Press the OPEN and insert the disc. Close the front panel. ‘‘LOADING’’ and ‘‘FILE CHECK’’ will appear in the display window. Playback begins automatically. Note Make sure that the front panel is closed when playback be- gins.
-
Page 13: Mp3/Wma Operation
MP3 / WMA operation You can play MP3 and WMA files written on CD-ROMs, CD- Rs, or CD-RWs by following the procedures below. In this section, “track” and “album” mean “MP3 or WMA file” and “folder” in PC terminology, respectively. MP3 / WMA play Loading Discs OPEN... -
Page 14: Mp3 / Wma Overview
MP3 / WMA Overview This unit can play back files recorded in MP3 or WMA format on CD-ROM, CD-R (recordable) or CD-RW (rewritable) discs. There are some limitations on the files and media that can be used, so before recording files on a disc please carefully read the following information. - Page 15 Note Concerning Bit Rate and Record Time Please refer to the following general guide concerning the bit rate used when encoding and the overall time of a file re- corded on disc. Before recording on a disc, please carefully read the soft- ware instructions and ensure you use it correctly.
- Page 16 Glossary Bit rate The bit rate expresses the amount of information transferred per second as a number of bits. The greater the quantity of information, the higher the bit rate. The unit is “bits/second”. “kbps” indicates “kilo (1,000) bits/ second”. Emphasis The software used for recording has an “emphasis”...
-
Page 17: Installations
Installations Supplied Mounting Hardware Bushing, Locking Mounting Strap Release Sleeve Screw screw and Screw Keys Precautions • Be sure to detach the front panel before you start in- stalling the unit. • Choose the mounting location carefully so that the unit will not interfere with the normal driving operations of the driver. -
Page 18: Connections
Connections Warning • To prevent short circuit, remove the key from the ignition and disconnect the battery’s (–) terminal. • This unit is designed for negative ground 12 V DC operation only. You can not use it for 24 V or other types of car batteries. Connection procedure Caution •... -
Page 19: Replacing The Fuse
Maintenance Replacing the Fuse If the fuse is blown, check the power connection first and then replace the fuse. If the fuse blows again under normal condi- tions, the unit may be defective. Back of the unit Warning Use only a fuse with the specified amperage (10 A). Use of another type of fuse can result in a fire or unit damage. -
Page 20: Troubleshooting Guide
Also make sure that antenna is connected, extended and dry inside. If the above mentioned solutions do not help to improve the situation, consult your nearest Blaupunkt dealer or in the United States call 1-800-266-2528 for technical assistance, parts and service. Call 1-800-950-2528 for dealer referral or to request product brochure. -
Page 21: Specifications
Specifications GENERAL Dimensions : Approx. 178 mm 50 mm 155 mm Power requirements : 12 volts DC car battery (negative ground) Output Power : RMS and Peak Power ratings (188 watts) 23 watts RMS/47 peak Output Wiring : Floating-ground type designed for 4 speaker use.
Need help?
Do you have a question about the MP3000 and is the answer not in the manual?
Questions and answers