Advertisement
Quick Links
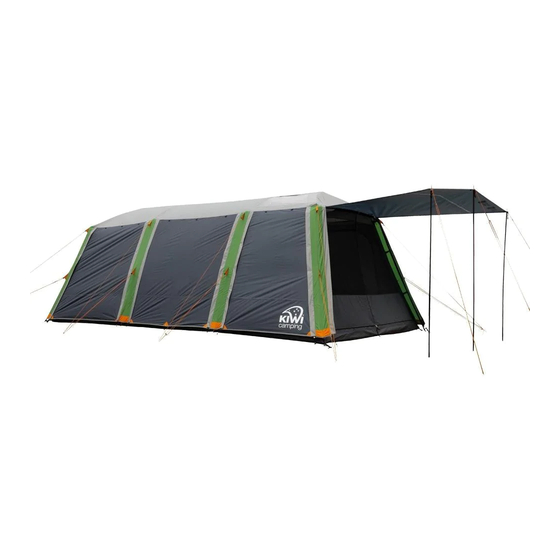
Falcon 9 Frame Tent
Model No. KC070-210
PITCHING INSTRUCTIONS
Your tent includes:
1 x Frame Set
1 x Canvas
1 x Canvas Fly (11 x guy ropes attached)
52 x Pegs
7 x Ropes (5 x single ropes, 2 x 'V' ropes)
1. Select a dry, level site and clear any sharp objects that may puncture the
floor. Remove the tent from its carry bag, untie fabric ties and unroll the
tent.
2. Take the frame parts bag and carefully tip out the poles. Group the poles
together in to the following pole groups:
Side Wall Assembly Poles:
Parts: #1, #18/#8, #1 (2 Sets)
Centre Ridge Pole:
Parts: #2/1, #181#8, #1 (1 Set)
End Support Poles:
Parts: #5, #4 (3 Sets)
Parts: #48, #SB (1 Set)
External Centre Ridge Upright Poles: Parts: #32, #33 (2 Sets)
Internal Centre Ridge Upright Pole:
Parts: #6/2, #7/3 (1 Set)
Support Poles:
Parts: #6/3, #34, #35, #358,
#34, #6/3 (1 Set)
Porch Poles:
Parts: #50, #51, #10/2 (1 Set)
Parts: #14, #13 (1 Set)
Parts: #42B, #42 (2 Sets)
Parts: #41B, #41 (4 Sets)
(Extra set for side awning)
The poles are coded with a number on a coloured sticker for easier assembly.
The green poles are along the bottom (green for grass), the blue poles are the
upper level poles (blue for sky) and the red poles are the porch poles.
Although the stickers should last well, it is a good idea to label the poles
with the same coloured insulation tape and a permanent marker for future
reference.
rence.
Filename: 3732_KC070-210_Falcon-9_Instr.pdf
Dimensions: 400mm W x 240mm H
Colour: Black
3. Roll the tent out and move it into
the desired position. Ensure each
side is pulled taut. Peg the four
corners out first, then the middle
pegging loops on each side, then
proceed to peg out the remaining
pegging points.
To keep the porch clean and out of
the way, fold it back over the roof of
the tent until needed.
To make sure the tent stays in place
insert the pegs into the ground at a
45° angle, not straight down.
Unzip and open all of the doors and windows to make erecting the tent easier.
4. SIDE WALL FRAME ASSEMBLY:
5. A) From the porch end of the tent, insert Part #1 through the elasticised
gusset sock (looks like a sleeve) and webbing loop and through the pole
sleeve, feed part #8/#18 through sleeve and connect to part #1.
B) Take second Part #1 and follow same process at the back of the tent.
Feed Part #8/#18 through sleeve and attach. Repeat for the other side.
6. While the tent is still lying on the ground, the CENTRE RIDGE can be
assembled. Connect Part #2/1 to Part #18/#8.
7. Insert the pole through the gusset
sock. from underneath the porch
canopy through to the top and then
through the pole sleeve along the
ridge, towards the rear of the tent.
Tie the elastic loop at the front of
the tent around Part #2/1. Connect
Part #1 to the end of Part #8 and
ensure the webbing loop fits over
the rivets securely. Also check that
the pole sleeve hasn't caught when
the poles have been pushed together. Check that all poles have been
threaded through any webbing loops on all three frame assembly's.
8. Fitting the fly: carefully lay the fly on top of the tent and attach the Velcro
loops to the corners of the tent frame. Clip the buckle into place on at the
front.
9. Connect parts #5 and #4 (3 sets) together and connect Part #4B to #5B.
These will create the END SUPPORT LEGS needed below.
10. Insert the connected END
SUPPORT LEG poles into the
roof ends and raise the sides
of the tent. This will take two
people to do effectively. Raise
the front entrance first.
11. Connect part #32 to Part #33 (2 sets) to make the EXTERNAL CENTRE
RIDGE UPRIGHT poles.
12. Place the EXTERNAL CENTRE
RIDGE UPRIGHTS into place
at each end and lift the roof until
taut, use the dome clip buttons to
adjust to the appropriate height so
the tent fabric is taut.
Advertisement

Related Manuals for Kiwi Camping Falcon 9


Summary of Contents for Kiwi Camping Falcon 9
- Page 1 3. Roll the tent out and move it into Falcon 9 Frame Tent 7. Insert the pole through the gusset the desired position. Ensure each sock. from underneath the porch Model No. KC070-210 side is pulled taut. Peg the four...
- Page 2 13. Refer to the Support Pole Configuration Diagram below. Go inside the tent 15. Assemble the porch ridge pole (#10/2, #51, #SO) and connect to the TENT CARE INSTRUCTIONS and find the slot in the top of the wall seam, approximately 10cm in front of opening in Part #2/1 at the centre of the front of the tent.
Need help?
Do you have a question about the Falcon 9 and is the answer not in the manual?
Questions and answers