Cochlear Osia 2 User Manual
Hide thumbs
Also See for Osia 2:
- Clinician's quick manual (84 pages) ,
- User manual (60 pages) ,
- Quick manual (8 pages)
Table of Contents
Advertisement
Advertisement
Table of Contents

Subscribe to Our Youtube Channel
Related Manuals for Cochlear Osia 2


Summary of Contents for Cochlear Osia 2
- Page 1 EN-US English Cochlear™ Osia® 2 Sound Processor User manual...
-
Page 2: Indications
The Osia Sound Processor is intended to be used as part • Evidence that hearing loss is bilateral retrocochlear or bilateral of the Cochlear Osia System to pick up surrounding sound and central origin transfer it to the implant through a digital inductive link. -
Page 3: Table Of Contents
Wear your sound processor ................12 Wireless communication link ............33 For users with two implants ................12 Electromagnetic compatiblity (EMC) ..........34 Attach a Cochlear SoftWear Pad ..............13 ™ Guidance and manufacturer’s declaration – Attach a Safety Line ..................... 14 electromagnetic emissions.................34... -
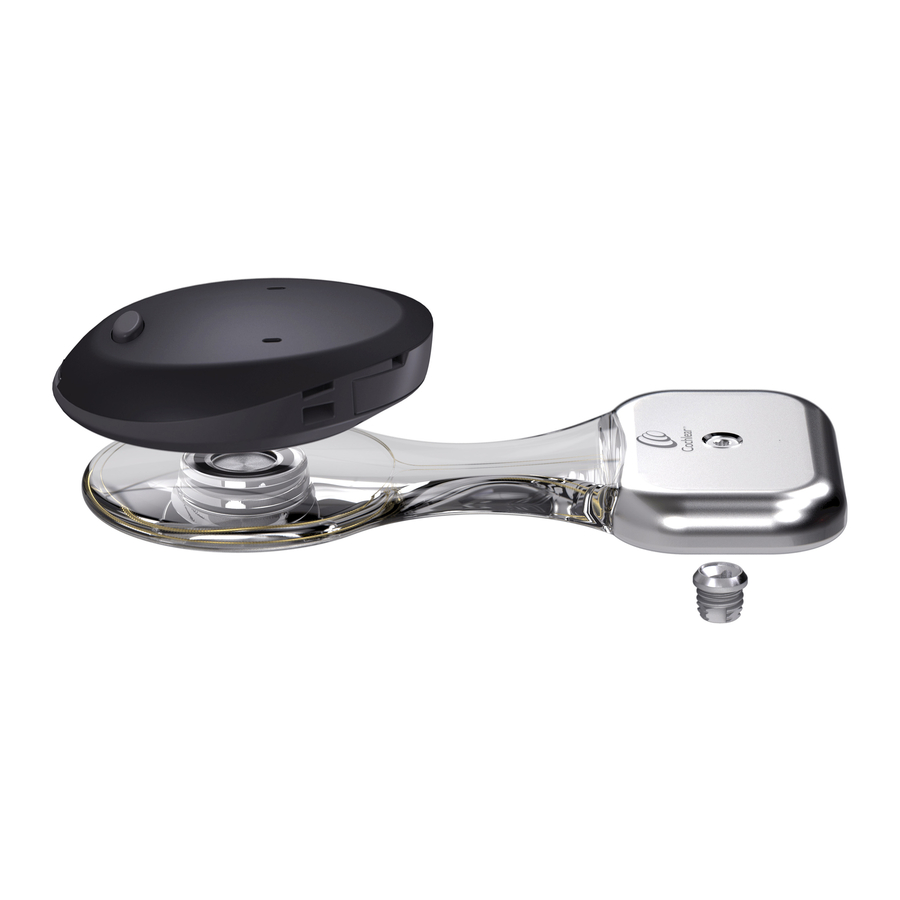
Page 4: Overview
Overview Turn on and off THIS WAY UP Turn on your sound processor by completely closing the battery door. (A) Front Turn off your sound processor by gently opening the battery door Indicator light until you feel the first “click.” (B) Control button Microphone... -
Page 5: Adjust Volume
To change programs, press and release the button on your sound processor. Batteries The Osia 2 Sound Processor uses a high power 675 (PR44) zinc air disposable battery designed for hearing implant use. CAUTION If a standard 675 battery is used the device will not function. -
Page 6: Change The Battery
Change the battery Lock and unlock the battery door 1. Hold the sound processor with the front facing you. You can lock the battery door to prevent it from opening accidentally (tamper-proof). This is recommended when 2. Open the battery door until it is completely open. (A) the sound processor is being used by a child. -
Page 7: Wear
Wear Attach a Cochlear SoftWear ™ The Cochlear SoftWear Pad is optional. If you experience discomfort when wearing your processor, you can attach this Wear your sound processor adhesive pad to the back of your processor. Place the processor on your implant with the button/light NOTE facing up and battery door facing down. -
Page 8: Attach A Safety Line
Wear the headband in the sound processor from front to back. (B) The Cochlear Headband is an optional accessory that holds the 3. Pass the clip through the loop and pull the line tight. (B) processor in place on your implant. This accessory is useful for 4. -
Page 9: Change The Cover
Change the cover To remove the cover: 1. Open the battery door. (A) VELCRO LEFT ANTI-SLIP RIGHT VELCRO 2. Press and lift to remove the cover. (B) PROCESSOR (for forehead) PROCESSOR POCKET POCKET 1. Open the headband and lay it flat on a table with the anti-slip facing up and the pockets facing away from you. -
Page 10: Flight Mode
Wireless accessories You can use Cochlear Wireless accessories to enhance your listening experience. To learn more about the options available, ask your hearing care professional or visit www.cochlear.com. To pair your sound processor to a wireless accessory: 1. Press the pairing button on your wireless accessory. -
Page 11: Care
• Secure your sound processor with a Safety Line or use the headband during physical activities. If the physical activity General signals involves contact, Cochlear recommends removing the sound Beeps What it means processor during the activity. -
Page 12: Visual Signals
Visual signals Wireless signals Your hearing care professional can set up your processor to show Beeps and melodies What it means the following light indications. Wireless Accessory pairing confirmation. General signals Ripple tone in upward melody Wireless streaming activated. Light What it means No implant or wrong implant Ripple tone upward melody... -
Page 13: Troubleshooting
4. Check that the cover is attached correctly, see page 17. 5. If the problem continues, contact your hearing care professional. 1. Try using an adhesive Cochlear SoftWear pad. See Attach a Cochlear SoftWear™ Pad, page 13. 2. If you are using a retention aid, such as a headband, this may be placing pressure on your processor. -
Page 14: Cautions
Cautions • Use your Osia System only with approved devices and accessories. • If you experience a significant change in performance, remove Young children who are developing motor skills are at greater your processor and contact your hearing care professional. risk of an impact to the head from a hard object (e.g. -
Page 15: Batteries
(for example when removing or putting on clothes • Do not disassemble, deform, immerse in water or dispose of over your head, or getting out of a vehicle), before the Cochlear batteries in fire. Osia system contacts any object or person you should touch •... -
Page 16: Medical Treatments
• Sound processor enclosure: PA12 (Polyamide 12) • Magnet housing: PA12 (Polyamide 12) • Magnets: Gold coated Magnetic Resonance Imaging (MRI) Environmental conditions • The Osia 2 Sound Processor, remote and related accessories are MR Unsafe. Condition Minimum Maximum • The Osia implant is MR Conditional. For full MRI safety Storage &... -
Page 17: Operating Characteristics
Change program, activate streaming, activate flight mode Battery door functions Turn processor on and off, activate flight mode Battery One PR44 (zinc air) button cell battery, 1.4V (nominal) Only high power 675 zinc air batteries designed for cochlear implants should be used... -
Page 18: Electromagnetic Compatiblity (Emc)
Guidance and manufacturer’s declaration – electromagnetic environment specified below. The customer or electromagnetic emissions the user of the Osia 2 Sound Processor should assure that it is The Osia 2 Sound Processor is intended for use in the used in such an environment electromagnetic environment specified below. -
Page 19: Environmental Protection
This device complies with part 15 of the FCC (Federal such as antenna cables and external antennas) should be used no closer than 30 cm (12 in.) to any part of your Osia 2 Sound Communications Commission) Rules and with RSS-210 of ISED Processor, including cables specified by the manufacturer. -
Page 20: Privacy And The Collection Of Personal Information
Cochlear and others involved in care with regard to the device. This equipment generates, uses and can radiate radio frequency For more information please read Cochlear’s Privacy Policy on energy and, if not installed and used in accordance with www.cochlear.com/privacy or request a copy from Cochlear at the... -
Page 21: Product Order Overview
Cochlear Wireless Mini Microphone 2, EU Cochlear Osia 2 Sound Processor P770841 Cochlear Wireless Mini Microphone 2, GB P1233400 Cochlear Osia 2 Sound Processor Kit P770844 Cochlear Wireless Mini Microphone 2, US Cochlear Osia 2 Sound Processor Cover P770847 Cochlear Wireless Mini Microphone 2+, AUS... -
Page 22: Key To Symbols
Key to symbols Radio symbols The following symbols may appear on your processor or remote components and/or packaging: FCC ID: QZ3OSIA2 USA product label requirements Refer to instruction Date of manufacture manual IC: 8039C-OSIA2 Canada product label requirements Manufacturer Temperature limits Australia/New Zealand label requirements Catalogue number Type B applied part... - Page 23 Please contact your local Cochlear representative for product information. The Cochlear Osia 2 Sound Processor is compatible with iPhone, iPad and iPod touch. For compatibility information visit www.cochlear.com/compatibility. “Made for iPhone” means that an electronic accessory has been designed to connect specifically to iPhone and has been certified by the developer to meet Apple performance standards.
Need help?
Do you have a question about the Osia 2 and is the answer not in the manual?
Questions and answers