Table of Contents
Advertisement
Advertisement
Table of Contents

Related Manuals for Plastimo S Series


Summary of Contents for Plastimo S Series
- Page 1 PLASTIMO JIB REEFING SYSTEMS S-SERIES 406-S 608-S 810-S...
-
Page 2: Table Of Contents
ASSEMBLY INSTRUCTIONS FOR S-SERIES ASSEMBLY INSTRUCTIONS FOR S-SERIES 406-S 608-S 810-S 406-S 608-S 810-S I N D E X Technical specifications of 406-S, 608-S, 810-S Description of specific parts for each model Tools needed FLAT ASSEMBLY (forestay dismantled) Dismantling the forestay Assembly of the jib reefing system IN SITU ASSEMBLY (directly onto the boat) Measuring the length of the forestay... - Page 3 TECHNICAL SPECIFICATIONS 406-S MODEL Ø 6,5 mm 119.5 Ø 4 - 7 mm Model 406-S Réf. N° chainplate version 25722 Réf. N° turnbuckle version 25723 Forestay diameter (mm) 4 - 7 Luffrope diameter (mm) Length A chainplate (m) 6.20 Length A turnbuckle (m) 6.28 Length B (m) 5.95...
- Page 4 608-S MODEL Ø 6.5 mm Ø 4 - 7 mm Modèle 608-S Réf. N° chainplate version 25724 Réf. N° turnbuckle version 25725 Forestay diameter (mm) 4 - 7 Luffrope diameter (mm) Length A chainplate (m) 9.22 Length A turnbuckle (m) 9.40 Length B (m) 8.94...
- Page 5 810-S MODEL Ø 6.5 mm Ø 4 - 7 mm Modèle 810-S Réf. N° chainplate version 25374 Réf. N° turnbuckle version Forestay diameter (mm) 4 - 7 Luffrope diameter (mm) Length A (m) 11.05 Length B (m) 10.44 Length C (mm) Length D (m) 10.49 S (m²)
-
Page 6: Description Of Specific Parts For Each Model
DESCRIPTION OF SPECIFIC PARTS FOR EACH MODEL 406-S model - 1 drum unit - 1 halyard swivel - 2 TCL screws M4 x 12 ( to secure reefing line feeder 406-S) 608-S model - 1 drum unit - 1 halyard swivel Enrouleur 810-S - 1 drum unit - 1 halyard swivel... - Page 7 Standard parts for all models - 1 boltrope prefeeder - 1 top end stop - 2 bearings - Coupling sleeves - 406-S ð Qty 4 - 608-S ð Qty 6 - 810-S ð Qty 7 - 1 base spar - Intermediate spars - 406-S ð...
-
Page 8: Tools Needed
- 1 Chc M5 x 12 screw to secure base spar to drum TOOLS NEEDED - Hammer - Pliers - Comfortable bosun's chair (Plastimo). - Allen key (∅4) - Electric or hand drill - 1 ∅ 4 mm drill - Hacksaw... -
Page 9: Dismantling The Forestay
FLAT ASSEMBLY - This method consists of fully dismantling the forestay and assembling the jib reefing system while the forestay is lying flat. - We recommend this method as it is faster. - In certain cases the top part of the forestay cannot be dismantled, in this case:: ý... - Page 10 ASSEMBLING THE JIB REEFING SYSTEM - Lay the forestay flat - Place the parts to be assembled alongside the forestay - Assemble the drum unit on the forestay and put the rigging screw pin or screw and nut in place (select the chainplate hole that corresponds to the initial forestay adjustment) - Slide a bearing into the drum - Insert a coupling sleeve into the base spar (ensure that the hole in the coupling sleeve is in line with the pre-drilled hole of the...
- Page 11 - Secure with the 4 N°7 (3.9 x 9.5) TF screws - Insert an aluminium coupling sleeve, put some silicone filler into the hole and position a TF MS x 8 screw (do not tighten or it will be difficult to put the second screw in place). - Put a second spar into position, put some silicone filler in the hole and position the screw (once the two screws are in position they may both be tightened).
- Page 12 Installing the top end stop - Slot the second bearing into the top end stop - Slide the top end stop over the aluminium spar - Drill a hole (with a 4 mm drill) IMPORTANT: refer to diagram for the positioning of the top end stop - Before putting the screw into position, do not forget to slide the halyard swivel into place (ensure that the conical end of the halyard swivel faces downwards) - Put the top end stop back into position...
-
Page 13: Measuring The Length Of The Forestay
IN SITU ASSEMBLY ý this method of assembly may be carried out by one person ý it is not necessary to dismantle anything at the masthead Steps to be followed: MEASURING THE LENGTH OF THE FORESTAY - In order for this jib reefing system to be perfectly adapted to your boat the length « X » needs to be known. Helpful hint: - Slide a small shackle around the forestay - Ensure that it lies flush against the sleeve... -
Page 14: Cutting The Last Spar
- Attach a halyard to the shackle - Attach a length of rope (or a tape measure) to the shackle - Hoist the shackle until it touches the top sleeve of the forestay - Mark the piece of rope level with the top of the drum unit - Lower the shackle CUTTING THE LAST SPAR Stretch out flat the piece of rope used to measure the length of the forestay... -
Page 15: Assembling The Top End Stop
ASSEMBLING THE TOP END STOP - The top end stop should be assembled on the aluminium spar that has just been cut. a) The second bearing is slotted into the top end stop b) Slide the top end stop fully over the end of the spar (IMPORTANT: refer to diagram below for positioning of the hole in the top end stop) c) Drill a hole using a ∅4 mm drill ASSEMBLING THE SPARS... - Page 16 - Refasten the forestay - Attach a halyard to the halyard swivel in order to support the spars as they are assembled - Insert a coupling sleeve - Put some silicone filler into the holes before tightening the screws (in order to reduce the electrolytic couple between the stainless steel screw and the aluminium)
-
Page 17: Assembling The Base Spar
ASSEMBLING THE BASE SPAR - IMPORTANT: ensure the base spar is facing the right way (see diagram below) holes to secure prefeeder end to be inserted into drum -Cutting the PVC liner - Slide the prefeeder into position from the bottom of the spar until it is in line with the holes in the spar (IMPORTANT: ensure that the prefeeder is the right way up) -
Page 18: Assembling The Drum Unit
INSTALLING THE BOLTROPE PREFEEDER - Put the prefeeder back into position - Put some silicone filler in the holes - Insert and tighten the 4 N°7 screws - Wipe away any excess filler with a cloth ASSEMBLING THE DRUM UNIT - Detach the forestay from its mounting plate on the boat - Position the sleeve or... -
Page 19: Adjusting The Reefing Line Feeders
ADJUSTING THE REEFING LINE FEEDERS 406-S model - The reefing line feeder on the 406-S model is assembled either on the right or left hand side of the drum unit, depending on which direction you prefer to reef. - To fasten the reefing line feeder, use the two M4 x 12 nuts and bolts (see page 6) starboard assembly port assembly - The angle is adjusted by loosening the two screws that hold the chainplate. -
Page 20: Recommendations
RECOMMENDATIONS Reefing line feeders ý The angle of all the reefing line feeders may be adjusted. IMPORTANT: they should be positioned in a way that best suits the direction of pull on the line Reefing line ý The reefing line is wound around the drum. Only use pre-stretched rope in order to eliminate any elasticity Refer to diagram below for the position of the reefing line as it comes out of the drum 90°... -
Page 21: Maintenance
MAINTENANCE Rinse the drum unit once a year with fresh water (no dismantling required). - No other special maintenance is needed. fresh water PROBLEM CAUSE SOTUTION ENCOUNTERED ý Halyard turns with the - Forestay not taut enough - tighten the backstay halyard swivel ý... -
Page 22: Optional Extras
OPTIONAL EXTRAS HALYARD DIVERTERS - When the genoa is furled or unfurled, if the angle between the halyard and the forestay is too tight, the halyard risks being twisted round as the halyard swivel turns. - 2 options are available to solve this problem: Option 1 : Halyard diverter wheel - To install the diverter wheel, it is necessary to dismantle the forestay Ref: 25720... - Page 23 Référence Reference N° 406-S 406-S 25722 25723 25752 Base 25392 Alloy spar 25384 Coupling sleeve 26179 PVC liner 25675 Screw TCL M4 x 12 22827 Bearing 10001 Drum 10003 " 10008 " 26324 Reefing line adjuster 26325 Coupling plates 5 holes 21308 11 holes 21291...
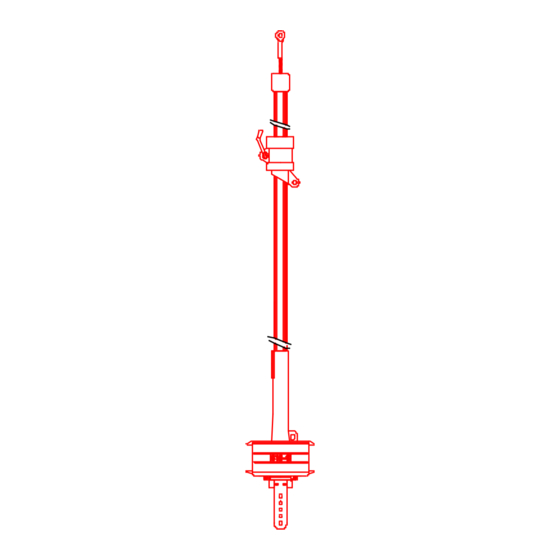
- Page 24 406 -S...
- Page 25 Référence Reference N° 608-S 608-S 25724 25725 25752 Base 25392 Alloy spar 25384 Coupling sleeve 26179 PVC liner 25675 Screw TCL M4 x 12 22827 Bearing 10001 Drum 10003 " 10008 " 26324 Reefing line adjuster 26325 Coupling plates 5 holes 21308 11 holes 21291...
- Page 26 608 - S...
- Page 27 Référence Reference N° 810-S 25374 25752 Base 25392 Alloy spar 25384 Coupling sleeve 26179 PVC liner 25675 Screw TCL M4 x 12 22827 Bearing 10001 Drum 10003 " 10008 " 26324 Reefing line adjuster 26325 Coupling plates 5 holes 21308 11 holes 21291 5 holes...
- Page 28 810 S...
Need help?
Do you have a question about the S Series and is the answer not in the manual?
Questions and answers
How many turns of the reefing line should there be on the drum before reefing
There should be a minimum length of one halyard turn on the drum before reefing.
This answer is automatically generated
When fitting my new 609s furling system should it cover the turnbuckle or fit above the turnbuckle. Thanks for any assistance.
The Plastimo 609S furling system should be fitted with the reefing drum sitting above the turnbuckle. This setup ensures proper adjustment of the forestay tension and accommodates the longer link plates supplied with the turnbuckle system.
This answer is automatically generated