
Related Manuals for Larsen & Brusgaard ALTITRACK


Summary of Contents for Larsen & Brusgaard ALTITRACK
- Page 1 LARSEN & BRUSGAARD Mosevej 3 4070 Kirke Hyllinge, Denmark Phone: +45 4648 2480 Fax: +45 4648 2490 E-mail: L-and-B@L-and-B.dk...
- Page 2 ALTITRACK is a trademark of Larsen & Brusgaard, Denmark. ©2010. Larsen & Brusgaard ApS. All rights reserved. Larsen & Brusgaard operates a policy of continuous development. Therefore, we reserve the right to make changes and improvements to any of the...
- Page 3 If you are in doubt about how this limitation af- fects your skydiving, consult a licensed instructor. DO NOT use this equipment unless you are on, or have passed an approved skydiving course. Use the ALTITRACK™ at your own risk.
-
Page 4: Table Of Contents
3.1 Before night jumping ...................... 17 4 - Jump Mode ......................... 18 5 - Power OFF ........................... 18 6 - Zeroing and Altitude Offset ....................20 6.1 Zeroing the ALTITRACK ....................20 6.2 Altitude Offset ....................... 20 7 - Backlight ..........................22... - Page 5 8 - Battery Status ........................23 9 - Customize the ALTITRACK ..................... 24 9.1 SETUP Selector........................ 24 10 - Main Setup Display ......................26 10.1 Turn the ALTITRACK OFF ....................27 10.2 Delete Jump ......................... 29 10.3 Set Total Number of Jumps .................... 30 10.4 Set Total Freefall Time ....................
- Page 6 11.5 Logbook Screen # 4. (View Current Time/Date, Temperature and Altitude) ......52 12 - Remaining Logbook Storage ....................53 13 - Replacing the Battery ......................54 14 - Resetting the ALTITRACK ....................55 15 - Battery cover ........................57 16 - Firmware Version ....................... 58 17 - Operational Hints and Trouble-shooting ................
-
Page 8: 1- Introduction
At first glance, the ALTITRACK™ looks like many of the more common analog altimeters used throughout the world... but look a little closer. The ALTITRACK™ is the only sport altimeter with an analog face, but utilizes the most high tech and durable digital components for accuracy that surpasses every other mechanical sport altimeter currently available. -
Page 9: Features
1 - Introduction 1.1 Features • 45 deg. offset scale for easy line of sight viewing when mounted on the hand/ wrist • Electroluminescent backlight for night jumping • Smooth, none erratic pointer movement… stepper motor controlled • Automatic calibration to local elevation •... -
Page 10: Software & Functions
1.2 Software & functions • Storing up to 15 minutes of data of each jump with a total of 6.5 hours recording time (e.g. 200 jumps with two minute profiles) • Records and displays jump details from exit to landing, date, jump number, exit altitude, opening altitude, freefall time and complete speed statistics for maximum and average speeds in TAS or SAS •... -
Page 11: Description
2 - Description 2.1 Analog Face 1. Right Front Button • Power ON • Enable / Disable backlight • Power OFF 2. Left Front Button • Power ON • Perform ACCESS • Adjust altitude if the DZ elevation differs Fig. 1 – Analog face from that of the airport of take-off •... -
Page 12: Digital Face
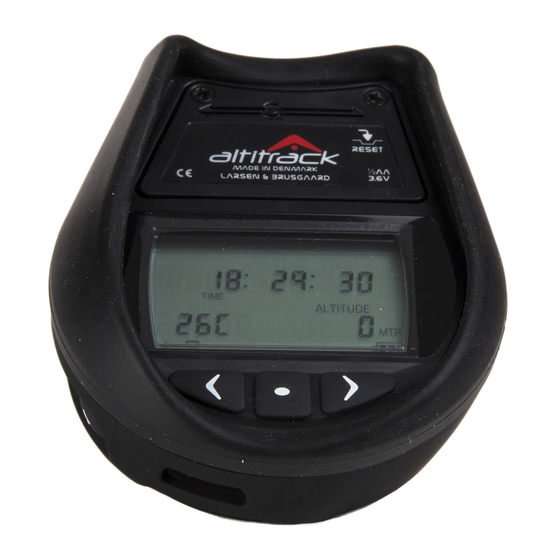
2.2 Digital Face Rubber support Battery compartment LCD display Left button 10. Mode button 11. Right button 12. Reset button (below battery cover) Fig. 2 – Digital face... -
Page 13: Pc Connection
2.3 PC Connection Fig. 3 – PC Connection 13. Connector for PC data download and firmware upgrade (under rubber cover) (Jump-Track and USB-Track required) -
Page 14: Display
Fig. 4 – Digital face Shows minutes when displaying time 20. Dive Type icon 21. Jump Mode indicator Flashes when the ALTITRACK is in Jump Mode 22. Deployment altitude in logbook Displays current altitude when in “Altitude Screen” 23. Battery status... - Page 15 30. Delete logbook icon face 31. Clock icon Used when displaying current time and total freefall time 32. Total icon Used when displaying total jumps and total freefall time 33. Delete current jump icon 34. OFF icon Used when turning the ALTITRACK OFF...
-
Page 16: Power On
3 - Power ON Note: The ALTITRACK must be switched ON prior to entering the airplane Press Right or Left Front Button until “ACCESS” and “LOW BAT” flashes. Then release the button. The ALTITRACK can be used for jumping, if: - The pointer moves from “6”... -
Page 17: Before Night Jumping
The unit displays “Logbook screen # 1”. (Main information)” on the LCD. The LCD automatically switches OFF after 15 sec. To switch ON the display, press any of the three buttons below the LCD. Fig. 6 - Logbook screen #1. No data stored 3.1 Before night jumping: Verify that the backlight is functioning. -
Page 18: Jump Mode
LCD the “airplane icon” starts to flash. - Exiting Jump Mode: The ALTITRACK exits Jump Mode automatically within one minute after it senses ground level again. If the ALTITRACK has been preset to a different altitude it exits Jump Mode as described in paragraph 6. - Page 19 Note: If the ALTITRACK is not manually switched OFF, it will automatically switch OFF 14 hours after the last jump or 14 hours after the last pressing of any button (28 hours in case adjustment of altitude has been performed without jumping with the...
-
Page 20: Zeroing And Altitude Offset
6 – Zeroing and Altitude Offset 6.1 Zeroing the ALTITRACK The ALTITRACK continuously adjusts to the local elevation and the pointer is at the zero “0” position. If the pointer is not at “0” prior to jumping, the unit has not adjusted itself to the local elevation and it must be manually zeroed. - Page 21 - The airplane must fly level at the same altitude as that of the DZ. - At that altitude switch the ALTITRACK OFF and the ON again and let it calibrate to “0” before continuing climbing.
-
Page 22: Backlight
Note: The backlight is automatically disabled when manually switching OFF the ALTITRACK. Note: If the backlight is turned ON while the ALTITRACK is not in Jump Mode, the backlight will automatically turn OFF after 2 hours. If the backlight is turned ON while the ALTITRACK is in Jump Mode, the backlight will... -
Page 23: Battery Status
The two bars correspond to a battery capacity between 100 and 10%. Low capacity: Symbol shows one bar inside the icon. Replace battery as soon as possible, however the ALTITRACK can still be used for jumping as long as it is not used for night jumping or at temperatures below zero deg. -
Page 24: Customize The Altitrack
9 - Customize the ALTITRACK The ALTITRACK can be customized to your personal settings. Your settings will be stored and recalled also after replacing batteries. When you first get the ALTITRACK, we recommend you to go through the SETUP Selector to customize the unit. - Page 25 Main Setup Display, then press to exit. Note: If no button has been pressed within 5 minutes after choosing any SETUP window, the ALTITRACK will return to the Main window (showing Time, Temperature inside instrument and Altitude).
-
Page 26: Main Setup Display
The Main setup display accesses to the following functions: Turn the ALTITRACK OFF- Delete Jump - Set total number of jumps - Set total freefall time - Set current date - Set current time - Delete logbook - MPH / KMH - Feet / Meter - (TAS) True Airspeed / (SAS) Skydiver’s Airspeed - Canopy... -
Page 27: Turn The Altitrack Off
Main Setup Display - Turn the ALTITRACK OFF - Delete Jump - Set total number of jumps - Set total freefall time - Set current date - Set current time - Delete logbook - MPH / KMH - Feet / Meter - (TAS) True Airspeed / (SAS) Skydiver’s Airspeed - Canopy log Enable / Disable - Dive Type - Celsius / Fahrenheit - Beep ON / OFF... - Page 28 “Match Value” At “Match Value” press The pointer moves to “6” and the unit switches OFF. Note: When switched OFF the ALTITRACK cannot be used for jumping. Customer settings and clock are not lost when switched OFF.
-
Page 29: Delete Jump
Main Setup Display - Turn the ALTITRACK OFF - Delete Jump - Set total number of jumps - Set total freefall time - Set current date - Set current time - Delete logbook - MPH / KMH - Feet / Meter - (TAS) True Airspeed / (SAS) Skydiver’s Airspeed - Canopy log Enable / Disable - Dive Type - Celsius / Fahrenheit - Beep ON / OFF... -
Page 30: Set Total Number Of Jumps
Main Setup Display - Turn the ALTITRACK OFF - Delete Jump - Set total number of jumps - Set total freefall time - Set current date - Set current time - Delete logbook - MPH / KMH - Feet / Meter - (TAS) True Airspeed / (SAS) Skydiver’s Airspeed - Canopy log Enable / Disable - Dive Type - Celsius / Fahrenheit - Beep ON / OFF 10.3 Set Total Number of Jumps... -
Page 31: Set Total Freefall Time
Main Setup Display - Turn the ALTITRACK OFF - Delete Jump - Set total number of jumps - Set total freefall time - Set current date - Set current time - Delete logbook - MPH / KMH - Feet / Meter - (TAS) True Airspeed / (SAS) Skydiver’s Airspeed - Canopy log Enable / Disable - Dive Type - Celsius / Fahrenheit - Beep ON / OFF... -
Page 32: Set Current Date
Main Setup Display - Turn the ALTITRACK OFF - Delete Jump - Set total number of jumps - Set total freefall time - Set current date - Set current time - Delete logbook - MPH / KMH - Feet / Meter - (TAS) True Airspeed / (SAS) Skydiver’s Airspeed - Canopy log Enable / Disable - Dive Type - Celsius / Fahrenheit - Beep ON / OFF... -
Page 33: Set Current Time
Main Setup Display - Turn the ALTITRACK OFF - Delete Jump - Set total number of jumps - Set total freefall time - Set current date - Set current time - Delete logbook - MPH / KMH - Feet / Meter - (TAS) True Airspeed / (SAS) Skydiver’s Airspeed - Canopy log Enable / Disable - Dive Type - Celsius / Fahrenheit - Beep ON / OFF... -
Page 34: Delete Logbook
Main Setup Display - Turn the ALTITRACK OFF - Delete Jump - Set total number of jumps - Set total freefall time - Set current date - Set current time - Delete logbook - MPH / KMH - Feet / Meter - (TAS) True Airspeed / (SAS) Skydiver’s Airspeed - Canopy log Enable / Disable - Dive Type - Celsius / Fahrenheit - Beep ON / OFF 10.7 Delete Logbook... - Page 35 Press (“Delete Logbook” icon flashes) Press to increase the counter “Match Value” Press to decrease the counter “Match Value” At “Match Value” press to delete logbook CautioN: The accumulated number of jumps and freefall time are also erased. WarNiNg: Once is pressed at match value, there is no way to restore the information.
-
Page 36: Mph / Kmh Selector
Main Setup Display - Turn the ALTITRACK OFF - Delete Jump - Set total number of jumps - Set total freefall time - Set current date - Set current time - Delete logbook - MPH / KMH - Feet / Meter - (TAS) True Airspeed / (SAS) Skydiver’s Airspeed - Canopy log Enable / Disable - Dive Type - Celsius / Fahrenheit - Beep ON / OFF 10.8 MPH / KMH Selector... -
Page 37: Feet / Meter Selector
Main Setup Display - Turn the ALTITRACK OFF - Delete Jump - Set total number of jumps - Set total freefall time - Set current date - Set current time - Delete logbook - MPH / KMH - Feet / Meter - (TAS) True Airspeed / (SAS) er’s... -
Page 38: Tas) True Airspeed / (Sas) Skydiver's Airspeed
Main Setup Display - Turn the ALTITRACK OFF - Delete Jump - Set total number of jumps - Set total freefall time - Set current date - Set current time - Delete logbook - MPH / KMH - Feet / Meter - (TAS) True Airspeed / (SAS) Skydiver’s Airspeed - Canopy log Enable / Disable - Dive Type - Celsius / Fahrenheit - Beep ON / OFF... - Page 39 TAS is a term used in aviation: It is the speed of an object relative to the sur- rounding air, regardless of the altitude. SAS is a new concept developed by LARSEN & BRUSGAARD: SAS is the speed of a skydiver calculated from measurements of air pressure and temperature and con- verted to a fixed air pressure (875.3 mb) and a fixed temperature (+7.080C) which corresponds to 4,000 feet ASL.
-
Page 40: Canopy Log Enable / Disable
Main Setup Display - Turn the ALTITRACK OFF - Delete Jump - Set total number of jumps - Set total freefall time - Set current date - Set current time - Delete logbook - MPH / KMH - Feet / Meter - (TAS) True Airspeed / (SAS) Skydiver’s Airspeed - Canopy log Enable / Disable - Dive Type - Celsius / Fahrenheit - Beep ON / OFF... -
Page 41: Dive Type Selector
Main Setup Display - Turn the ALTITRACK OFF - Delete Jump - Set total number of jumps - Set total freefall time - Set current date - Set current time - Delete logbook - MPH / KMH - Feet / Meter - (TAS) True Airspeed / (SAS) Skydiver’s Airspeed - Canopy log Enable / Disable - Dive Type - Celsius / Fahrenheit - Beep ON / OFF... - Page 42 Description This mode can be used to: 1. Store the Dive Type to be performed on the next jump The selected Dive Type is displayed in the Logbook Screen #3 2. Change freefall sensitivity Only when Dive Type is set to STu or SLO. Press (“DIVE TYPE”...
- Page 43 * Dive Type, STu (Student). In STu the descent rate parameters are changed to allow detection of short freefalls, (2 sec). Note: The ALTITRACK freefall detection is very sensitive in this mode and may log if the airplane descends. ** Dive Type, SLO (Slow). In SLO the exit fallrate and deployment calculation para-...
-
Page 44: Celcius / Fahrenheit Selector
Main Setup Display - Turn the ALTITRACK OFF - Delete Jump - Set total number of jumps - Set total freefall time - Set current date - Set current time - Delete logbook - MPH / KMH - Feet / Meter - (TAS) True Airspeed / (SAS) Skydiver’s Airspeed - Canopy log Enable / Disable - Dive Type - Celsius / Fahrenheit - Beep ON / OFF... -
Page 45: Beep On / Off
Main Setup Display - Turn the ALTITRACK OFF - Delete Jump - Set total number of jumps - Set total freefall time - Set current date - Set current time - Delete logbook - MPH / KMH - Feet / Meter - (TAS) True Airspeed / (SAS) Skydiver’s Airspeed - Canopy log Enable / Disable - Dive Type - Celsius / Fahrenheit - Beep ON / OFF... -
Page 46: Main Selector
11 - MAIN Selector In the MAIN SELECTOR press repeatedly to scroll through the menu functions in this order: logbook screen # 1. (Main information) logbook screen # 2. (Playback, Jump Profile) logbook screen # 3. (Date, Time and Dive Type) Main Display (Time/date, temperature and altitude) Press (only necessary when in Jump Mode) - Page 47 3 seconds To go to lowest jump #, press and hold for 3 seconds The ALTITRACK will display three different terminal speed informations in mph and kmh. 1. Average speed, 2. Max speed, 3. Min speed All speeds are calculated from 15 sec after exit to 7 sec before deployment.
-
Page 48: Important Notice About Speed Recordings
Speed information is available in scroll mode, if freefall lasted more than 6 sec. 11.2 Important Notice About Speed Recordings Experience has shown that when mounting the ALTITRACK on the hand or belly, different air pressures induced by hand or body movements may result in incorrect... -
Page 49: Logbook Screen # 2. (Playback, Jump Profile)
Press again 11.3 Logbook Screen # 2. (Playback, Jump Profile) Example Fig. 24 - Logbook Screen # 2. (Playback, Jump Profile) The information on the display includes: - Time after exit in seconds - Speed at time - Temperature inside instrument at exit and then updated every 30 sec. - Altitude at time - Freefall and canopy status... - Page 50 Press to playback the jump profile at ¼ speed Press twice to playback in real time Press three times to playback at 2x speed Press four times to playback at 5x speed Press to playback the jump profile in reverse at ¼ speed Press twice to playback in reverse in real time Press...
-
Page 51: Logbook Screen # 3. (Date, Time And Dive Type)
Press again 11.4 Logbook Screen # 3. (Date, Time and Dive Type) Example Fig. 25 - Logbook Screen # 3. (Date, Time and Dive Type) The information on the display includes: - Jump Date - Jump Time - Dive Type To scroll through the previous jumps press To change direction, press... -
Page 52: Logbook Screen # 4. (View Current Time/Date, Temperature And Altitude)
Press again 11.5 Logbook Screen # 4. (View Current Time/Date, Temperature and Altitude) Example Fig. 26 - Logbook Screen # 4. (view current time/date, temperature and altitude) The information includes: - Current time (24 hours’ format) or current date (yyyy:mm:dd) - Current temperature inside instrument in Celsius or Fahrenheit - Altitude - Freefall and canopy log status... -
Page 53: Remaining Logbook Storage
12 - Remaining Logbook Storage The ALTITRACK flash memory can store 400 minutes of data (e.g. 200 jumps with two minute profiles or 26 jumps with 15 minute profiles). The ALTITRACK flash storage is organized in ½ minute sectors; meaning that a 20 sec. -
Page 54: Replacing The Battery
13 - Replacing the Battery Fig. 28 – Battery cover with screws Fig. 29 - Battery 1. Unscrew and remove battery cover 2. Remove old battery 4. Install new battery noting polarity. Use SAFT LS 14250 (3.6V) or equivalent 5. Press a paperclip into the tiny (Reset) hole next to the battery and release The unit restarts 6. -
Page 55: Resetting The Altitrack
Note: Customer settings are not lost when removing battery. However, the built-in clock may need to be reset to the current time. 14 - Resetting the ALTITRACK The reset button is located inside the battery compartment. To gain access to the reset button, remove the battery cover. - Page 56 3. Put battery cover back into place and fasten the 2 screws. After resetting, the battery system requires 2 minutes to calibrate itself before displaying the correct status. While calibrating, the battery icon toggles between full and low. Note: Reset the unit after battery replacement, when troubleshooting and when verifying software version number.
-
Page 57: Battery Cover
Air filter Fig. 31 - Battery cover with Air Filter The ALTITRACK is water resistant and the battery cover functions as an air filter, preventing water get inside the unit. In case the ALTITRACK becomes wet, please check the air filter on the battery cover. If it is wet, dry it up using a hair dryer or... -
Page 58: Firmware Version
16 - Firmware Version Perform reset or turn the unit OFF and then ON The version number is displayed in the upper part of the screen. The number displayed in the lower part of the screen is the scale type Firmware Version Scale Type Fig. -
Page 59: Operational Hints And Trouble-Shooting
17 - Operational Hints and Trouble-shooting When the ALTITRACK detects a fault, an error (“ERR”) symbol and trouble shooting numbers 2 to 5 and 100 are displayed in the upper part of the LCD screen. At the same time the unit beeps every minute. -
Page 60: Tas And Sas
18 - TAS and SAS Definitions True Airspeed (TAS) and Skydiver’s Airspeed (SAS) are two methods of calculating the airspeed of a moving/flying/falling object. TAS is a term used in aviation: It is the speed of an object relative to the surrounding air, regardless of the altitude. - Page 61 Example: A skydiver (in a fixed freefall position) who has a terminal fallrate of 62 meters/sec at 10,000 feet will have a terminal fallrate of 50 meters/sec at 3,000 feet. It will be seen that the difference in altitude (air pressure) makes it difficult to compare the fall-rates when measured using TAS.
- Page 62 you are jumping at, SKYDIVER’S AIRSPEED (SAS) will be the same for the same body position. SAS is very useful when doing big formation skydiving. If using TAS, it will seem like the base is slowing down the fall rate during the entire skydive. To set TAS / SAS see paragraph 10.10.
-
Page 63: Mounting The Rubber Support
19 - Mounting The Rubber Support Step 1. Bend the closing flap slightly and hold it next to the connector port (Fig. 33) and fit the right corner into the guide on the right corner of the Altitrack. Fig 34. Fig. 33 Fig. 34... - Page 64 Step 2. Continue pressing the rubber support into the guide (Fig. 35) until reaching the two side buttons. Fig. 36. Fig. 35 Fig. 36...
- Page 65 Step 3. Fit and press the left corner into the left corner of the Altitrack (Fig. 37) and press remaining rubber into place towards the two side buttons. Fig. 38. Fig. 37 Fig. 38...
- Page 66 Step 4. Carefully align and press the end of the sealing into the end of connector port (Fig. 39) and continue until the sealing is completely fitted into port. Fig. 40. It may be necessary to adjust and press several times on the sealing to make a good fit. Fig.
- Page 67 Step 5. Close the sealing flap by first pressing at the buttom of the flap (Fig. 42), then finishing by pressing on the top with a fingernail. The flap must be flush with the surrounding surface. Fig. 43. Fig. 42 Fig.
-
Page 68: Mounting The Finger Loop
20 - Mounting The Finger Loop The Finger Loop comprises one Velcro Strap and one Rubber Band. Fig. 44. Note: The velcro strap has one part of soft material on one side and one part with hooks on one side. Fig. - Page 69 Step 1. Guide the velcro strap through the opening on the front of the Altitrack with the soft material part facing towards the scale. Adjust the strap so it has equal length on each side of the bar. Fig. 45.
- Page 70 Step 2. Route the hook part up through the rubber band top opening. Fig. 46. Fig 46...
- Page 71 Step 3. Continue and loop the hook part down through the second opening and pull the rubber band to the Altitrack bar. Fig. 47. Fig 47...
- Page 72 Step 4. Put the soft part through the big hole. Fig. 48. Fig 48...
- Page 73 Turn the Altitrack upside down. While holding the hook part tight towards the Altitrack (Fig. 49), press the soft part into the second opening with your index fingertip while paying attention that it does not connect with the hook part until it has been fully put through the opening.
- Page 74 Step 6. Close the hook part around the soft part and press firmly. Fig. 51. Fig. 51...
-
Page 75: Mounting The Wrist Strap
21 - Mounting The Wrist Strap General: The wrist strap is delivered in its closed position (Fig. 52) and before mounting, it must be opened fully (Fig. 53) Fig. 52 Fig. 53... - Page 76 Step 1. Route the left strap through the left side opening in the Altitrack (Fig 54) and align it parallel with itself (Fig. 55). Fig. 54 Fig. 55...
- Page 77 Step 2. Adjust the cut angled end of the strap to be flush with the outer edge of the wide velcro band and press into place. Fig. 56. Fig. 56...
- Page 78 Step 3. Route the right strap through the right opening in the Altitrack, align it parallel with itself and adjust the cut angled end of the strap to be flush with the outer edge of the wide velcro band and press into place. Fig. 57.
- Page 79 Step 4. For storage purpose, put the velcro strap end through the buckle (Fig. 58) and close. Fig. 59. Fig. 58 Fig. 59...
-
Page 80: Specifications, Altitrack
22 - Specifications, ALTITRACK Freefall time: +/- 1 sec Mechanical Speed (TAS/SAS): +/- 3 mph (+/- 5 kmh) Dimensions: 81 x 69 x 23 mm Datalogger Weight: 130 g LCD viewing area: 9.5 cm2 Continued storage of freefall profiles: Last 400 minutes... - Page 81 Other Present altitude: +/- 10 ft Operating altitude: 0 to 40,000 ft (0 to 12,191 m) Maximum negative adjustment: 3,000 ft (1,000 meter) Clock: +/- 4 min/month Storing Temperature: -20C to +70C Operating Temperature Range: -30C to +60C (-22F to +140F) Function Period: 14 hours Battery type: SAFT Lithium LS 14250 (3.6V) or equivalent Battery Life Time (at normal use): approximately 2 years...
- Page 82 The logbook has advanced search and print options and can sort many types of skydives such as Tandem, AFF, freefly, etc. The JUMP-TRACK™ / ALTITRACK™ combination is an invaluable tool for all skydivers to study their performance in the air.
-
Page 83: Warranty
The following conditions apply to the ALTITRACK warranty: If within 12 months of the purchase of ALTITRACK a defect or damage is identified by faulty manufacture, LARSEN & BRUSGAARD will repair the unit at no cost the the end user.
Need help?
Do you have a question about the ALTITRACK and is the answer not in the manual?
Questions and answers