Advertisement
Quick Links
WARNING: Use the ALTITRACK™ at your own risk.
The Quick Start Guide enables you to set-up the basic functions of the
Altitrack to make the first jump. For detailed description of menus,
functions and features, please read the manual.
Analog and digital face
Analog face
3
4
1. Right Front Button
2. Left Front Button
3. ACCESS indication (Flashes every 15 seconds when unit is powered ON)
4. Low battery indicator
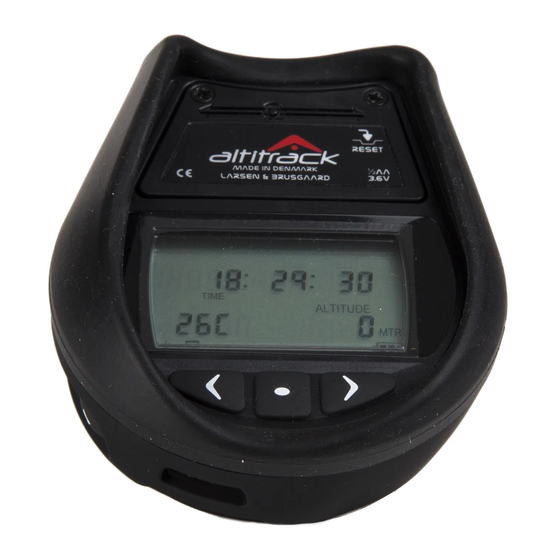
Digital face
6
7
6. Rubber support
8
7. Battery compartment
8. LCD display
9. Left button
10. Mode button
11. Right button
12. Reset button (below battery cover)
9
Power ON
The ALTITRACK has been powered OFF prior to shipping from our factory. To turn the
power ON, press and hold any button until the unit beeps, then release the button.
The ALTITRACK runs a self-test and moves the pointer from "6" to zero.
The unit displays "Logbook screen # 1". (Main information)" on the LCD.
The ALTITRACK uses very little battery power and does not need to be switched OFF.
However, we recommend that you switch OFF the ALTITRACK when traveling on
commercial flights, when driving in mountanious areas and when the jump season is
over. To power OFF, see manual.
Road Map
It is recommended that you familiarize yourself with the ALTITRACK ROAD MAP which
2
is a very helpful tool when using the ALTITRACK for the first time.
1
ALTITRACK Settings
The ALTITRACK can be customised to your personal settings.
The Factory default settings are as follows
Temperature:
Canopy Log:
Feet / Meter:
Mph / Kmh:
TAS / SAS:
Sound ON / OFF:
Type of Dive:
Date format:
12
Time format:
If you want to customise each setting, please read the manual. If you only want to
customise the most important settings prior to the first jump (your total number of
jumps, Time and Date), please go to section "Customising the ALTITRACK Settings"
in this Quick Start Guide.
Otherwise, continue reading below.
Zeroing the ALTITRACK
Explanation:
The ALTITRACK continuously adjusts itself to the local elevation and the pointer is
at the zero "0" position. If the pointer is not within one width from "0" prior to
11
10
jumping, the unit has not yet adjusted itself to the local elevation and it must be
manually zeroed.
To manually zero the ALTITRACK you must first perform ACCESS:
1. Press the Left Front Button and release quickly
2. When the green ACCESS indicator light on the front of the ALTITRACK dial
illuminates, immediately press the Left Front Button again and keep it
pressed (ACCESS indicator light goes OFF)
3. When the ACCESS indicator illuminates again, release the button immediately
Then move the pointer to "0" by using the Right Front Button or Left Front Button.
The unit is now zeroed and the LCD displays "0" altitude.
Example
No data stored
Celsius
Enabled
Feet
Mph
TAS
ON
0
2006:01:01 (year, month, date)
00:00:00 (hours, minutes, seconds)
Advertisement

Related Manuals for Larsen & Brusgaard ALTITRACK


Summary of Contents for Larsen & Brusgaard ALTITRACK
- Page 1 WARNING: Use the ALTITRACK™ at your own risk. The ALTITRACK uses very little battery power and does not need to be switched OFF. The Quick Start Guide enables you to set-up the basic functions of the However, we recommend that you switch OFF the ALTITRACK when traveling on Altitrack to make the first jump.
- Page 2 Note: The ALTITRACK goes out of ACCESS if no button has been pressed within 5 sec. Press again to display Logbook Screen # 3. (Date, Time and Dive Type) Note: When performing zeroing the ALTITRACK enters Jump Mode (see chapter ”Jump Mode”) and remains in Jump Mode for 5 hours, if no jump is made.
Need help?
Do you have a question about the ALTITRACK and is the answer not in the manual?
Questions and answers