Table of Contents
Advertisement
Quick Links
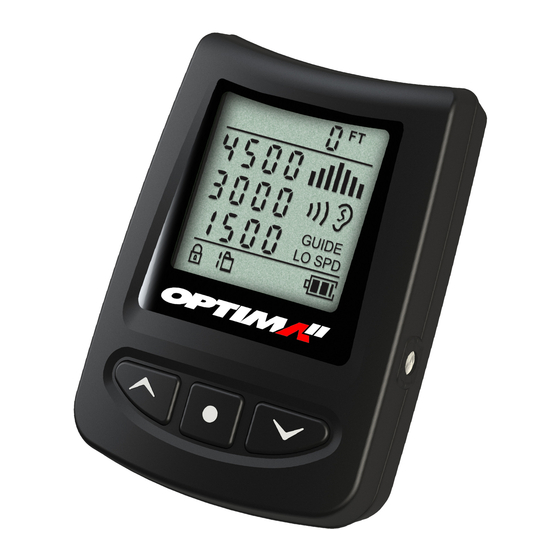
1st. warning altitude (1st. low speed alarm)
2nd. warning altitude (2nd. low speed alarm)
3rd. warning alarm (3rd. low speed alarm)
Perform ACCESS
Warning bank
Pitch
OFF
Battery status
Lo speed status
Alarm sounds
FT/MTR
Altitude/altitude offset
Clock
Up
Mode
Down
WARRANTY
The following conditions apply to the OPTIMA II warranty:
Within 12 months after delivery, damage or defects in the
unit that are proven to be caused by faulty manufacture
will be repaired by LARSEN & BRUSGAARD at no cost to the
end user.
To make a claim under this warranty, send the unit to an
authorized dealer or directly to LARSEN & BRUSGAARD
together with the dated purchase invoice or receipt.
The warranty becomes void if damage is caused by external
circumstances or if the unit has been serviced or repaired by
third parties unauthorized by our national agents or LARSEN
& BRUSGAARD.
All further claims, especially for defects after skydiving
accidents, are excluded. LARSEN & BRUSGAARD has no
obligation to honour any extension of warranty granted by
any national agent.
Waiver of Liability
The buyer and user of the OPTIMA II indemnify the manu-
facturer and vendor from any liability for damage incurred
before, during and after skydiving with the instrument.
WARNING!
The OPTIMA II is intended to be a backup device and
must not be relied upon as your primary means of
maintaining altitude awareness. Use the OPTIMA II at
your own risk.
Do not put the OPTIMA II directly next to your ear when
testing the alarm sounds on the ground, as the OPTIMA II
alarm volume is very loud. It may cause pain or damage to
the ear.
Due to outside wind noise in freefall, the alarm sounds will
not be perceived to be as loud as when testing the OPTIMA
II on the ground.
If the OPTIMA II is not mounted correctly, you may not hear
the alarm sounds in freefall. Make sure the OPTIMA II is
mounted correctly before you jump.
The OPTIMA II must be active (powered on) prior to entering
the airplane.
INTRODUCTION
Congratulations on purchasing your new OPTIMA II!
The OPTIMA II design is based upon the latest fi ndings in
microcomputer technology and freefall parameters and pro-
vides four warning banks (four sets of warning altitudes) for
both high speed and low speed to provide added fl exibility
in confi guring frequently used warning alarms. In addition,
up to three climb warning alarms can be set.
NEW!!
The OPTIMA II introduces a new class of warnings for
use by skydivers – Canopy Descent Warnings and landing
Guide Tones. These allow you to preset warning altitudes for
use under canopy and, if desired, to provide timing beeps
to help you track your landing progress versus your altitude
during the semi-fi nal stage of your canopy descent.
NOTE: The Canopy Descent Alerts are essentially low speed alerts
and can also be used by wing suit fl yers to keep track of altitude in
preparation for separation and canopy deployment.
The OPTIMA II is fully automatic. It continually records
the ambient air pressure and temperature and adjusts the
electronic circuitry to the local elevation.
The thin and ergonomic design ensures a perfect and
comfortable fi t to your ear when placed in your fraphat or
hard helmet.
The OPTIMA II can be mounted on the outside of any type of
helmet by means of the enclosed ties.
The OPTIMA II is ideally suited for Relative Work, Skysurfi ng,
Freefl ying, Head Down, Wing Suit Flying, Student, Tandem,
AFF, and also canopy related activities such as accuracy,
Crew and swooping.
We hope you will enjoy jumping with your new OPTIMA II.
Please read ALL of the instructions prior to actual skydiving
use. It is a very good idea to practice ACCESSing the
OPTIMA II and setting the warning values on the ground
prior to your fi rst jump with the OPTIMA II.
If you have any questions please call, fax or e-mail us.
LARSEN & BRUSGAARD
INSTRUCTIONS
Power ON
The OPTIMA II has been powered off prior to shipping from
our factory. To turn the power on, press and hold any key un-
til the unit beeps, then release the key. The OPTIMA II runs
a self-test and sounds three beeps as it fl ashes the screen
three times. It then displays a screen confi guration referred
to henceforth as the "Main Display." This represents the
starting point for all further actions with respect to OPTIMA
II actions and subsequent displays.
NOTE: To save battery power, the screen display will switch OFF after
14 hours. However, the unit is still ready to jump.
Performing ACCESS
Performing ACCESS
Note: The OPTIMA II goes out of ACCESS and back to the Main
Note: The OPTIMA II goes out of ACCESS and back to the Main
Display if no button has been pressed within 5 sec. ALL functions
Display if no button has been pressed within 5 sec. ALL functions
(except Power ON) can be performed ONLY when the OPTIMA II is
(except Power ON) can be performed ONLY when the OPTIMA II is
in ACCESS mode.
in ACCESS mode.
1. Press
1. Press
and release quickly – the padlock icon turns
and release quickly – the padlock icon turns
off (disappears)
off (disappears)
2. When the padlock icon reappears, immediately press
2. When the padlock icon reappears, immediately press
and keep it pressed – the padlock icon will disappear
and keep it pressed – the padlock icon will disappear
again
again
3. When the padlock icon appears again, release im-
3. When the padlock icon appears again, release im-
3. When the padlock icon appears again, release im-
mediately
mediately
The OPTIMA II now fl ashes the warning bank icon with a
The OPTIMA II now fl ashes the warning bank icon with a
number in front of it to indicate the active warning bank
number in front of it to indicate the active warning bank
number in front of it to indicate the active warning bank
number.
number.
Menu Function Sequence
Menu Function Sequence
By repeatedly pressing
By repeatedly pressing
the OPTIMA II scrolls through the
the OPTIMA II scrolls through the
menu functions in this order:
menu functions in this order:
menu functions in this order:
For the active warning bank: 1st warning altitude - 2nd
For the active warning bank: 1st warning altitude - 2nd
For the active warning bank: 1st warning altitude - 2nd
warning altitude - 3rd warning altitude; sound pitch; sound
warning altitude - 3rd warning altitude; sound pitch; sound
volume; test alarm sounds; feet/meters; altitude offset; OFF
volume; test alarm sounds; feet/meters; altitude offset; OFF
volume; test alarm sounds; feet/meters; altitude offset; OFF
icon; Main Display.
icon; Main Display.
General Note:
General Note:
To leave a menu function, wait until the display times out,
To leave a menu function, wait until the display times out,
or,
or, or,
press and hold
press and hold
for 5 sec.,
for 5 sec.,
or,
or, or,
press
press
repeatedly until the padlock icon fl ashes, then press
repeatedly until the padlock icon fl ashes, then press
or or
or
to exit
to exit
to exit
High Speed Warnings and Setup Selector
Warning Bank Menu Functions
The OPTIMA II has 4 freefall warning banks. When the
warning bank icon is fl ashing, press
or
to select
warning bank 1 to 4.
Setting the Warning Altitudes
The setting of altitudes in each warning bank can be perfor-
med either on the ground or in the airplane during climb to
jump altitude.
1. Press
until 1st warning altitude fl ashes
2. Press
or
to change 1st warning altitude
3. Press
again and the 2nd warning altitude fl ashes
4. Press
or
to change 2nd warning altitude
5. Press
again and the 3rd warning altitude fl ashes
6. Press
or
to change 3rd warning altitude
Sequence of Warning Alarm Altitudes
You may note that when setting the warning altitudes, it is
possible to set the 1st warning alarm altitude lower than the
second or even the 3rd warning altitudes. The 2nd warning
altitude could be set to a higher value than the 1st warning
altitude or a lower value than the 3rd warning altitude, and
so on. This is not a problem – when the OPTIMA II exits
ACCESS mode, it will automatically sort and store the war-
ning alarms such that the highest warning altitude become
the 1st warning alarm, the next highest warning altitude
becomes the 2nd warning alarm, and the lowest warning
altitude becomes the 3rd warning alarm.
If you choose, you may have only two warning alarms. The
procedure is the same as above, but choose same altitude for
the two highest warning alarms (the OPTIMA II then sounds
only the 2nd and 3rd warning alarms).
One Warning Alarm
If you wish only one warning alarm, choose same altitude
for all three warning alarms using the above procedure. (The
unit sounds only the 3rd warning alarm).
Sound Pitch
Press
again. The musical note icon and pitch bar graph
will begin to fl ash
Press
or
to change the pitch up or down. The pitch
bar graph will display the number of bars corresponding to
the selected pitch and the selected pitch will sound.
Note: When selecting a pitch on either side of the center vertical
bar (3,800 Hz), the output volume decreases about 5 dB because
the speaker is no longer at its optimum resonance frequency.
Sound Volume
Press
or
to select output volume.
"1" is very low volume (112 dB), "10" is very high volume
(117 dB)
The OPTIMA II is factory preset to "7".
NOTE: In case of low capacity the volume will automatically switch
to "1" and it cannot be changed until the batteries have been
replaced.
Test Warning Sounds
Press
again. The ear icon will begin to fl ash.
Press
or
. This causes the OPTIMA II to sound the
preset alarm sequence at the selected pitch.
Feet/Meters
Press
again. The FT or MT indicator located in the altitude
area of the Main Display will begin to fl ash.
Press
or
to switch between feet (FT) or meters (MT).
Altitude Offset
Explanation:
If the DZ elevation differs from that of the airport of takeoff,
use the altitude offset capability to set the DZ elevation
prior to entering the airplane or set the altitude offset to
zero when climbing through the DZ elevation.
Press
again. The displayed altitude (normally 0) in front
of the FT or MT indicator will begin to fl ash.
Press
or
to set an altitude offset to match the
altitude of the landing DZ relative to the takeoff airport.
Note: When performing manual altitude offset the OPTIMA II enters
Jump Mode and retains the altitude offset for 14 hours, if no jump
is made. After 14 hours the OPTIMA II recalibrates to the fi eld ele-
vation where it is currently located and once again displays 0. The
altitude offset is not retained when the OPTIMA II is powered OFF.
Power OFF
The OPTIMA II can be manually powered OFF to further
extend the battery life time when not in use.
Press
again. The OFF icon in the icon area of the Main
Display will begin to fl ash.
Press and hold both
and
until the display fl ashes,
then release. The OPTIMA II will shut off.
Customer settings (except altitude offset) are stored in non-
volatile memory when the OPTIMA II is powered OFF.
When powered OFF, the OPTIMA II cannot be used for
jumping.
Advertisement
Table of Contents

Related Manuals for Larsen & Brusgaard OPTIMA II


Summary of Contents for Larsen & Brusgaard OPTIMA II
- Page 1 3rd warning altitude Jump Mode and retains the altitude offset for 14 hours, if no jump is made. After 14 hours the OPTIMA II recalibrates to the fi eld ele- All further claims, especially for defects after skydiving...
- Page 2 One 3 second pulsating alarm if vertical airspeed exceeds 13 m/ Descent and Low Speed Warnings Selector. so on. This is not a problem – when the OPTIMA II exits unit and release. The unit restarts. sec at preset altitude. Sound sequence: Pulsating, low repetition.
Need help?
Do you have a question about the OPTIMA II and is the answer not in the manual?
Questions and answers