Table of Contents
Advertisement
Fan Kit #2767/FK26 -
for Radiance, Stardance, Dutchwest & Oxford Gas Heaters and
Defiant NC, Dutchwest NC and Encore NC Wood Stoves
Please read these instructions before proceeding with
installation.
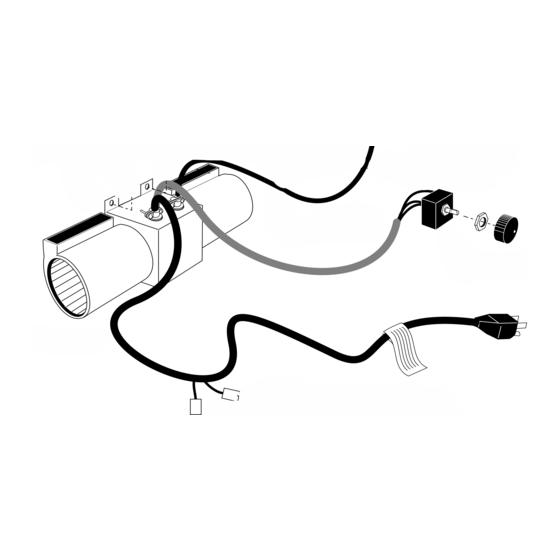
Kit contents
• Fan Assembly with Rheostat and Snapstat
• Fan Mounting Bracket for RVF33
• Snapstat Mounting Bracket
• 1/4 - 20 x 3/4" hex head screws, (4)
• 1/4 - 20 hex nuts, (2)
• 1/4" Star Washers, (2)
• #8 Star Washer, (1)
• #10 Sheet Metal Screws, (2)
• Retaining Nut (1)
• Control Knob
• Wire Tie
Tools Needed
• Flat blade screwdriver
• Work gloves
• Phillips screwdriver
It is easiest to install the fan before the stove is connected
to the gas supply line. Compare the contents of the fan kit
with the list above and Figure 1 to confirm that you have all
of the parts.
!
Avoid any drafts that alter burner flame patterns. Do
not allow fans to blow directly into the fireplace.
This optional fan kit is equipped with a three-pronged
(grounding) plug for your protection against shock
hazard and should be plugged directly into a properly
grounded three-pronged receptacle. Do not cut or
remove the grounding prong from this plug.
Installation Instructions
WARNING
Fan Kit contents.
1/4" Star
Washer
RVF33 ONLY
Fan Mounting
Bracket
1/4-20 Hex
Nuts
Fan Assembly
This kit fits several different stoves; follow the procedures for
your specific stove. Match these instructions to the model
Rad2767 Fan Kit Parts.eps
name and/or number on the stove's instructions or nameplate.
MOTOR
BLK
ON/OFF
RHEOSTAT
#2767 / FK26 Fan wiring diagram.
ST236
FK26 wiring diagram
12/99
RDV40, RNV40,
1/4-20 x 3/4"
RVF33, SDV30
Hex Bolts
Snapstat Bracket
#8 Star
Washer
#10 Sheet
Snapstat
Metal
Screws
1/4-20 x 3/4"
Hex Bolts
1/4"Star
Washer
Rheostat
Connect to PC Board
on RF Models Only
BLK
SNAPSTAT
WHT
2003135_R16 • 04/17
Advertisement
Table of Contents

Summary of Contents for Vermont Castings 2767/FK26
- Page 1 Fan Kit #2767/FK26 - Installation Instructions for Radiance, Stardance, Dutchwest & Oxford Gas Heaters and Defiant NC, Dutchwest NC and Encore NC Wood Stoves Fan Kit contents. RDV40, RNV40, 1/4-20 x 3/4” 1/4” Star RVF33, SDV30 Hex Bolts Washer Snapstat Bracket...
-
Page 2: Table Of Contents
Fan Kit #2767/FK26 - Installation Instructions for Radiance, Stardance, Dutchwest & Oxford Gas Heaters and Defiant NC, Dutchwest NC and Encore NC Wood Stoves Table of Contents Radiance Direct Vent RADVT ................2 RDV40................. 2 RDVOD ................3 Natural Vent RNV40................. -
Page 3: Radiance Direct Vent Radvt
Radiance Direct Vent - RADVT 3. Secure the fan assembly to the bottom plate with two (2) 1/4 - 20 x 3/4” hex head screws and one (1) 1/4” star 1. Remove the rear shroud panel (Figure 6) and fasten the washer. -
Page 4: Rdvod
2. Attach the snapstat assembly to the snapstat bracket with two (2) sheet metal screws. Attach the snapstat bracket Rheostat Knob to the side shield. (Figure 7) Retaining Nut 3. The rheostat control switch attaches to the left side of the T'STAT valve bracket at the front of the stove. -
Page 5: Vent Free Rvf33
RVF33 1. Remove the rear shroud. Use work gloves to protect Heat Shield against sharp edges. Loosen the two (2) screws on each side just enough to disengage the shroud panel from the sides of the stove. (Figure 10) 2. Remove the switch box. (Figure 10) •... -
Page 6: Natural Vent Rnv40
Radiance Natural Vent - RNV40 1. Remove the rear skirt. Use work gloves to protect your hands. Remove six (6) sheet metal screws around the Switchbox 1/4- edge of the draft hood opening. (‘A’, Figure 14) Remove Rheostat 20x1/2” Assy. the rear skirt cover plate: three (3) screws hold it on. -
Page 7: (Serial #'S Up To 1456 (Rnvodrn), 1944 (Rnvodrp)
8. Fasten the switch box to the rear skirt with a sheet metal 2. Position the fan behind the rear shroud. (Figure 19) Pass screw as shown in Figure 16. Tighten the Phillips bolt the fan rheostat assembly and snapstat assembly beneath holding the switch box to the rear skirt and the stove. -
Page 8: (Serial #'S Starting At 1457 (Rnvodrn), 1945 (Rnvodrp)
4. Attach the snapstat housing to the snapstat bracket with 2. Carefully pull the shroud assembly away from the rear of two (2) sheet metal screws and one (1) #8 star washer. the stove. (Figure 19) 3. With the rear shroud assembly in the upright position, set 5. - Page 9 • 6. Position the fan assembly so the ducts slide between the Attach the control knob to the rheostat shaft. inner and outer shroud. The inner shroud should engage • Use the wire tie to secure the fan and rheostat wire with the two (2) slots in the ends of the bracket so that harnesses together.
-
Page 10: Ruvs40
Radiance Unvented (RUVS40): The fan kit includes a ‘snapstat’, a temperature sensing switch which will be mounted to the blower duct just below the top plate of the stove. The snapstat automatically turns the fan on or off at approximately 109°F. These directions are oriented facing the rear of the stove. -
Page 11: Ruvsod
RUVSOD Snapstat Wire 1. Loosen the four (4) phillips head screws which secure the Rheostat Wire rear shroud to the stove sides. (Figure 34) 2. Carefully pull the shroud assembly away from the rear of the stove. Fan Bracket 3. With the rear shroud assembly in the upright position, set the bottom of the shroud on a padded surface to prevent scratching. - Page 12 5. Connect snapstat leads. Disconnect the snapstat module 8. Refasten the outer shroud to the inner duct assembly. from the leads inside the snapstat bracket. (Figure 36) 9. Install the snapstat by loosening the front screw on the Bend open the snapstat bracket. Use needlenose pliers inner side of the duct.
-
Page 13: Stardance Direct Vent Sddvt
Stardance Direct Vent - SDDVT 1. Remove the rear skirt insert panel at the bottom of the Rear Skirt (Figure 15) and fasten the blower assembly to the firebox back with the two Phillips pan-head bolts originally installed in the firebox back. (‘A’, Figure 41) Rheostat Control Rear Skirt... -
Page 14: Sdv30
SDV30 4. If the stove has already been installed, replace the valve cover plate with two (2) sheet metal screws. The bottom 1. Remove the panel at the bottom of the rear skirt (Figure of the stove’s rating plate and lighting instructions plate 40) and remove two (2) Phillips head bolts from the bottom should protrude through the slot at the top right corner of of the firebox back. -
Page 15: Sdv30R
SDV30R Star Washer 1. Remove the rear skirt insert panel at the bottom of the Sheet Metal rear skirt (Figure 47) and fasten the blower assembly to Screws Phillips the firebox back with the two (2) phillips pan head bolts Snapstat Pan Head originally installed in the firebox back. - Page 16 (Figure 52) Align the locating pin on the NOTE: The #2767/FK26 Fan Kit includes mounting hardware rheostat stem with the smaller hole in the Control Panel. that is not used on the Stardance Natural Vent heater.
-
Page 17: Snv30 (Drop-In Burner)
Sheet Metal Screw Star Washer Sheet Metal Screw Insert flange behind lip of shroud opening Nuts Figure 56 - Attach the snapstat and fan assembly to the rear shroud. • Remove retaining nut from shaft of rheostat. (if ST589 preinstalled) Figure 54 - Reattach the cover plate;... -
Page 18: (Serial #'S Starting At 5251 (Snv30Rn), 5484 (Snv30Rp)
Snapstat Bracket Snapstat Module Pinch Grommet to Remove Insert the flange behind the lip of the shroud opening. Figure 60 - Remove the snapstat and grommet from the bracket. Figure 58 - Reattach the cover plate and secure the rear shroud ST670a to the firebox draft hood assembly. - Page 19 Slot Outer Shroud Inner Shroud Slot Rheostat Rheostat Retaining nut Rheostat Knob Figure 64 - Attach fan rheostat. ST347a FK28 Figure 62 - Position the fan to engage the inner shroud with the fan bracket slots and secure with sheet metal screws. rheostat install ST194 attach fan to shroud...
-
Page 20: Dutchwest Direct Vent/Natural Vent
Dutchwest & Oxford Direct Vent/Natural Vent • Thread the retaining nut onto the shaft of the rheostat, NOTE: The #2767 / FK26 Fan Kit may include parts that are tightening with a wrench. Do not overtighten. not used on the Dutchwest/Oxford gas stoves. •... - Page 21 Slot Outer Snapstat Bracket Shroud Snapstat Module Pinch Grommet Inner Shroud to Remove Slot Figure 71 - Position the fan to engage the inner shroud with the fan bracket slots and secure with sheet metal screws. ST194 Figure 69 - Remove the snapstat and grommet from the bracket. attach fan to shroud ST670a Snapstat...
-
Page 22: Defiant Nc
Install the retaining ring and rheostat knob onto the shaft. 4. Place cables where they won’t be harmed by traffic. 5. Fan will not operate until stove reaches approximately 109°F. Vermont Castings 352 Mountain House Road • Halifax, PA 17032 www.vermontcastings.com 2003135...